Performance Max is Google’s answer to “just let the algorithm figure it out.” It promises to find your customers across Search, Shopping, YouTube, Display, Discover, and Gmail — all from a single campaign. For Shopify store owners, it sounds like a dream. And for some, it genuinely is. But for many others, it is a budget black hole that shows impressive impression counts while quietly burning through ad spend with little to show for it.
What’s in This Article
The difference between PMax success and PMax failure comes down to one thing: how you set it up. Google gives you almost no control once the campaign is running, which means the decisions you make during setup — your asset groups, audience signals, product feed quality, and goals — determine everything. Get it right and PMax can deliver 4-8x ROAS. Get it wrong and you will spend thousands on brand searches and display impressions that would have happened anyway.
Here is the setup framework we use with eCommerce Circle members to make Performance Max campaigns actually perform for Australian Shopify stores.
The Feed Is Everything (Seriously, Fix It First)
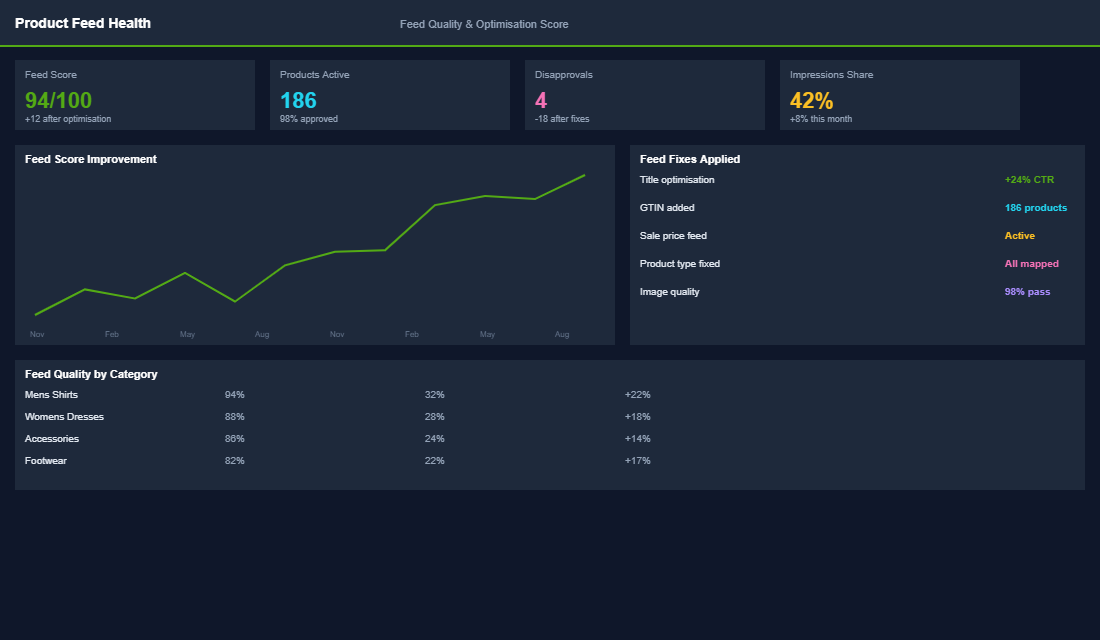
Your product feed is the foundation of every Google Shopping and Performance Max campaign. If your feed is weak, no amount of campaign optimisation will save you. Google uses your feed data to decide when to show your products, where to show them, and how to present them. A poor feed means poor placement and wasted spend.
Optimise your product titles. Your Shopify product title might be “The Byron Linen Shirt” but Google needs “Men’s Linen Shirt — Relaxed Fit — Breathable Summer — Byron Range.” Front-load the most important keywords: product type, key attribute, and gender/audience. Keep titles under 150 characters but use all the space you can. Stores that optimise their product titles see 20-30% more impressions and a 15-20% improvement in CTR.
Write keyword-rich descriptions. Do not just copy your Shopify product description — write a feed-specific description that includes search terms customers actually use. Include material, size options, use cases, and your unique selling points. Aim for 500-1,000 characters of genuine, keyword-relevant content.
Use custom labels for campaign segmentation. Custom labels (custom_label_0 through custom_label_4) let you segment products by any attribute you choose: margin tier, best seller status, price range, seasonal relevance, or promotional status. This is critical for PMax because it lets you create separate asset groups for high-margin products vs low-margin products — and bid accordingly.
Get your images right. Google Shopping images should show the product clearly on a white or clean background. Lifestyle images work for some categories but clean product shots typically deliver better CTR in Shopping results. Ensure images are at least 800×800 pixels and show the product from the most flattering angle.
Campaign Structure: Asset Groups That Work
The asset group is where you define what Google has to work with. Think of each asset group as a mini-campaign within your PMax campaign. Here is how to structure them for a Shopify store.
Create asset groups by product category, not by audience. Most guides tell you to segment by audience — but for ecommerce, category-based asset groups work better. Create one asset group for each major product category: “Men’s Shirts,” “Women’s Dresses,” “Accessories,” etc. This lets you tailor your creative assets (images, headlines, descriptions) to each product type.
Use listing groups to control which products appear. Within each asset group, use listing groups to select only the relevant products. Your “Men’s Shirts” asset group should only show men’s shirt products — not your entire catalogue. Use product type, custom labels, or brand attributes to filter precisely.
Load every asset slot with quality creative. PMax lets you upload up to 20 images, 5 logos, 5 videos, 5 headlines (30 chars), 5 long headlines (90 chars), and 5 descriptions (90 chars). Use all of them. More assets give Google more combinations to test, and the algorithm gets better results with more options. For video, even a simple 15-second product showcase outperforms having no video — where Google will auto-generate a terrible slideshow from your images.
Audience Signals: Guiding the Algorithm
Audience signals are suggestions to Google — they tell the algorithm where to start looking for customers, but they do not restrict targeting. Think of them as hints, not rules. However, the right signals dramatically speed up the learning phase and improve early performance.
Upload your customer list. Your existing customer email list is the strongest audience signal you can provide. Google uses it to find similar high-value prospects. Upload your full customer list, and if possible, create a separate list of your top 20% customers by LTV for an even stronger signal.
Add website visitor audiences. Create audiences based on site behaviour: all visitors (last 180 days), product page viewers (last 90 days), add-to-cart but did not purchase (last 30 days), and past purchasers (last 365 days). Layer all of these as audience signals.
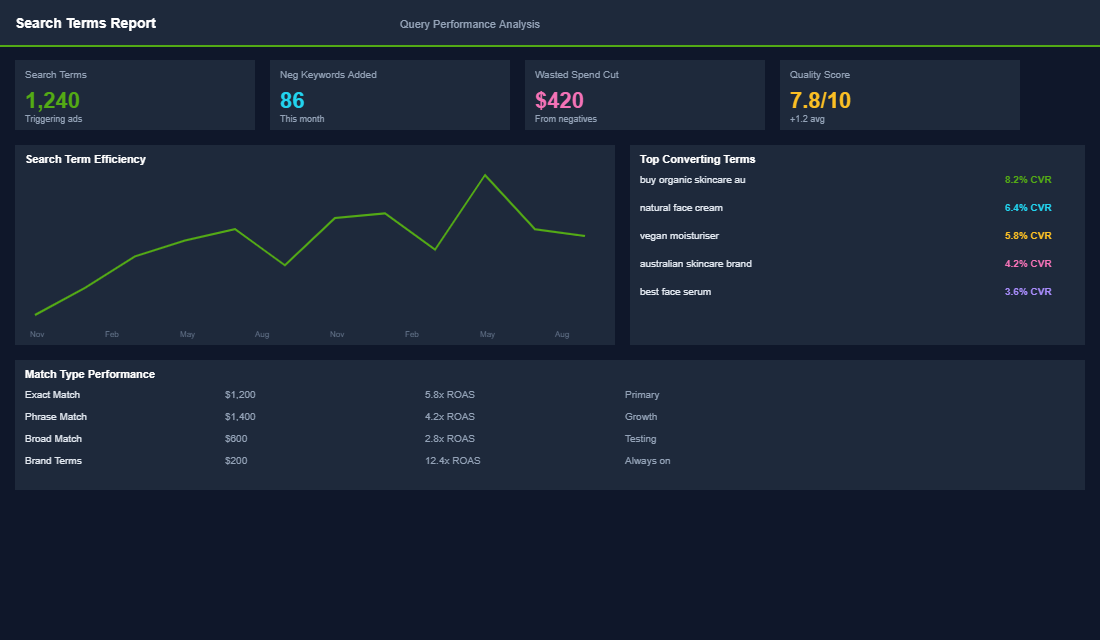
Use custom segments based on search terms. Create custom segments using the search terms your ideal customers use: product category keywords, competitor brand names, and problem-aware keywords. For a skincare brand, this might include “natural moisturiser,” “organic skincare Australia,” and competitor names. This tells Google the type of searcher you want to reach.
Budget, Bidding, and the Learning Phase
PMax needs data to learn, and data costs money. The most common mistake is launching with too small a budget, getting poor results during the learning phase, and killing the campaign before it has a chance to optimise.
Start with a budget that allows 10-15 conversions per week. If your target CPA is $30, you need at least $300-$450 per week ($45-$65 per day) to give PMax enough conversion data to optimise. Below this threshold, the learning phase drags on and performance stays erratic.
Use “Maximise Conversion Value” with a target ROAS. For ecommerce, this bidding strategy typically outperforms “Maximise Conversions” because it optimises for revenue, not just transaction count. Set your target ROAS 10-20% below your actual goal for the first 2-4 weeks to give the algorithm room to learn, then tighten it gradually.
Do not touch the campaign for 2-3 weeks. This is the hardest part. PMax needs time to learn which placements, audiences, and creative combinations work. Making changes during the learning phase resets the process and wastes your budget. Set it up correctly, launch it, and resist the urge to tinker for at least 14-21 days.
Monitoring and Optimisation After Launch
- Check asset performance ratings. After 2-3 weeks, review asset performance ratings (Low, Good, Best). Replace any “Low” performing assets with new variations. Keep “Best” performers running and create more assets in a similar style.
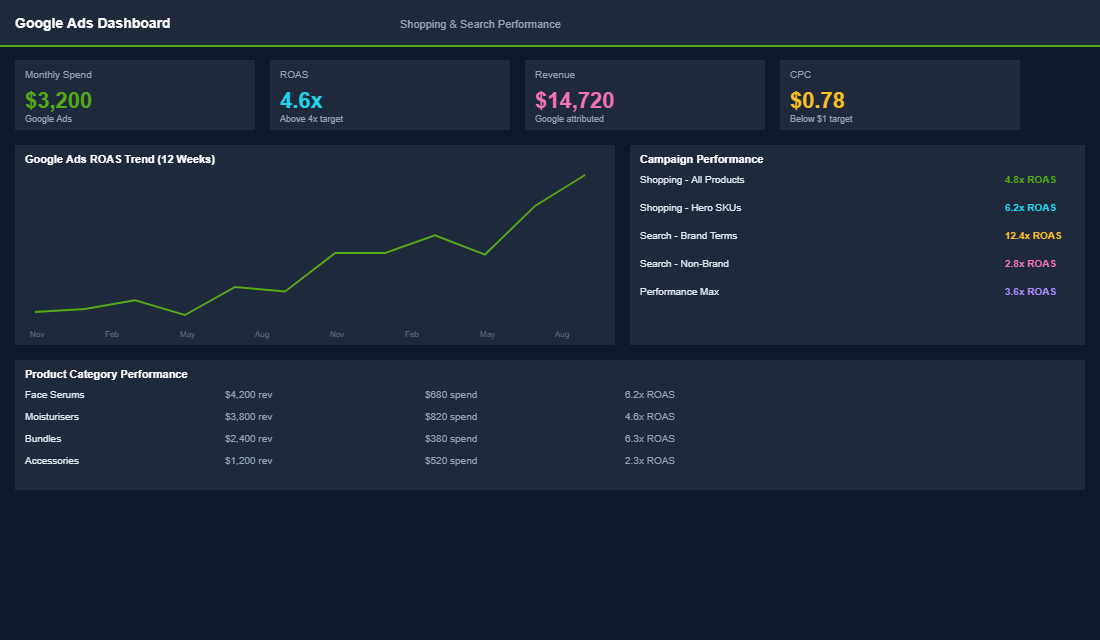
- Monitor search term insights. PMax now shows search term categories and top search terms. Check these weekly. If you see brand terms dominating (your own brand name), you may need a separate brand Search campaign to prevent PMax from cannibalising cheap brand traffic.
- Review placement reports. Check where your ads are actually showing. If Display and YouTube placements are eating budget without converting, consider adding URL exclusions for low-quality placements.
- Segment by product performance. Use Google Ads reports to see which products are driving conversions and which are spending without results. Exclude consistently non-performing products from your listing groups and let your budget concentrate on winners.
PMax Is Powerful — When You Control What You Can
Performance Max takes away most of the manual controls that experienced advertisers rely on. But it gives you leverage in other areas: feed quality, creative assets, audience signals, and product segmentation. Focus your energy on these inputs and let the algorithm handle the rest. The stores that succeed with PMax are the ones that invest in preparation — not the ones that try to micromanage the machine.
Inside the eCommerce Circle, Google Ads strategy is part of our Promotion pillar. We help members set up Performance Max campaigns with properly optimised feeds, structured asset groups, and the right audience signals from day one. If your PMax campaigns are spending but not scaling, or if you are thinking about launching Google Ads for the first time, our coaching walks you through the exact setup that works for Australian Shopify stores.