“Performance Max is killing our Meta numbers.” That is the sentence I hear three or four times a month from Aussie Shopify founders. They open a fresh PMax campaign, the reported ROAS sits at 7x or 9x, and they assume Google has finally cracked the code. Six weeks later they look at their bank account and revenue is flat.
What’s in This Article
What happened is simple. PMax claimed credit for purchases that would have happened anyway. Most of those conversions came from people typing the brand name into Google, finding the brand because the ad was sitting on top of the organic listing, and clicking the ad instead of the free result.
That is not new sales. That is rented ground.
The benchmark numbers tell the story. The average PMax ROAS in 2026 sits at 4.1x according to WordStream-LocaliQ, but stores spending under $2,000 a month land closer to 2.8x while accounts above $50K a month push past 5.2x. The gap is not budget. The gap is structure. The brands hitting 5 to 8x are running a feed-first system that segments by margin, blocks brand cannibalisation, and feeds Google’s algorithm clean first-party data instead of letting it guess.
Inside eCommerce Circle we have walked hundreds of Aussie Shopify founders through this rebuild. The pattern is always the same six layers. Get any one of them wrong and PMax becomes the most expensive brand search campaign in your ad account.
Here is how to do it properly.
Layer 1: The Merchant Centre Foundation
Everything starts in Google Merchant Centre. If your feed is broken, no amount of clever asset group structure will save you.
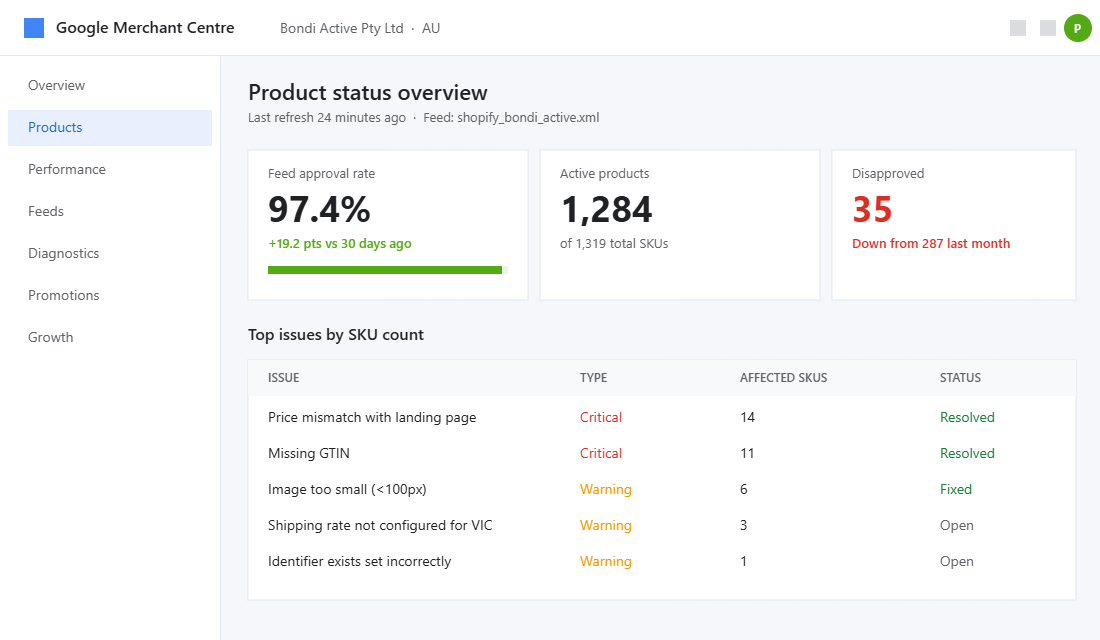
The first thing to audit is product approval rate. Open Merchant Centre, click Products, and look at the Issues column. Most Aussie stores I audit have between 8% and 25% of their catalogue disapproved or limited. The most common reasons are price and availability mismatches between Shopify and the feed, missing GTINs, incorrect identifier_exists flags on private-label products, and image quality flags on lifestyle hero shots.
Each disapproved SKU is a product that cannot show in Shopping ads, cannot show in the Free Listings tab, and cannot be served by PMax. Fixing approval rate is usually the single fastest lever in any audit we run. We have seen accounts move from a 78% approval rate to 97% in two weeks just by cleaning Shopify variant data and re-uploading GTINs.
The second audit is feed freshness. Google fetches your feed once every 24 hours by default. If your prices change frequently, that delay is the source of most of your disapprovals. Switch to the content API push via the Shopify “Google & YouTube” app, or layer a feed manager like Channable or DataFeedWatch on top of Shopify to push price and stock changes in near real time.
The third audit is shipping settings. Google calculates Total Price for ad ranking using your Merchant Centre shipping table. If that table does not match Shopify, you will lose impressions to competitors whose total price displays correctly. For Aussie founders, that means setting GST-inclusive prices, configuring AUD properly, and mapping shipping zones to your actual Sendle or Australia Post rates.
A clean Merchant Centre account is not optional. It is the floor everything else rests on.
Layer 2: Product Title Architecture
Once the feed is approved, the next lever is the product title. This is the single highest ROI optimisation in the entire PMax stack, and most Shopify stores are getting it wrong by default.
The Shopify product title was written for your store’s collection page. It says things like “The Cloud Hoodie” or “Coastal Tee in Sage”. That title looks beautiful on your PDP. It also tells Google absolutely nothing about what the product is, who it is for, or which search query should match it.
Merchant feed performance data shows that optimised titles increase impressions by 15 to 30% and CTR by 10 to 20%. Titles with an exact match to the search query lift CTR by 88%. The format that works in 2026 is brand, product type, key attribute, size or colour, gender or audience. So “The Cloud Hoodie” becomes “Bondi Active Cloud Hoodie Men’s Fleece Pullover, Navy, Size M”.
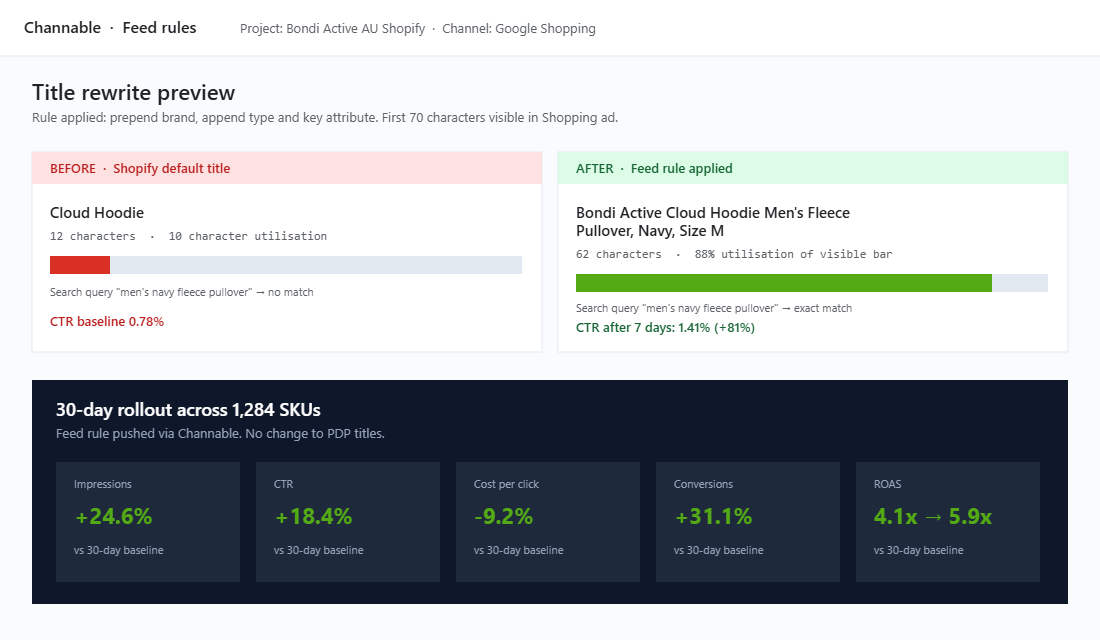
Notice how the brand sits in front of the product type for branded searches, then the attributes follow in order of search frequency. Google allows 150 characters but only the first 70 are visible in most placements. About 80% of CTR is decided by what sits inside that first 70 characters.
The trick is not to rewrite every Shopify product title on the store. That destroys your beautiful PDP. Instead, override the Google Shopping title through a feed rule in Channable, DataFeedWatch, or the Shopify “Google & YouTube” app title settings. The PDP keeps its branding voice. The feed gets the keyword-rich version Google needs.
White-background product images lift CTR by roughly 25% versus lifestyle or contextual hero images at the Shopping placement. Most Shopify stores upload the lifestyle photo as the primary image because it looks better on the PDP. Override that in the feed too. Send Google the clean cutout. Save the lifestyle shot for asset group creative.
This single layer is usually worth a 15 to 25% impression lift before you change anything else.
Layer 3: Custom Labels for Margin-Based Bidding
Here is where most agencies stop and most $1m a year Aussie brands keep losing money. They run PMax at a single ROAS target across the entire catalogue. Then they wonder why the campaign keeps pushing the cheap, low-margin product that has good conversion rate and ignoring the hero SKU that prints cash.
The fix is custom labels. Merchant Centre gives you five custom label fields (custom_label_0 through custom_label_4) that you can populate with anything you want. The four that earn their keep are margin tier, hero status, seasonal status, and stock position.
- custom_label_0: Margin tier. High (50%+ contribution margin), Mid (30 to 49%), Low (under 30%). Group products by what they actually contribute to the business, not by what they cost.
- custom_label_1: Hero status. Heroes are the SKUs that drive the majority of revenue. Most stores find 20% of SKUs deliver 70 to 80% of sales. Heroes get more aggressive bidding and more asset group attention.
- custom_label_2: Seasonal tags. “Winter”, “Summer”, “Father’s Day”, “Christmas”. This lets you spin up seasonal asset groups in 30 seconds when the trigger fires.
- custom_label_3: Stock position. “Healthy”, “Low Stock”, “Clearance”. If a SKU is six weeks from running out, you want to throttle it before you waste spend pushing a product that will be unavailable when the ad clicks.
Custom labels live in the feed. Push them via your feed manager, or build them in a Shopify metafield and map them through the Google & YouTube app. Once they are in Merchant Centre you can use them as listing group filters inside any asset group.
Layer 4: Asset Group Structure by Margin Tier
Now the campaign architecture starts to make sense. Each asset group inside your PMax campaign should serve one margin tier, not your whole catalogue.
The default agency approach is one PMax campaign with one asset group containing the full product feed. That gives Google maximum flexibility. It also means Google bids the same effective ROAS target across products that have wildly different unit economics, and the algorithm gravitates to whatever converts cheapest. Cheapest converting is almost never highest profit converting.
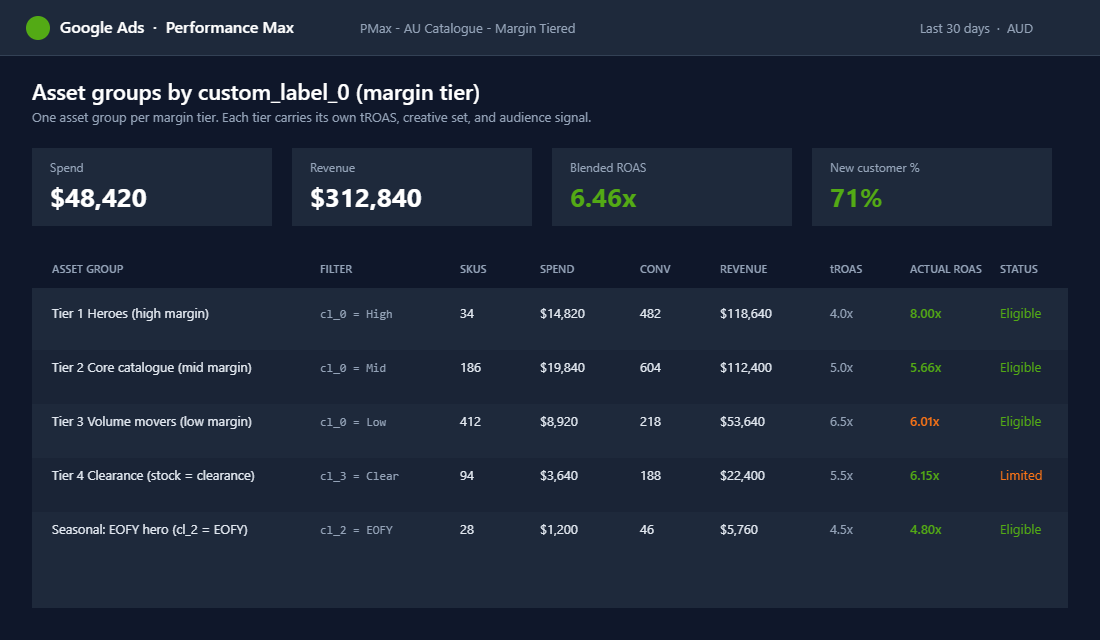
The better structure for a Shopify catalogue between 50 and 2,000 SKUs is one campaign per major catalogue division, three to five asset groups per campaign, and each asset group filtered by custom_label_0 (margin tier) or custom_label_1 (hero status). Inside each asset group, set the target ROAS based on the actual margin profile.
A High margin asset group can run a target ROAS of 3.5 or 4x. The maths work because the underlying contribution margin per dollar of revenue is higher. A Low margin asset group needs a target of 6x or higher to clear break-even. Set the right floor and Google’s bidding algorithm finally optimises for profit instead of revenue.
This is also where Aussie founders need to pay attention to the Marketing Efficiency Ratio (MER) framework. Total blended MER is the right measure of whether your media spend is moving the business forward. Asset-group-level ROAS targets are a tool you use to make sure each margin bucket pulls its weight inside that blended number.
Each asset group should have its own creative. Lifestyle imagery for the hero tier. Promotion-style banners for the clearance tier. Logo-led brand creative for the high-margin signature SKUs. If you serve the same creative to every tier, Google’s AI has nothing to learn from.
Layer 5: Audience Signals and Customer Match Lists
Audience signals are how you tell Google’s algorithm where to fish. They do not lock targeting the way old Google Ads audiences did. They point the AI at the people you actually want to find, and PMax expands from there.
The signal that outperforms every other source is customer match. Upload your Shopify customer list to Google Ads, segment by recency, and feed it to PMax as the primary signal. According to Google’s own data, first-party signals consistently outperform third-party signals, and customer match lists are the highest quality first-party seed an account can have.
A workable list architecture for an Aussie Shopify store is four customer match audiences.
- All Customers. Every email you have collected. Refresh every 30 days.
- Buyers Last 90 Days. Highest recency. These power lookalike expansion.
- Buyers Last 12 Months. The broader purchaser pool. Long-tail seed.
- High LTV Buyers. Top quartile by spend. This is the audience Google should be hunting clones of.
Stale customer match lists lose effectiveness fast. Set a 30-day refresh cadence in your calendar and treat it like a non-negotiable.
If you are on Shopify Advanced or Shopify Plus, the Shopify Audiences feature pushes a high-quality first-party seed built from cross-merchant purchase signals across Shopify’s network straight into Google Ads. This is one of the few audience tools that consistently lifts new-customer conversion rate without inflating brand cannibalisation.
The second signal you should always include is your GA4 audiences. Past purchasers, product browsers, cart abandoners. If you are running a Klaviyo welcome flow, layer the engaged-subscriber segment in as well. The same first-party data that powers your retention emails should be educating your acquisition campaigns. Skip third-party in-market segments unless you have nothing else. They are weak signal and they push PMax toward broad, low-intent inventory.
Layer 6: Brand Exclusions and the Cannibalisation Defence
This is the layer that separates the 4x ROAS accounts from the 7x ROAS accounts. If you do not block PMax from bidding on your brand terms, the campaign will quietly eat your brand search budget and report the credit as new conversions.
The mechanism is simple. PMax sees that branded queries convert at extreme rates because the people typing your brand name into Google already wanted to buy. The algorithm pushes spend toward those queries because the unit economics look perfect. The result is PMax sitting on top of your own organic listing, charging you $1.50 to $3 per click for traffic that would have arrived for free.
Google now gives you three layers of defence and you should use all three.
- Campaign-level brand exclusions. Found under Campaign Settings then Brand Exclusions. This blocks PMax from bidding on your registered brand name. It also catches misspellings and variants automatically, which is why Google recommends it over plain negative keywords for brand defence.
- Campaign-level negative keywords. Capped at 100 for years, raised to 10,000 in 2026. This is now a serious tool. Build a 200 to 500 keyword negative list covering brand variants, customer service queries, post-purchase intent terms, and any irrelevant categories.
- Account-level negative keyword lists. Capped at 1,000 keywords but the right home for evergreen blocks like “free”, “cheap”, “complaints”, and competitor brands you do not want PMax wandering toward.
The detection method to validate it is working is simple. Run a cross-campaign report every 30 days. If your brand search impression share dropped after PMax launched, and PMax’s reported ROAS is suspiciously high, cannibalisation is happening. Use incrementality testing with a geo-holdout to confirm what PMax is actually adding versus what it is claiming.
The Compound Effect: How the Six Layers Stack
These six layers compound. Each one on its own produces a 10 to 30% lift. Stacked, they take an average account from 3.5x ROAS to 6 or 7x, and they do it on a profit basis, not on Google’s inflated reported number.
The sequence to roll out matters. Do not start with Layer 6 brand exclusions on a brand new campaign or you will starve Google’s algorithm of the easy wins it needs to learn. The right rollout is:
- Layer 1 first (always). Merchant Centre approval rate above 95% before anything else.
- Layer 2 product titles. Push the feed rule, wait seven days, measure CTR lift.
- Layer 3 custom labels. Build the four labels and confirm they are flowing through to Merchant Centre.
- Launch a fresh PMax campaign with a single asset group fed by Layer 3 custom labels. Add Layer 5 audience signals at launch.
- Once spend is above $200 a day for two weeks, split into Layer 4 asset groups by margin tier.
- Layer 6 brand exclusions on day 30. Only after the campaign has converted long enough to see brand search impression share starting to slip.
The most important number to watch through the rollout is not Google’s reported ROAS. It is the CAC Payback Period on new customers acquired through PMax. If payback is inside 90 days on first order and inside 150 days when you factor in second-purchase lift, the campaign is healthy. If it is longer than that, PMax is buying you revenue that is not paying for itself.
Track the blended MER weekly. Track new-customer payback monthly. Run a geo-holdout incrementality test quarterly. The reported ROAS in the Google Ads dashboard is a directional signal. Those three numbers above are the truth.
The 6-Layer PMax Rollout Checklist
If you take nothing else from this article, work through this checklist with your media buyer this week.
- Layer 1. Merchant Centre approval rate above 95%, GST-inclusive AUD pricing, real-time content API push.
- Layer 2. Product title feed rule live, first 70 characters carrying brand, product type, and primary attribute.
- Layer 3. Custom labels 0 through 3 populated for every SKU. Margin tier, hero status, season, stock position.
- Layer 4. One asset group per margin tier, each with its own target ROAS and creative set.
- Layer 5. Four customer match lists uploaded, Shopify Audiences connected, GA4 audiences feeding in. Refresh monthly.
- Layer 6. Brand exclusions on, 200 to 500 campaign-level negative keywords, account-level negative list for evergreen blocks.
- Reporting. Blended MER weekly, new-customer CAC payback monthly, geo-holdout incrementality quarterly.
Inside eCommerce Circle, Google Performance Max is one of the core pillars we work on with every member running paid media at scale. If you want a second opinion on yours, let’s talk.