You’re spending money on Meta ads. Maybe you’ve even dabbled in Google Search campaigns. But if you’re not running Google Shopping ads for your Shopify store, you’re leaving one of the highest-intent traffic sources in ecommerce completely untouched.
What’s in This Article
Here’s the thing most Shopify brand owners get wrong about Google Shopping: they think it’s just “another ad channel.” It’s not. Google Shopping puts your products in front of people who are actively searching for what you sell — with your image, price, and brand name right there in the search results. These aren’t people scrolling Instagram between dog videos. These are buyers with credit cards ready.
Google Shopping ads account for roughly 26% of all clicks to ecommerce sites, and they do it at a cost-per-click that’s 40-55% lower than standard Search ads. The average Shopping CPC sits between $0.50 and $0.95, which means you’re reaching high-intent shoppers for a fraction of what you’d pay on other channels. But — and this is where most stores fall over — your results are only as good as your product feed. A messy feed means wasted spend. A well-optimised feed means compounding returns every single month.
Let’s break down exactly how to set up, optimise, and scale Google Shopping ads for your Shopify store — from Merchant Center setup through to the feed tweaks that separate 2x ROAS stores from 10x ROAS stores.
How Google Shopping Actually Works (And Why Your Product Feed Is Everything)
Unlike Search ads where you bid on keywords, Google Shopping ads are driven entirely by your product feed. Google reads your feed data — titles, descriptions, images, prices, categories — and decides which search queries to show your products for. You don’t choose keywords. Google does the matching for you based on how well your feed describes your products.
This is why feed optimisation matters more than any bidding strategy or campaign structure. If your feed is thin, generic, or poorly categorised, Google won’t match your products to the right searches — or worse, it’ll match them to irrelevant ones that burn through your budget.
The flow works like this: your Shopify store sends product data to Google Merchant Center (either through the native Google & YouTube channel app or a third-party feed tool). Merchant Center processes and validates your feed. Then Google Ads pulls from that feed to create and serve Shopping ads. Every decision Google makes about when, where, and to whom your products appear comes back to what’s in that feed.
Think of your product feed as the foundation of a house. You can have the best bidding strategy in the world, but if the foundation is cracked, nothing built on top of it will hold.
Setting Up Google Merchant Center for Your Shopify Store
Before you can run a single Shopping ad, you need Google Merchant Center connected to your Shopify store. Here’s the step-by-step:
Step 1: Create your Merchant Center account. Head to merchants.google.com and sign in with the Google account you want to manage your shopping feed from. Enter your business name, country (Australia), time zone, and website URL. Accept the Terms of Service.
Step 2: Verify and claim your website. Google needs to confirm you own the domain. The easiest method for Shopify stores is adding an HTML tag to your theme’s <head> section. Go to Online Store > Themes > Edit Code > theme.liquid, and paste the verification meta tag just before the closing </head> tag.
Step 3: Install the Google & YouTube channel app. In your Shopify admin, go to Sales Channels and add the Google & YouTube app. Connect it to your Merchant Center account. This creates an automatic sync between your Shopify products and your Google feed. When you update a price or inventory level in Shopify, it flows through to Merchant Center within minutes.
Step 4: Configure your shipping and tax settings. For Australian stores, make sure your Merchant Center shipping settings match what you actually charge. Mismatches between your feed price (or shipping cost) and your checkout price will get your products disapproved fast. Set up shipping by weight or price threshold to match your Shopify shipping profiles.
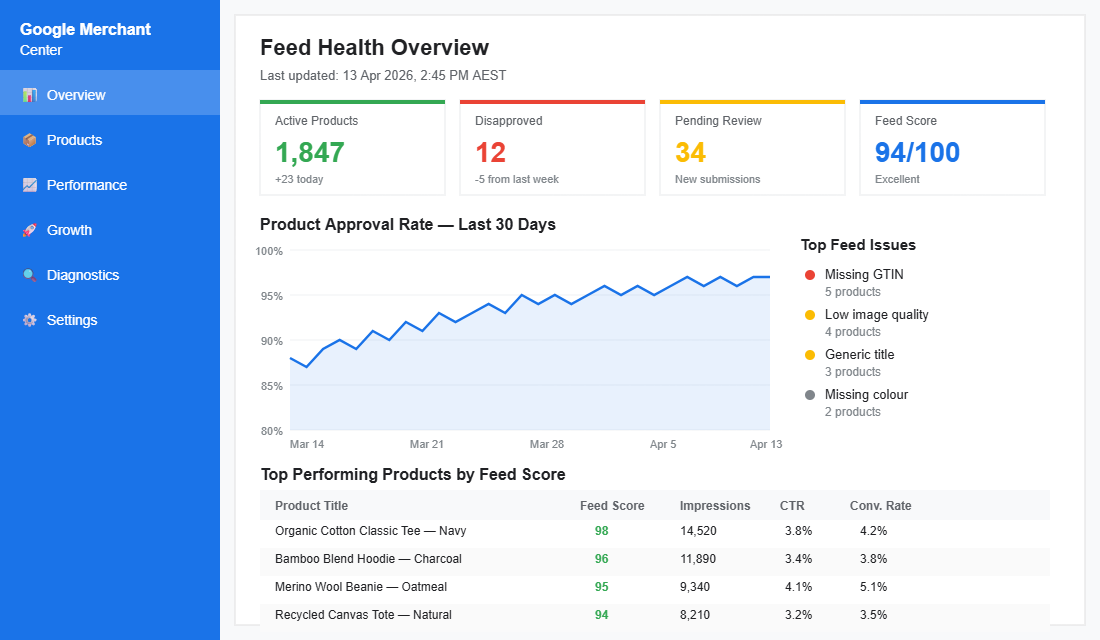
Step 5: Submit your feed and check for errors. Once the Google & YouTube app syncs, head to Merchant Center and check the Diagnostics tab. This shows you any products that were disapproved and why. Common issues include missing GTIN numbers, image quality problems, or price mismatches. Fix these before launching any campaigns.
The 6 Product Feed Optimisations That Actually Move ROAS
Setting up the feed is table stakes. Optimising it is where the real results come from. Here are the six changes that consistently produce the biggest ROAS improvements for Shopify stores.
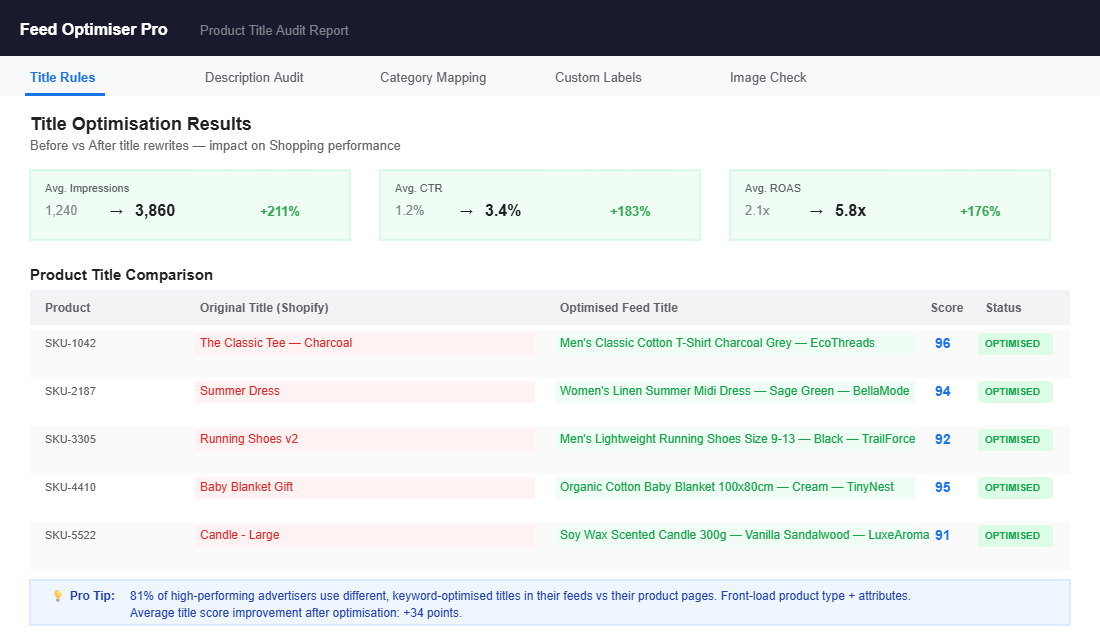
1. Rewrite your product titles with keywords first. This is the single highest-impact change you can make. Your Shopify product title might say “The Classic Tee — Charcoal” but your Shopping ad title should read “Men’s Classic Cotton T-Shirt Charcoal — [Your Brand].” Google weighs the first words of your title most heavily when matching to search queries. 81% of high-performing advertisers use different, more keyword-rich titles in their Shopping feeds compared to their product pages. Front-load the product type, material, colour, and size — then add your brand name at the end.
2. Go deep on Google Product Categories. Google’s auto-categorisation is wrong 15-20% of the time, especially for niche or multi-purpose products. Don’t rely on it. Manually assign categories that are at least 2-3 levels deep. Instead of “Apparel & Accessories,” go with “Apparel & Accessories > Clothing > Shirts & Tops > T-Shirts.” The more specific your category, the better Google matches your products to relevant searches.
3. Write feed-specific product descriptions. Google reads every word of your product description to understand what you’re selling. Thin descriptions — or worse, duplicate descriptions across variants — kill your relevance score. Write unique, keyword-rich descriptions of at least 150 words per product. Include the product type, materials, use cases, dimensions, and any attributes a shopper might search for. Don’t stuff keywords. Write naturally, but be thorough.
4. Upgrade your product images. Your Shopping ad image is the first thing a shopper sees. Google recommends a minimum of 800×800 pixels, but aim for 1200×1200 or higher. Use clean, white-background product shots as your primary image — they consistently outperform lifestyle images in Shopping ads. Add lifestyle images as additional images. Make sure there’s no text overlay, watermarks, or promotional badges on the main image (Google will disapprove these).
5. Use custom labels to segment your campaigns. Custom labels (custom_label_0 through custom_label_4) let you tag products with your own categories — like margin tier, seasonality, best-seller status, or price range. This lets you build Shopping campaigns that bid differently on high-margin products versus low-margin ones, or push seasonal items harder during peak periods. Most stores never touch custom labels, which means they’re bidding the same on a $20 accessory as a $200 hero product.
6. Keep pricing and availability in real-time sync. Nothing tanks your Merchant Center health score faster than price mismatches or advertising out-of-stock products. The native Shopify sync handles this decently, but if you’re running flash sales or have fast-moving inventory, consider a feed tool with more frequent update intervals. Products that get disapproved for data quality issues don’t just stop showing — they can drag down your entire account’s trust score.
Choosing the Right Campaign Type: Standard Shopping vs. Performance Max
Once your feed is clean and optimised, you need to decide how to structure your actual campaigns. In 2026, you’ve got two main options: Standard Shopping campaigns and Performance Max (PMax).
Standard Shopping campaigns give you the most control. You can see exactly which search queries trigger your ads, set product-level bids, and create granular product groups based on brand, category, item ID, or custom labels. If you want to know precisely where every dollar goes and manually optimise based on that data, Standard Shopping is your pick.
Performance Max campaigns use Google’s AI to serve your products across Shopping, Search, Display, YouTube, Discover, and Gmail — all from a single campaign. PMax typically delivers broader reach and can find audiences you’d never target manually. But you trade transparency for that reach. Query-level data is limited, and Google decides where your budget goes across channels. For a deeper breakdown, check out our guide to Performance Max for Shopify.
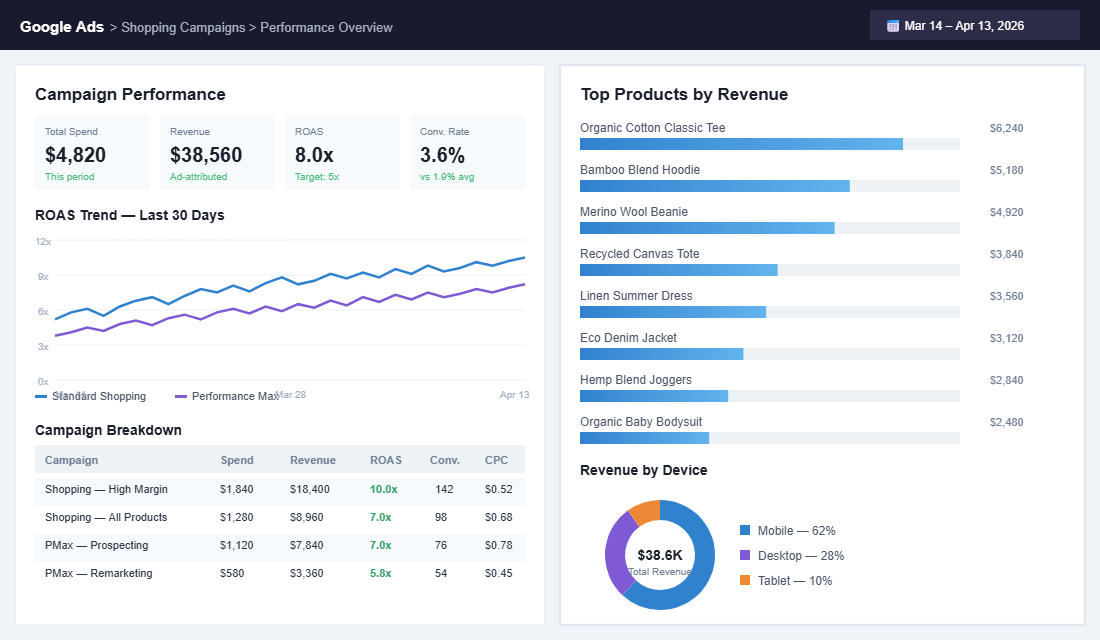
The play most smart Shopify brands run in 2026: start with Standard Shopping to build baseline data and understand which products convert best. Then layer on a Performance Max campaign to capture incremental reach. Run both simultaneously — Standard Shopping to protect your highest-ROAS products with controlled bids, and PMax to prospect and expand. In Q1 2026, Shopping and PMax campaigns were delivering conversion rates between 3.0% and 4.8% for well-optimised accounts.
Real Brands, Real Results: What Good Google Shopping Looks Like
Let’s look at what this looks like when it’s done right — with real Australian examples.
The Plant Broker is an Australian ecommerce brand selling indoor plants online. By restructuring their Google Ads account with Shopping campaigns as the core scaling channel, they achieved a 28x ROAS and reduced their customer acquisition cost by 51%. Their ad-attributed revenue hit $129,000, contributing to over $262,000 in total ecommerce sales. The key? Clean feed data, proper conversion tracking with cost-of-goods-sold pulled from the product feed, and campaign segmentation by product margin.
Blue Bungalow, an Australian women’s fashion boutique, partnered with DataFeedWatch to overhaul their product feed. By optimising product titles, improving categorisation, and using custom labels to segment campaigns by performance tier, their Google Shopping campaigns became more profitable than any previous advertising they’d run. Cold prospecting campaigns on Display — fuelled by Shopping data — started netting positive profit on first purchase.
Both examples share a common thread: the feed was the foundation. The campaign structure and bidding came second. Get the feed right, and the campaigns almost optimise themselves.
The Best Feed Management Tools for Shopify Stores
Your choice of feed tool depends on your catalogue size and how many channels you sell on. Here’s the breakdown:
Shopify’s Native Google & YouTube Channel (Free) — If you’re just starting out with fewer than 100 products and only selling on Google, the built-in app handles the basics. It syncs automatically and gets your products into Merchant Center without extra cost. The limitation: minimal feed customisation. You can’t rewrite titles specifically for Shopping or add custom labels without workarounds.
Simprosys Google Shopping Feed (From $4.99/month) — The best value option for growing stores. Rated 4.9 stars from over 4,000 reviews on the Shopify App Store. Supports Google, Meta, Pinterest, and Microsoft Shopping. The free tier lets you test with a small catalogue before committing. The $17.99/month plan covers up to 10,000 products with full feed customisation including title overrides, custom labels, and multi-channel output.
DataFeedWatch (From $64/month) — The powerhouse option for established stores doing serious volume. Supports over 2,000 shopping channels. The standout feature is title A/B testing — you can test different title formats against each other and measure which version produces better click-through rates and ROAS. Also includes feed auditing that flags issues before they cause disapprovals. If you’re spending $5K+ per month on Shopping ads, DataFeedWatch pays for itself quickly.
Setup steps for Simprosys (recommended for most stores):
- Install from the Shopify App Store and connect your Merchant Center account
- Map your Shopify product fields to Google Shopping attributes
- Set up title rules (e.g., prepend product type, append colour and size)
- Assign Google Product Categories manually for your top-selling products
- Create custom labels based on margin, best-seller status, or collection
- Enable automatic feed sync and set your update frequency to at least every 6 hours
- Review the feed preview before submitting to Merchant Center
The Compound Effect: How Feed, Campaign, and Data Work Together
Here’s where it all clicks. Google Shopping isn’t just another traffic source — it’s a compounding system when every piece works together.
Your optimised product feed tells Google exactly what you sell and who should see it. Your campaign structure (Standard Shopping for control, PMax for reach) ensures you’re capturing demand at every stage of the funnel. Your custom labels let you allocate budget where your margins are highest. And your conversion tracking feeds performance data back to Google’s algorithms, making them smarter with every sale.
This is the flywheel effect. Better feed data leads to better ad matching. Better matching leads to higher click-through rates. Higher CTR improves your quality signals with Google, which lowers your CPC. Lower CPC at the same conversion rate means higher ROAS. And higher ROAS gives you more budget to reinvest — compounding your growth month after month.
The stores that treat Google Shopping as a “set and forget” channel get mediocre results. The stores that treat their product feed like a living asset — constantly testing titles, refining categories, segmenting by margin, and syncing their data — are the ones hitting 8x, 10x, even 28x ROAS like The Plant Broker.
If you’re already running Meta ads and Google Search ads, Shopping should be the next pillar you build. It captures a completely different type of buyer — one who’s further along in their purchase journey and already comparing products.
Your Google Shopping Quick-Start Checklist
Use this checklist to audit your current setup or get started from scratch:
- Merchant Center: Account created, website verified, shipping settings match Shopify
- Feed connection: Google & YouTube app installed OR third-party feed tool connected
- Product titles: Keyword-rich, front-loaded with product type, unique per product
- Product descriptions: At least 150 words, unique per product, includes key attributes
- Google Product Categories: Manually assigned, at least 3 levels deep
- Images: 800x800px minimum (1200×1200 recommended), white background, no text overlays
- Custom labels: At least 2 labels set up (margin tier + best-seller/seasonal)
- Pricing sync: Real-time or every 6 hours minimum
- Diagnostics: Zero disapproved products, all warnings addressed
- Campaign structure: Standard Shopping for top products + Performance Max for reach
- Conversion tracking: Revenue and COGS tracking enabled in Google Ads
- Negative keywords: Added to Standard Shopping to block irrelevant searches
Make Google Shopping Part of Your Growth Engine
Google Shopping isn’t complicated. But it does reward the brands that take their product feed seriously and treat it as a strategic asset rather than a technical afterthought. The brands hitting double-digit ROAS aren’t doing anything magical — they’re just disciplined about feed quality, campaign segmentation, and continuous optimisation.
Inside the eCommerce Circle, Promotion is one of the 10 core pillars we work on with every member — and Google Shopping feed optimisation is one of the first things we audit. If you’re spending on ads but haven’t touched your product feed in months, you’re almost certainly leaving money on the table.
Let’s Talk — we’ll take a look at your feed, your campaigns, and show you where the quick wins are.