Most Aussie Shopify owners bolt Afterpay onto their checkout because everyone else has it. They tick the box, wait for the AOV bump, and six months later they are staring at a profit and loss statement wondering why their margin looks thinner.
What’s in This Article
Here is the uncomfortable truth. BNPL can absolutely lift your average order value by 20 to 40 per cent. Afterpay’s own merchant data shows a 28 per cent lift in AOV and a 22 per cent lift in conversion. But those numbers only mean something if you actually keep the extra gross profit, which most stores do not. The 4 to 6 per cent flat fee plus 30 cents per order can wipe out the lift if your contribution margin is already tight.
Smart brands do not just “add Afterpay.” They pick the right mix of BNPL providers, price around the fees, merchandise the benefit on their product pages, and know exactly which order value ranges actually produce more profit with BNPL than without it. This article walks you through how to do that on Shopify, with the current fees, the 2026 regulatory landscape, and the decision framework we use with every brand inside the eCommerce Circle.
Why BNPL Matters More in Australia Than Anywhere Else
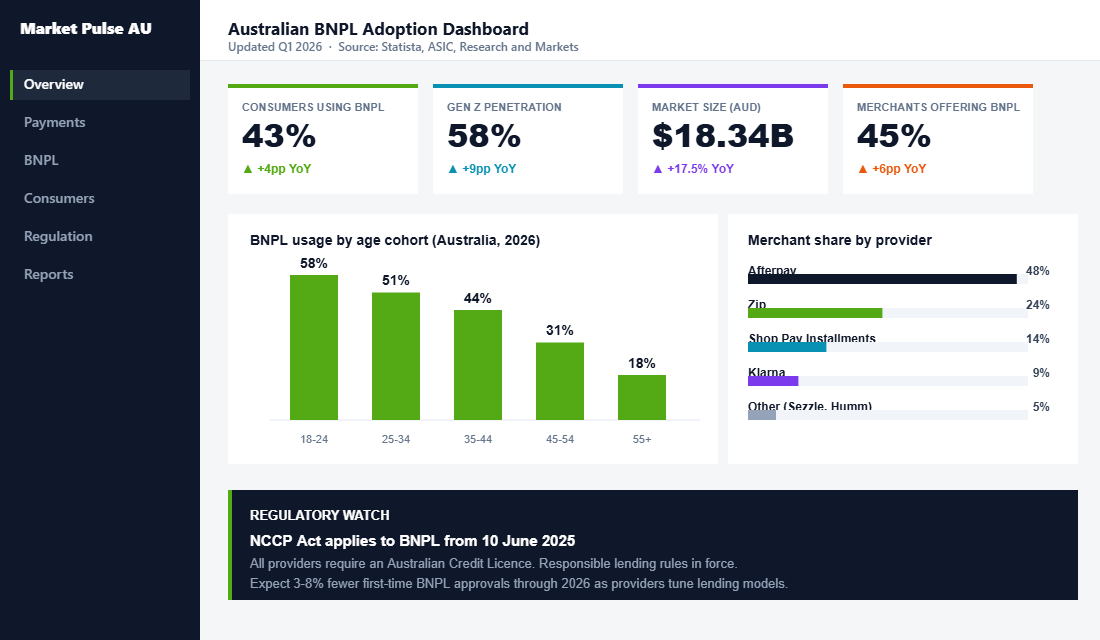
Australia is the spiritual home of buy now pay later. 43 per cent of Australian consumers use a BNPL service, and 45 per cent of Australian online retailers already offer one at checkout, according to Statista’s 2026 payment behaviour data. The Australian BNPL market is expected to grow 17.5 per cent this year to reach AUD 18.34 billion, per Research and Markets’ 2026 report.
For Gen Z, it is not a payment option. It is the default. 58 per cent of Australian Gen Z shoppers use BNPL, which means a significant chunk of your under-30 customer base will filter your brand by whether they can split the cost into four. If you sell apparel, beauty, homewares, or anything priced above 80 dollars, BNPL is a table stakes checkout feature in this market.
That is the demand side. The supply side is more complicated. Since 10 June 2025, every BNPL provider in Australia has had to hold an Australian Credit Licence under the NCCP Act, and sit under ASIC’s responsible lending rules. That means fewer dodgy providers, tighter approval rates, and more pressure on merchants to understand the product they are offering their customers. We will come back to what that means for your store.
The Four BNPL Providers Every Aussie Shopify Store Should Know
There are dozens of BNPL apps in the Shopify app store. Ninety per cent of your decision comes down to four providers.
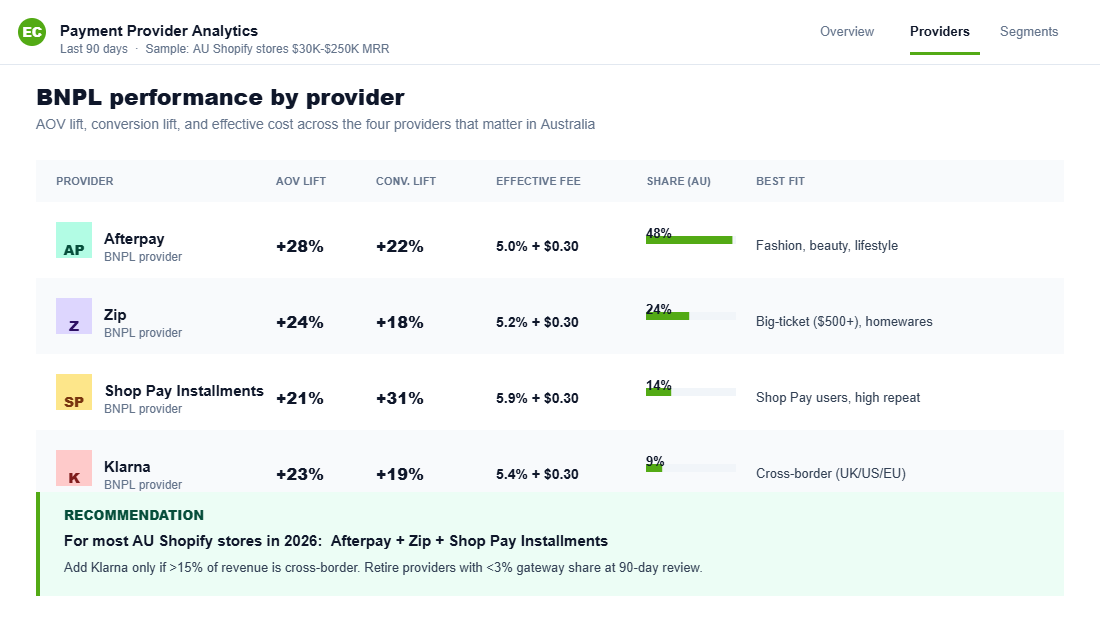
Afterpay is still the market leader in Australia. The model is four interest free payments over six weeks. It is strongest in fashion, beauty, and lifestyle. Average merchant fee is 4 to 6 per cent plus 30 cents per transaction, and Afterpay specifically blocks you from passing that fee on as a surcharge.
Zip (formerly Zip Pay and Zip Money) is the Aussie local hero. Zip has two products: Zip Pay for smaller baskets paid over weeks, and Zip Money for larger purchases (think over 1,000 dollars) paid over months. Zip tends to out-convert Afterpay for big-ticket items like furniture, appliances, and high-end electronics. Fees sit in a similar 4 to 6 per cent range.
Shop Pay Installments is Shopify’s own offering, powered by Affirm. This is the dark horse most Aussie stores sleep on. Because Shop Pay Installments lives inside Shop Pay, it does not redirect the customer out of your checkout. Shopify’s data shows Shop Pay has up to 1.72x higher conversion than standard guest checkout. Fee is around 5.9 per cent plus 30 cents. Important note: Shop Pay Installments is rolling out across regions and availability for Australian merchants depends on your Shopify plan and Shop Payments eligibility. Check the Shopify admin before you plan on it.
Klarna is the big international player. Globally dominant, especially for European and US customer bases. In Australia, Klarna sits behind Afterpay and Zip for volume but is the right call if you sell cross-border, particularly into the UK, Germany, or the US. Fees are in the 4 to 6 per cent band.
Sezzle and Humm are the other names you will see. Both are legitimate, both have audiences. Neither is big enough in Australia in 2026 to justify a third or fourth BNPL slot at checkout unless you are in a niche where they dominate.
The short answer for most Aussie Shopify stores in 2026: Afterpay plus Zip, with Shop Pay Installments as soon as it is fully available on your plan.
The Real Cost: What BNPL Fees Actually Do to Your Margin
This is where most owners get caught out. They treat the BNPL fee like a payment processing cost and move on. It is not. A 4 to 6 per cent fee on top of your Shopify Payments or Stripe fee is a meaningful hit to your contribution margin.
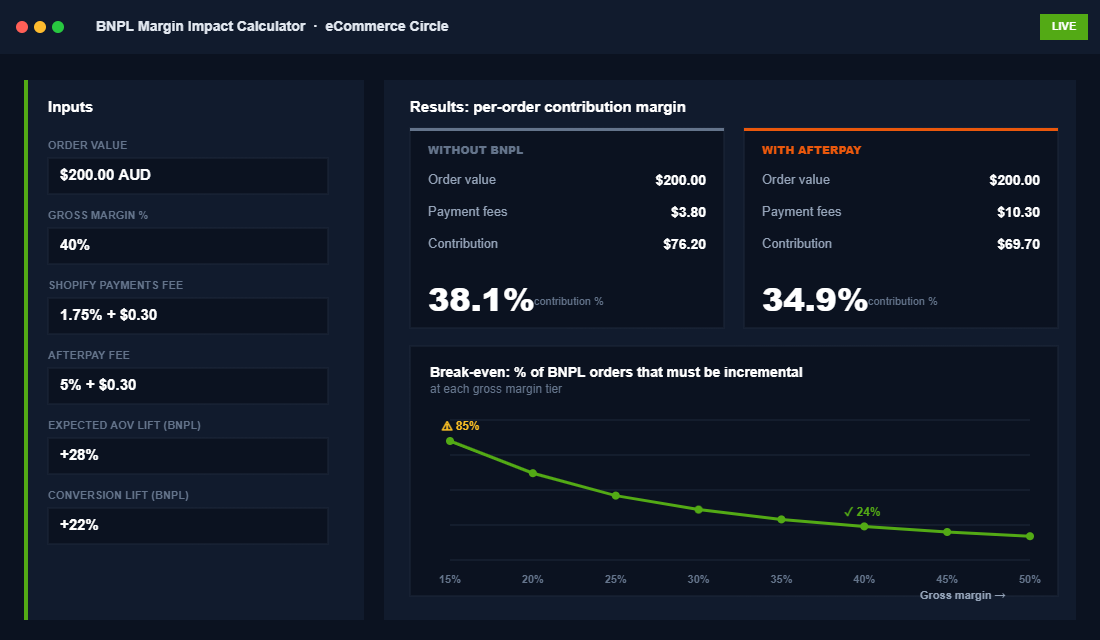
Let me show you the maths on a 200 dollar order.
Without BNPL, on Shopify Payments, you pay roughly 1.75 per cent plus 30 cents. That is about 3.80 dollars in payment fees. Your 200 dollar order keeps the rest of your gross profit intact.
With Afterpay on that same 200 dollar order, you pay roughly 5 per cent plus 30 cents. That is 10.30 dollars. You have paid an additional 6.50 dollars per order for the privilege of offering BNPL. If your contribution margin on that 200 dollar order was 40 dollars, you just gave up 16 per cent of your per-order profit.
The only way that trade is worth it is if BNPL caused the order to be bigger or to happen at all. Afterpay’s merchant data says yes on both counts: 28 per cent higher AOV and 22 per cent higher conversion. Baymard Institute and Statista’s 2026 checkout studies show BNPL reduces cart abandonment by around 16 to 20 per cent on orders above 100 dollars. On paper the trade looks great.
In practice, it depends entirely on what your contribution margin looks like. If your margin is 50 per cent, a 6 per cent fee is survivable even if only half your BNPL orders are incremental. If your margin is 20 per cent (looking at you, electronics and homewares), then a 6 per cent fee is 30 per cent of your profit on every BNPL order, and the maths only works if BNPL is genuinely bringing in orders you would not have otherwise captured.
If you have not mapped your contribution margin by product and by order tier, you are flying blind. We wrote a full walkthrough on this in our contribution margin guide. Read it before you decide what to do with BNPL.
How to Set Up Afterpay, Zip, and Shop Pay Installments on Shopify
The setup itself is not hard. Getting it right takes about 90 minutes once you have your merchant accounts approved.
- Apply for your merchant accounts before you touch Shopify. Go to afterpay.com.au/business, zip.co/au/business, and klarna.com/business and submit your merchant applications. Approval takes 3 to 10 business days. Shop Pay Installments is activated through your Shopify admin once Shop Pay is enabled, so no separate merchant application is needed.
- Enable Shop Payments and Shop Pay. In your Shopify admin, go to Settings, Payments, and confirm Shop Payments is active. Under Shop Pay, make sure it is toggled on. If you are eligible for Shop Pay Installments in your region, you will see it appear as a sub-option.
- Add Afterpay. In Settings, Payments, scroll to Additional payment methods and click Add payment methods. Search for Afterpay, select “Afterpay (New)” (the direct integration, not a third party app), and hit Activate. You will be prompted to install the Afterpay app and enter your merchant ID and secret key from the Afterpay merchant portal. Do not enable Test mode when you go live. This is the single most common Afterpay setup mistake.
- Add Zip. Same process. Settings, Payments, Additional payment methods, search for Zip. Choose the official Zip gateway. Enter your merchant credentials from the Zip partner portal. Zip will default to offering both Zip Pay and Zip Money based on your order value. For most brands that default is fine.
- Add the marketing messaging. This is the step 80 per cent of stores skip. Each provider gives you on-site messaging widgets that display the “4 payments of $X” breakdown on product pages and in the cart. Afterpay’s product page messaging typically lifts product page conversion by 5 to 8 per cent on its own, according to Afterpay’s 2025 merchant reporting. Install the messaging widget via each provider’s Shopify app. Place it directly under the price on your product template.
- Order a test purchase. Use a real account and a real card. Run one end-to-end order with each provider. Confirm the order settles in your Shopify admin with the correct gateway name and that the funds reconcile against your bank feed.
A 90 minute setup that ships this much revenue upside is one of the highest ROI hours you will spend this quarter. But the setup is the easy part. What you do after the setup is where the money is.
The 4-Part Merchandising Playbook That Actually Lifts AOV With BNPL
This is the section most “BNPL for Shopify” articles skip. Adding BNPL to checkout is the floor. Merchandising it properly is the ceiling.
Part 1: Product page messaging placed above the add to cart button, not below. Most themes install the Afterpay widget below the product description. Move it up. It needs to be visible before the customer scrolls. We have seen brands lift BNPL uptake by 40 per cent just by moving the messaging from below the description to directly under the price.
Part 2: Category page thresholds that nudge customers into the BNPL sweet spot. The BNPL sweet spot for Australian consumers is orders between 150 and 600 dollars. Below 150, they just tap their card. Above 600, approval rates drop. Structure your collection pages so your most profitable bundles and upsells land inside that range. This is where product bundling strategy stops being a nice-to-have and starts being a margin protection tool.
Part 3: Cart page “4 payments of” calculator as the customer is about to check out. Dynamic BNPL messaging that updates in real time as items are added is the cheapest AOV lever in ecommerce. Every major BNPL provider offers this widget. Every major Aussie brand uses it. If yours is not live yet, put it live this week.
Part 4: A dedicated BNPL landing page for paid traffic. This is the move most brands miss completely. Build a single page called /pages/buy-now-pay-later that explains which services you accept, shows the “4 payments of $X” breakdown on featured products, and links out to a curated collection of BNPL-friendly bundles. Run cheap remarketing ads to it. An Aussie activewear brand we work with lifted monthly Afterpay GMV by 38 per cent in six weeks with nothing more than this page and a 30 dollar per day Meta retargeting campaign.
Compliance: What Changed in June 2025 and What It Means for Your Store
On 10 June 2025, Australia folded BNPL into the National Consumer Credit Protection Act. Every BNPL provider now has to hold an Australian Credit Licence, comply with ASIC’s responsible lending rules, and meet fee caps and hardship provisions under the new “low cost credit contract” category.
For you as a merchant, the day to day does not change dramatically. You are not the credit provider. Afterpay and Zip carry the licensing obligation, not your Shopify store. But three things did change that you need to be aware of.
First, approval rates on new customers have tightened. Expect 3 to 8 per cent fewer first-time BNPL approvals at your checkout through 2026 as providers tune their responsible lending models. Hall and Wilcox’s 2025 regulatory briefing confirms this tightening was anticipated and is being observed in the market.
Second, surcharge and messaging rules are stricter. You cannot imply that BNPL is “interest free and fee free” for the customer without the required responsible lending language. Your on-site messaging and ad copy both need to comply. Most of the Shopify app widgets from Afterpay, Zip, and Klarna have already been updated for this. If you are using a third party BNPL app or hand-rolled widget, check it.
Third, your terms and returns policy need to be aligned with BNPL. Customers using BNPL have the same rights as any other customer under the Australian Consumer Law, and your returns handling has to account for how refunds flow back through the BNPL provider rather than the original card. Your BNPL provider does not refund the merchant fee on a returned order. That is a real cost to price in.
This is boring stuff. It also keeps you out of trouble. Get it right once.
The BNPL Decision Framework: Which Providers to Offer (and When to Cap Them)
Here is the decision framework we run with every brand inside the eCommerce Circle. Copy it, paste it into a Notion doc, and work through it for your store this week.
- Calculate your contribution margin by order value tier. Break your orders into four buckets: under 100 dollars, 100 to 250, 250 to 600, and 600 plus. Calculate your average contribution margin in each. This is your baseline.
- Decide which providers make the shortlist. If your AOV is under 200 dollars and your audience skews under 35, Afterpay is non-negotiable. If your AOV is over 500 dollars, Zip Money belongs at checkout. If you sell cross-border into the UK, US, or EU, add Klarna. If you are on Shopify Payments and eligible, Shop Pay Installments is a free-to-add bolt-on that does not need a separate merchant agreement.
- Price around the fee, not despite it. Bake the 4 to 6 per cent BNPL cost into your pricing on BNPL-heavy SKUs. Not a hidden surcharge (you cannot pass it on), but a margin buffer in your price build-up. Most brands forget to do this and then wonder where the margin went.
- Cap BNPL for your lowest margin SKUs. Some Shopify themes and apps let you restrict payment methods by collection or by product tag. If you have SKUs with under 20 per cent contribution margin, consider excluding them from BNPL. You will lose a small amount of top line. You will protect your profit.
- Review your BNPL mix every 90 days. Pull a report in Shopify of orders by gateway, AOV by gateway, refund rate by gateway, and contribution margin by gateway. One provider will almost always outperform the others for your specific brand. After 90 days, lean into the winner and consider retiring the laggard if its volume does not justify the admin overhead. This is the same 90 day cadence we recommend for your checkout optimisation work.
That is the framework. It is five steps, it fits on one page, and it is the difference between BNPL as a growth lever and BNPL as a silent margin leak.
The Compound Effect: Why BNPL Only Pays Off When You Get the Other Pieces Right
BNPL is not a standalone growth tactic. It is a multiplier. It multiplies whatever is already happening on your product pages, in your checkout, and in your email flows.
If your product pages are weak, BNPL will not save them. If your checkout leaks, BNPL will speed up the leak. If your email flows are not winning back abandoners, BNPL will not magically recover the carts you lose. We see this pattern in every audit we run inside the eCommerce Circle. The stores that get disproportionate returns from BNPL are the stores that already had the other pieces working.
Stack the pieces in the right order. Your product page copy and imagery need to be doing their job. Your checkout needs to be stripped of friction. Your cart abandonment flow needs to be running through Klaviyo or Omnisend and covering email plus SMS. Then you add BNPL. Now you are not just lifting AOV by 20 per cent. You are lifting AOV on top of a checkout that already converts 3 per cent instead of 1.5 per cent, which is a meaningfully different revenue story.
There is a second order effect too. BNPL customers tend to come back. Afterpay’s own cohort data shows repeat purchase rates from Afterpay customers are 20 per cent higher than from non-Afterpay customers over a 12 month window. If you pair BNPL with a genuine retention program, a post-purchase sequence, and a loyalty tier, you are not just acquiring bigger orders. You are acquiring better customers.
That is the full picture. Fees in, fees understood, framework in place, merchandising live, compliance handled, and the rest of your store doing its job.
Where to Next
Inside the eCommerce Circle, the Platform P is where we pull levers like this. BNPL, checkout, site speed, and the 12 apps worth paying for (and the 40 that are not). If your Shopify store is doing over 30K a month and you are sick of guessing where the margin is going, let’s talk.