Most product launches in Australia happen in silence. You spend three months sourcing a new SKU, sweating the packaging, getting the photography right. Launch day arrives. You send one email, post a single grid tile, and then you sit there refreshing your Shopify dashboard while the orders trickle in at the same boring pace as a normal Tuesday.
What’s in This Article
That is not a launch. That is an upload.
A real launch is a system that builds pressure before the product is even buyable, then releases it all at once. The brands you watch sell out in hours are not luckier than you. They run a repeatable sequence. The numbers back this up: depending on the study, somewhere between 60 and 80% of new product launches from smaller brands fail to hit their targets, and 72% of failed products had ignored customer feedback before they launched. The problem is almost never the product. It is the absence of a launch motion around it.
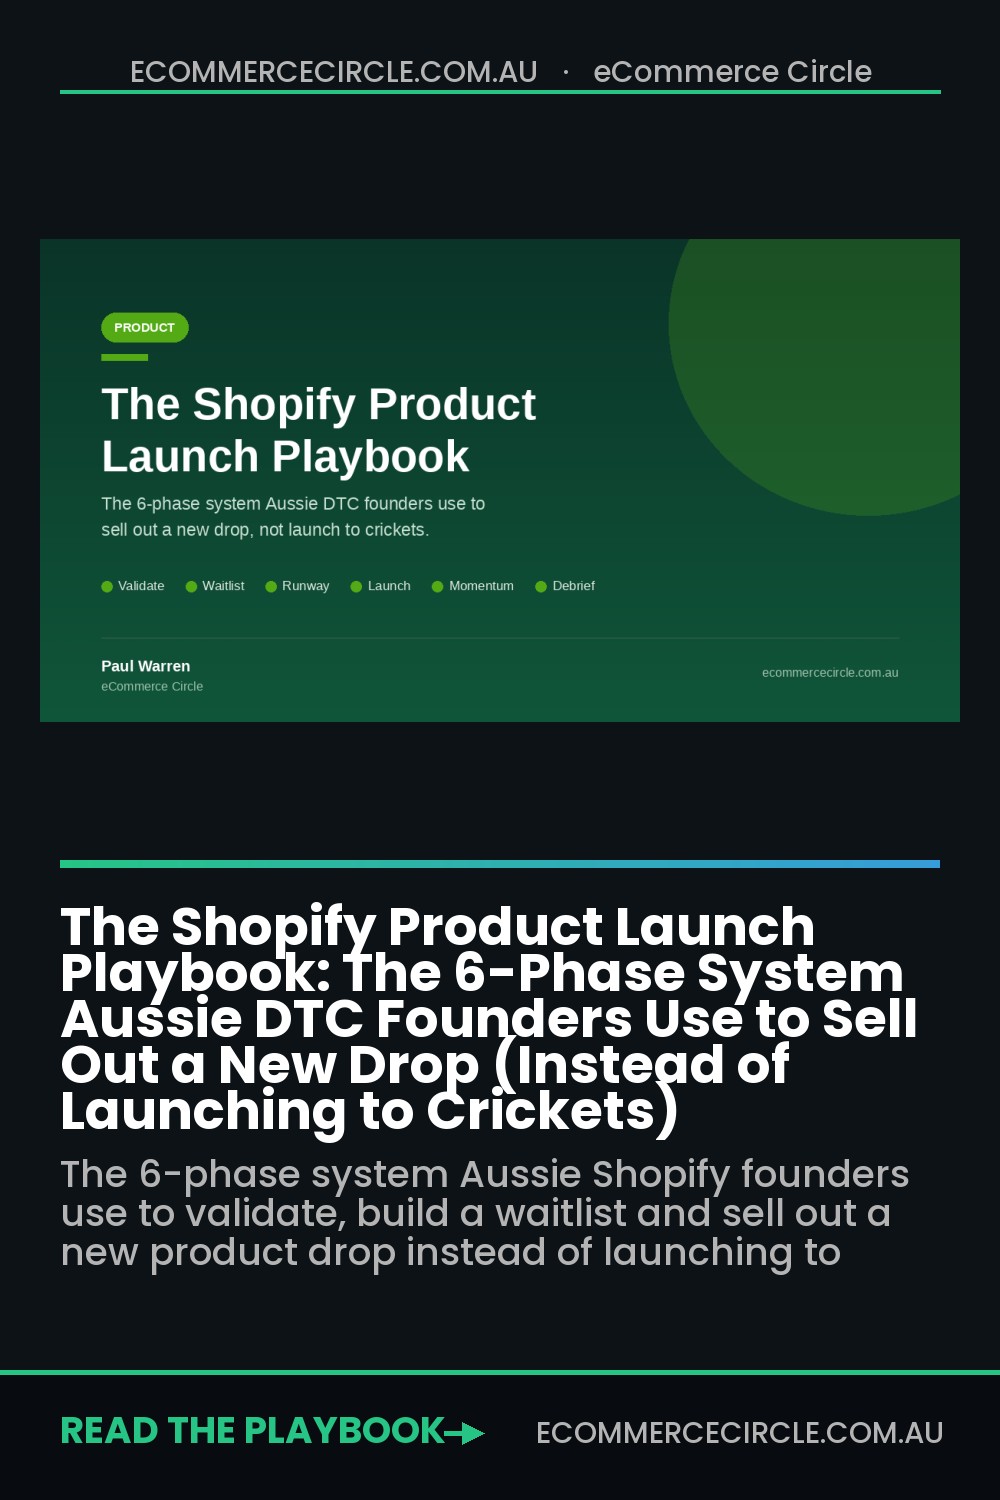
This is the 6-phase product launch playbook we walk through with eCommerce Circle members. It works whether you are dropping a hero product, a limited-edition colourway, or a brand-new category. Validate, build the waitlist, engineer the runway, execute launch day, sustain momentum, then debrief. Run it once properly and you will never launch to crickets again.
Phase 1: Validate Before You Commit a Single Dollar
The most expensive launch mistake is launching something nobody asked for. Before you order stock or set a date, you run a demand test. The goal is simple: collect hard signals that real Aussie customers want this thing, at this price, right now.
Run your idea through a five-signal scorecard. You are not looking for perfection. You are looking for four out of five green before you commit.
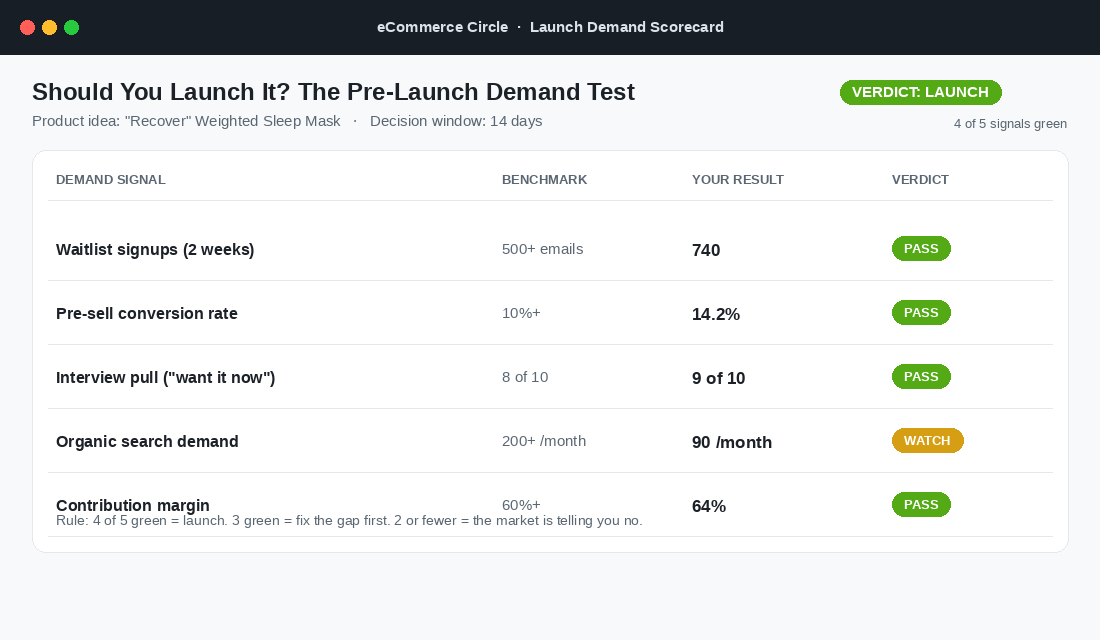
- Waitlist signups. Stand up a coming-soon page and see if you can collect 500+ emails in two weeks. Cold silence here is the cheapest no you will ever get.
- Pre-sell conversion. Offer the product for pre-order to a small segment. Pre-order conversion of 10 to 20% is strong, against a typical store conversion rate of 2 to 4%. If people will pay before it exists, demand is real.
- Interview pull. Talk to ten customers. If eight or more say “I would buy that today,” you have pull. If they say “that is nice,” you have politeness, not demand.
- Organic search demand. Check the search volume for the problem your product solves. Thin search is not a dealbreaker, but it tells you how much demand you will have to create yourself.
- Contribution margin. If the product cannot clear 60%+ contribution margin after COGS and shipping, the launch has to work twice as hard to pay for itself.
You can run this entire test in a week for almost nothing. A free coming-soon page, a pre-order toggle on one product, and ten customer calls will tell you more than any focus group. The point is to spend a week and a few hundred dollars finding out, rather than three months and twenty thousand dollars in stock. A WATCH or FAIL is not a reason to quit, it is a brief: weak search demand means you budget for awareness, a soft margin means you revisit pricing or sourcing before launch.
This is where most founders skip a step. They fall in love with the idea and treat validation as a formality. Do the opposite. Treat it as the gate. If you want a tighter script for the interview signal, our founder-led customer interview playbook gives you the nine questions that surface real demand instead of polite encouragement.
Phase 2: Build the Pre-Launch Waitlist (Your Unfair Advantage)
The waitlist is the single asset that decides whether launch day is a celebration or a panic. A warm list of people who raised their hand is worth far more than the same number of cold visitors on the day. When July, the Australian luggage brand, builds demand for a colourway, it is not unusual to see a waitlist run into the thousands before stock lands. That waitlist is what turns a restock into a sell-out.
Give yourself a four to six week window before launch and build the list with three capture surfaces:
- A coming-soon page. A dedicated page with the product story, a hero shot or teaser, and one job: capture the email. No navigation, no distractions.
- An email pop-up. Trigger a launch-specific pop-up on your highest-traffic pages. This is different from your standard welcome offer, so segment it. Our email pop-up playbook covers the six triggers that capture intent without annoying buyers.
- Organic and social teasers. Behind-the-scenes content, sampling, “guess what is coming” posts that point back to the coming-soon page.
Give people a reason to join beyond curiosity. Early access is the strongest incentive you have: “the waitlist shops first, before anyone else.” Add a launch-day discount, a free gift with the first orders, or a strictly limited allocation reserved for the list. Then tag every signup with a launch-specific segment in Klaviyo so you can email them separately from your main list and measure exactly how that segment converts on the day.
Set a target and watch the curve. A list climbing from 90 in week six to 740 by launch week is a list with momentum. A flat list is a warning you should act on before you have committed to a launch date.
Phase 3: Engineer the Launch Runway
A runway is the sequence of emails and content that takes a warm list and turns the temperature up to boiling by launch day. The mistake here is the single “It is live!” email. Single emails leave money on the table. Three-email sequences generate roughly 6.5 times more revenue than a one-and-done send, and layering social proof into the sequence can lift pre-order conversions by around 50%.
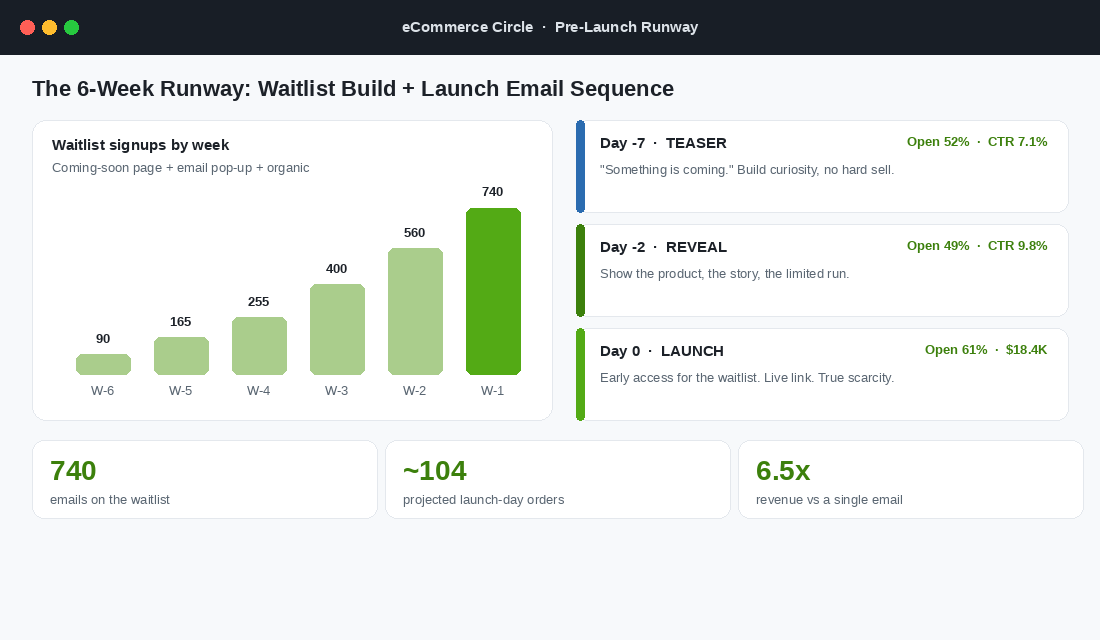
Build the core sequence as three beats:
- Day minus 7, the Teaser. “Something is coming.” Curiosity only, no hard sell. You are reminding the list they opted in and rebuilding anticipation.
- Day minus 2, the Reveal. Show the product, tell the story, name the limited run. This is where you earn the click. Frank Body built a cult following doing exactly this: treating each release like an event with a story, not a SKU with a price.
- Day 0, the Launch. Early access for the waitlist first, then the public. A live link, a clear deadline or quantity, and scarcity that is actually true.
Run the same beats on SMS and organic in parallel. The list does not all open email, so a short launch SMS and a launch-day story on socials catch the people email missed. Keep the message identical across channels so the launch lands as one coordinated moment.
Phase 4: Launch Day Execution
Launch day is about converting the pressure you built into orders without tripping over your own store. Four things decide the outcome.
Give the waitlist early access
Open the launch to your waitlist an hour or a day before the public. This rewards the people who raised their hand, creates an early wave of orders and social proof, and gives you a real demand read before you spend a cent on ads. Early-access and repeat buyers spend up to 300% more than first-timers, so treating your warmest customers as VIPs is not a courtesy, it is a revenue lever.
Use scarcity that is true
Limited quantity framing can lift conversion by around 20%, but only if it is real. “Only 200 made” works once. A fake countdown that resets when the page reloads burns the trust you spent months building. If the run genuinely is limited, say the number. Who Gives A Crap and Bondi Sands both run limited-edition releases where the scarcity is real, and that honesty is exactly why their drops convert.
Pick the right launch window
Timing matters more than founders think. For most Aussie stores, a mid-morning launch on a Tuesday, Wednesday or Thursday in AEST catches the most attention, while late Friday and weekends tend to go quiet for considered purchases. Avoid clashing with a public holiday or a major sale event unless you are deliberately riding it. Then watch the first hour like a hawk: that early conversion rate from your warmest segment is your single best predictor of how the rest of the launch will go.
Make sure the store can take the orders
Nothing kills a launch like a checkout that falls over under load. Before launch day, confirm your stock is set correctly, your discount or early-access codes work, your shipping rates are right, and your most popular path to checkout has been tested on mobile. Lead with owned channels (email, SMS, organic) which carry your warmest buyers, and only layer paid traffic on once you have confirmed the funnel converts.
Phase 5: Sustain Momentum Through Days 1 to 14
The launch is not over when the first wave clears. The two weeks after are where you capture the demand that did not convert on day one, and where a sell-out becomes a restock event instead of a dead end.
If you sell out, the back-in-stock waitlist is your second launch. Customers who sign up for a restock alert have already decided they want the product, which is why back-in-stock notifications convert at 25 to 35% and recover 15 to 25% of the revenue that stockouts would otherwise lose for good. Given that stockouts quietly cost the average store 4 to 8% of annual revenue, this is not a nice-to-have.
Set up a back-in-stock flow in Klaviyo
Klaviyo is the tool we reach for here because the flow is native to Shopify and takes under an hour to stand up. The setup:
- In Shopify, open the product and make sure Track quantity is switched on. Without inventory tracking, Klaviyo never learns the item went out of stock.
- Turn off “Continue selling when out of stock” for launch SKUs. If it stays on, the product always reads as available and the alert never fires.
- In Klaviyo, use the form editor to customise the “Notify me when available” button and the sign-up form. Back-in-stock forms are available for Shopify out of the box.
- Build the flow triggered by the “Subscribed to Back in Stock” event, with a back-in-stock delay that holds each subscriber until their item is restocked.
- Write a two-email restock sequence: an immediate “it is back” alert, then a follow-up 24 hours later with a gentle low-stock nudge.
Then pour fuel on the fire with social proof. Seed reviews from your early-access buyers, repost customer photos and unboxings, and run retargeting against everyone who visited but did not buy. User-generated content does double duty here: it is your highest-converting ad creative and your strongest organic proof that the launch is real. If you want earned media on top of owned channels, the Shopify PR playbook shows how Aussie founders land press for a launch without a five-figure agency retainer.
Phase 6: Debrief and Turn the Launch Into a System
The difference between a brand that launches well once and a brand that launches well every time is the debrief. Within a week of launch, run a simple review against the numbers that matter.
- Units sold and sell-through. Did you clear the run, and how fast?
- Waitlist conversion. What percentage of your list actually bought? This is the truest measure of how warm your list was and how good your runway was.
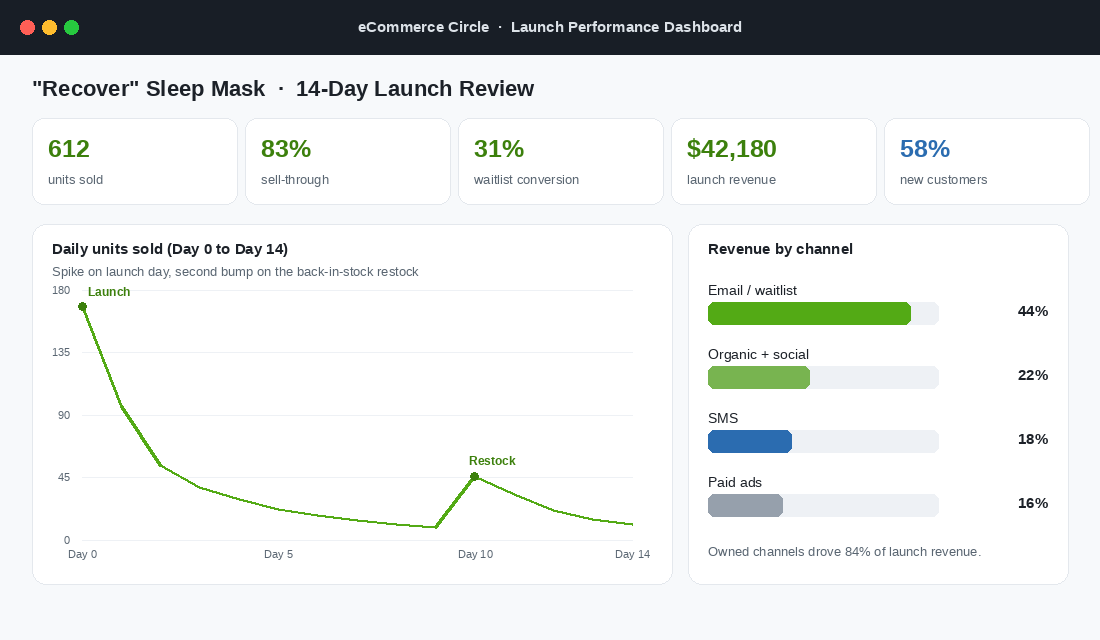
- Revenue by channel. Owned channels should carry the launch. If paid did the heavy lifting, your list-building needs work before the next drop.
- New versus returning. A healthy launch pulls in new customers while rewarding your existing base.
Write down what worked and what did not while it is fresh, then template it. Your coming-soon page, your three-email sequence, your launch-day checklist and your restock flow all become assets you reuse. The second launch should take half the effort of the first.
How the Playbook Flexes for Three Launch Types
The six phases stay the same, but the emphasis shifts depending on what you are launching. Know which one you are running before you start.
- The hero product. This is your flagship, the product you expect to anchor the catalogue for years. Spend the most on validation and the runway, because you are building a long-term asset, not a moment. Get the story and the photography right, because you will reuse them for a long time.
- The limited drop. A colourway, a collaboration, a seasonal edition. Scarcity is the engine here, so the limited quantity has to be genuine and clearly communicated. The waitlist and early access matter most, and selling out fast is a feature, not a failure.
- The new category. You are asking existing customers to see you differently, for example a skincare brand launching a body range. Validation is critical because you cannot assume your audience wants it, and the runway leans harder on education: why you, why now, why this fits the brand they already trust.
Four Launch Mistakes That Quietly Kill Momentum
Even founders who run the phases trip over the same avoidable errors. Watch for these.
- Launching cold. No waitlist, no runway, just an upload and a single email. This is the default, and it is why most launches underwhelm.
- Fake urgency. Countdown timers that reset, “almost gone” banners on fully stocked products. Shoppers have seen it all, and the trust cost is permanent.
- Discounting on day one. If your first move is a discount, you have told the market the product is not worth full price and trained your best customers to wait for the next sale.
- No restock plan. Selling out with no back-in-stock flow means every late buyer hits a dead end and walks. The waitlist is free money you are leaving on the table.
How the Phases Compound
Each phase makes the next one easier, and together they change the maths of a launch. Picture a $2M brand dropping a $69 hero product.
Validation (Phase 1) stops you ordering 2,000 units of something that would have sold 600. The waitlist (Phase 2) gives you 740 warm emails. The runway (Phase 3) lifts your launch-day conversion well above a cold-traffic baseline. Launch-day execution (Phase 4) converts roughly 14% of that list in the first 48 hours, which is over 100 orders before a single ad dollar is spent. Momentum (Phase 5) recovers another 15 to 25% of the buyers you would have lost to the sell-out through the back-in-stock flow. The debrief (Phase 6) means your next launch starts from a template, not a blank page.
Stack it up and a single drop can clear a 612-unit run at 83% sell-through, pull $42,000 in launch revenue with 58% new customers, and do it with owned channels carrying 84% of the load. That is not a lucky launch. That is a system doing what it was built to do.
Your Product Launch Checklist
Save this and run it the same way every time you drop something new:
- Validate: Score the idea against the five demand signals. Get four of five green before you commit stock.
- Waitlist: Stand up a coming-soon page, a launch pop-up and teaser content. Build for four to six weeks.
- Runway: Write the three-email sequence (teaser, reveal, launch) and mirror it on SMS and organic.
- Launch day: Early access for the waitlist, true scarcity, the right window, a tested checkout, owned channels first.
- Momentum: Back-in-stock flow live, reviews and UGC seeded, retargeting on, restock decision made.
- Debrief: Review sell-through, waitlist conversion and channel mix. Template everything for next time.
Inside eCommerce Circle, planning and running a launch the right way is one of the core pillars we work on with every member, because a single well-run drop can do more for your year than a month of business-as-usual. If you want a second opinion on your next launch, let’s talk.