Every product you sell has a price a shopper can check against three other stores in under a minute. Except one kind: the product with their name on it. The moment a customer adds a monogram, an engraving or a custom colour combination, price comparison dies, and Deloitte’s research on mass personalisation found that 1 in 5 interested consumers will happily pay a 20% premium for the privilege.
What’s in This Article
Most Aussie founders look at personalisation and see a fulfilment headache. Fair enough, done badly it is one. But done properly it is one of the few levers that lifts your average order value, your conversion on gifting traffic and your margin at the same time, without a single extra dollar of ad spend.
Some of Australia’s best DTC brands are proof. July turned monogrammed initials into a signature that sells luggage. Frank Green built a customisation studio where shoppers design their own bottle. The Daily Edited built an entire accessories brand on three gold-foil letters. This playbook breaks down the 5-layer system for adding personalisation to your own store without wrecking your operations.
Why Personalisation Is a Margin Strategy, Not a Gimmick
Before we get tactical, look at what the data says about customised products, because the numbers are stronger than most founders assume.
- 1 in 5 consumers interested in personalised products will pay a 20% premium for them, according to Deloitte’s Made-to-Order consumer review. On a $100 product, that is $20 of almost pure margin.
- 36% of consumers say they are interested in buying personalised products. That is not a niche. On a store doing 1,000 orders a month, that is a third of your customers you have never made the offer to.
- 62% of online shoppers have chosen, recommended or paid more for a brand offering a customised experience. The behaviour is already there. You are just not capturing it.
- Customised items routinely command 20 to 50% price premiums because a monogrammed product cannot be price-matched. There is no “same item cheaper elsewhere” when the item has your customer’s initials on it.
- Customers spend around 37% more with brands that personalise the experience. Even when the personalised item is a small share of the range, it pulls the whole basket up.
And there is a quieter benefit nobody talks about: personalised products almost never get returned for change of mind, and they almost never get bought purely on discount. They are the most defensible SKUs in your store.
Layer 1: Pick the Right Personalisation Type for Your Product
Personalisation is not one thing. There are four types, and picking the wrong one for your product and your operations is how stores end up with a backlog of angry gift buyers in December.
- Marking: monograms, engraving, embossing. Initials on luggage, names on drink bottles, a date inside a ring. Low complexity, high perceived value, perfect for gifting. This is where most brands should start.
- Custom print: names, numbers, artwork. Think custom pet portraits, jersey names, printed labels. Higher production effort, usually needs a print partner or in-house printer.
- Configuration: the customer assembles their combination. Frank Green’s bottle studio is the local benchmark: lid colour, base colour, button colour, then optional text. No two bottles alike, all from standard components. Operationally this is just smart inventory, not custom manufacturing.
- Made-to-order: built from scratch per order. Custom furniture, bespoke jewellery. Highest premium, hardest operations, longest lead times. Do not start here.
The rule: start with the type that adds the most perceived value with the least new machinery. For 80% of Aussie DTC brands that is marking, because a $300 engraving machine or a local pad-printing partner covers it, and it works on products you already stock.
One filter before you commit: personalisation suits products people keep or gift, not products they churn through. It works on the weekender bag, the leather wallet, the bottle. It does not do much for consumables at the value end of the market.
Layer 2: Price It Like a Product, Not a Favour
Most founders who add monogramming price it apologetically: $5, barely covering labour. That is backwards. The customer is not paying for three letters of vinyl or laser time. They are paying for a one-of-one item and, in most cases, a better gift.
Benchmarks from brands doing this well: personalisation add-ons in Australia typically sit at $10 to $25 per item for monogramming and engraving, with premium leather goods brands charging more. July charges for monogramming as a proper line item. The Daily Edited historically priced monogramming around the $15 mark and made it feel like a steal on a $200 tote.
Run the maths on your own numbers. Say your average product sells at $120 with a 60% gross margin, and your engraving costs you $3 in labour and consumables. Charge $18 for it and the personalisation itself carries an 83% margin. If a quarter of buyers take it up, you have added roughly $3.75 of nearly pure margin to every order across the store, before you count the premium behaviour it drives in the rest of the basket.
- Never bundle it free “to be nice”. Free personalisation reads as low value and buries your margin. Discount it inside a bundle or a VIP offer if you want a lever, but anchor a real price first.
- Set a gifting price point, not a cost-plus one. The buyer comparing your monogrammed wallet against a generic one is asking “is this a better present for $18 more?” The answer is almost always yes.
- Consider a two-tier offer. Standard initials at $15, premium placement or gift box with handwritten card at $29. Two-tier personalisation lifts the take rate of the lower tier on its own.
Layer 3: Build It in Shopify Without Breaking Your Theme
Shopify does not support personalisation fields natively on the product page, and the 100-variant cap means you cannot fake it with variants for anything beyond simple choices. You have two clean options.
The free route: line item properties. A small edit to your product template adds a custom text field whose value rides along on the order. It works, it costs nothing, but you get no character validation, no live preview and no easy way to charge for the add-on. Fine for a quiet test, limiting at scale.
The proper route: a product options app. The one we point members to most often is Product Personalizer by Zepto, because it handles paid add-ons and live preview, the two things that actually move the numbers. Setup takes about half an hour:
- Step 1: Install Product Personalizer from the Shopify App Store. Plans start around $10 USD a month, and there is a free trial to validate the idea before you pay anything.
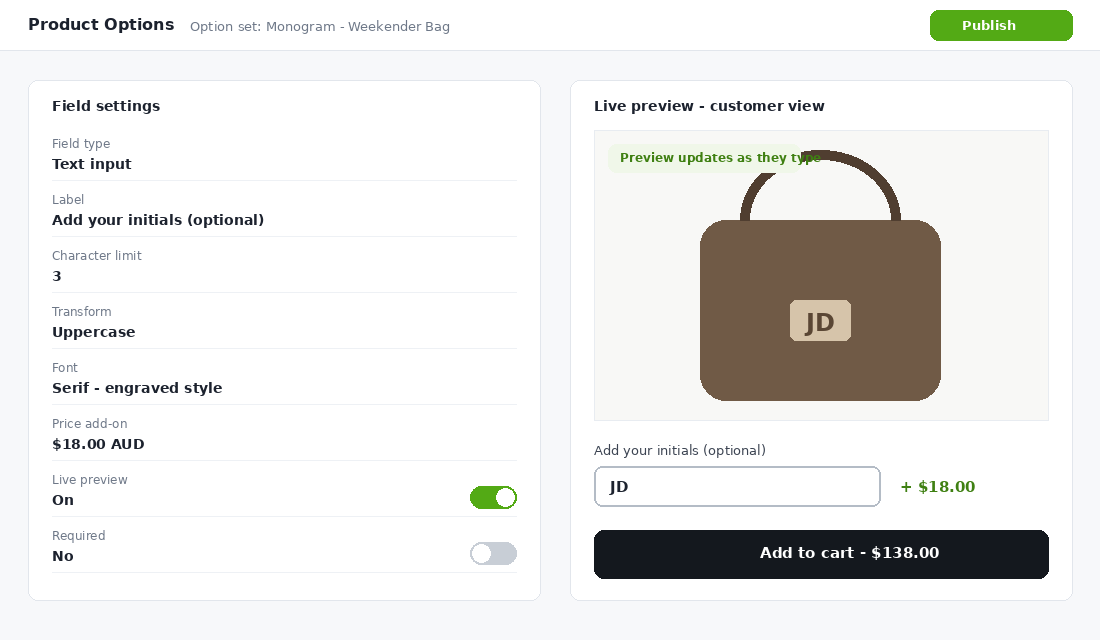
- Step 2: Create your first option set: a text field labelled “Add your initials (optional)”, capped at 3 characters, with an uppercase transform so “jd” becomes “JD”.
- Step 3: Attach a price add-on to the field, for example $18, so the fee is added automatically when the field is filled. The app handles this through a hidden add-on product, so your reporting still works.
- Step 4: Turn on live preview and position the initials on your product photo. This is the moment that converts shoppers: seeing “JD” rendered on the actual bag before they buy roughly doubles take-up compared with a bare text field.
- Step 5: Test the full journey on mobile: field, preview, cart, checkout, order confirmation. Confirm the personalisation value and fee appear on the order in Shopify admin before you go live.
Whichever route you choose, keep the field optional and quiet on the page. Personalisation should feel like a discovery, not a form to fill in. A single well-placed option under the variant picker beats a wall of custom fields every time, and it keeps your product page clean, which matters for everything we covered in the Shopify Product Page Playbook.
Layer 4: Sell It Like a Gift, Because It Usually Is
Adding the field is not the strategy. Merchandising it is. Personalised products over-index massively on gifting occasions, and in Australia that gives you a calendar: Christmas, Mother’s Day, Father’s Day, Valentine’s Day, plus weddings and corporate gifting all year round.
- Show it rendered, everywhere. Your PDP gallery should include at least one image of the product personalised. July’s product pages lead with monogrammed cases because the monogram is the differentiator, not an afterthought.
- Build a “Personalised Gifts” collection. Gift buyers search by occasion and recipient, not by product type. A dedicated collection captures “personalised gifts australia” search traffic that generic PDPs never will.
- Push it hard in the six weeks before each gifting peak. Your email flows, your Meta creative and your homepage hero should all feature the personalised version in the lead-up. This slots straight into the seasonal planning approach from the Father’s Day Playbook.
- Set expectations on the PDP. “Personalised orders ship in 2 to 3 business days” beats a surprise delay in the post-purchase email. Clarity here protects your reviews.
One warning from the trenches: do not launch personalisation for the first time in November. The brands that win BFCM and Christmas with monogramming stress-tested their process in August and September while volumes were forgiving.
Layer 5: Fulfil Without the Wheels Falling Off
Personalisation fails in the back room, not on the product page. The fix is treating personalised orders as a separate lane with its own rules.
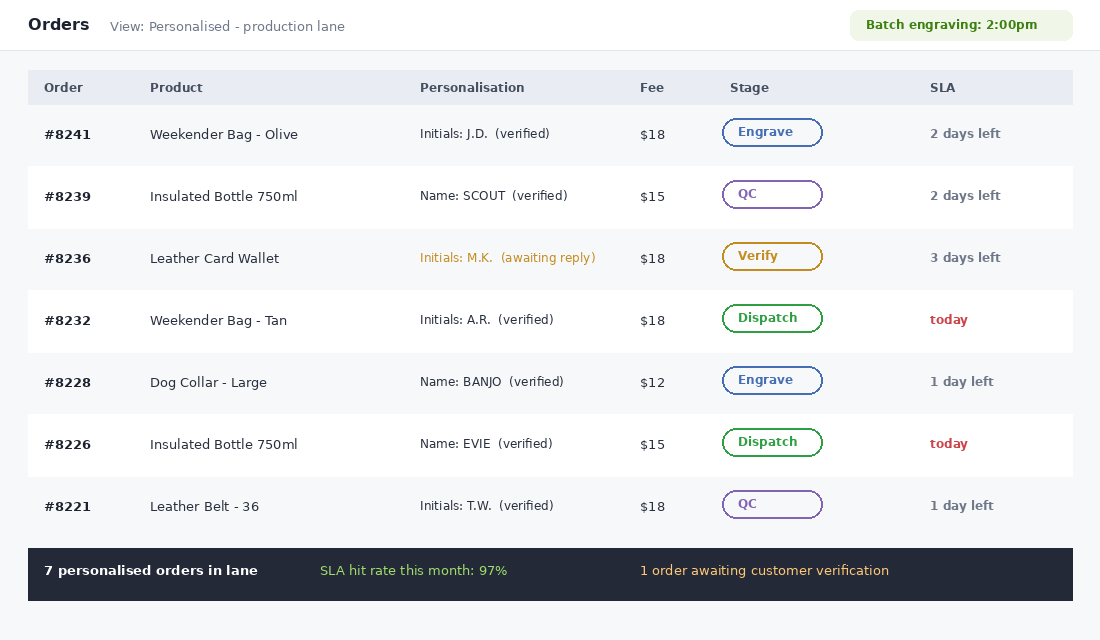
- Tag and route automatically. Use Shopify Flow to tag any order containing a personalisation property, so these orders land in their own view and never get picked as standard stock by mistake.
- Add a verification step. The single most common personalisation disaster is engraving the typo the customer made. Echo the entered text in the order confirmation email in large type, with a same-day window to reply with corrections. It converts your worst support ticket into a nice touch.
- Publish a clear returns position. Under Australian Consumer Law you must still remedy faulty items, but change-of-mind returns on personalised goods can reasonably be excluded. Say so plainly on the PDP and in your returns policy.
- Batch production daily, not per order. One engraving session at 2pm covering the day’s orders keeps unit labour low and your dispatch SLA honest.
- Protect the unboxing. A personalised product in a plain satchel is a wasted moment. Even a simple branded wrap lifts it, and the logic from the Packaging and Unboxing Playbook applies double here because so many of these orders are gifts.
The Numbers to Watch After Launch
Give it 60 days, then judge it on four numbers.
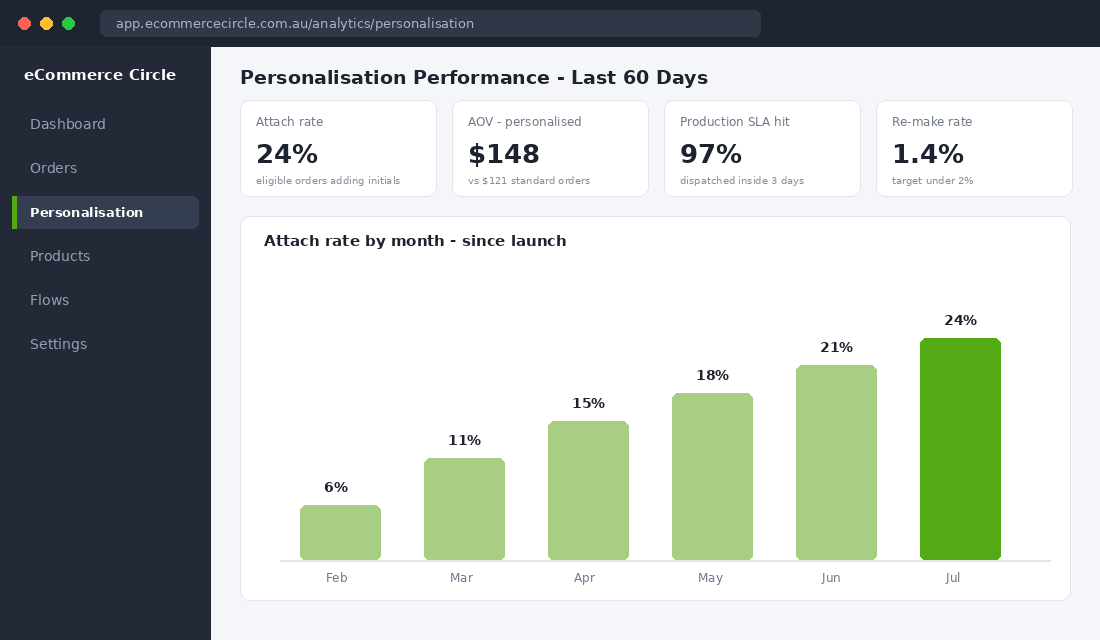
- Attach rate. The percentage of eligible orders that take the personalisation option. 10 to 15% is a solid start; gift-heavy brands push past 25% in peak season. Under 5% usually means the option is invisible on your PDP, not unwanted.
- AOV delta. Compare orders with personalisation against orders without. You should see the add-on fee plus a halo: personalising buyers more often add gift wrap, cards and second items.
- Production SLA hit rate. The percentage of personalised orders dispatched inside your promised window. If this slips below about 95%, fix operations before you spend another dollar promoting it.
- Error rate. Re-makes as a percentage of personalised orders. Above 2% means your verification step is not working.
Where Personalisation Programs Go Wrong
We have watched enough of these launches to know the failure patterns. They are all avoidable, and none of them are the reasons founders expect.
Launching across the whole range at once. Twenty personalisable SKUs means twenty products’ worth of preview images, production steps and edge cases on day one. The brands that make this work start with one hero product, get the attach rate and the ops humming, then roll out. Depth first, then breadth.
Hiding the option in a dropdown. If your personalisation lives in a collapsed accordion below the fold, your attach rate will convince you the idea failed. Put the field directly under the variant picker, show the rendered preview, and let the product photography do the selling.
No character rules. Give shoppers a free text box and they will give you emojis, 47-character messages and their full postal address. Cap the length, restrict the character set, and show exactly what will be produced. Every constraint you add removes a future support ticket.
Quoting standard shipping times. If your site promises next-day dispatch sitewide and your engraving takes two days, every personalised order starts its life as a broken promise. Split the promise by product and say it on the PDP, in the cart and in the confirmation email.
Treating December as the launch window. Peak gifting season is when personalisation earns its keep, but it is the worst possible time to be debugging fonts and re-making botched engravings. Launch in a quiet month, and go into November with a process that has already survived a hundred orders.
The Compound Effect: A Moat Made of Initials
Here is why this is worth the operational effort. Every other lever in your store, price, shipping speed, even creative, can be copied by a competitor with a bigger budget. A personalisation program compounds in ways that are genuinely hard to copy.
The premium pricing feeds margin. The gifting positioning opens seasonal peaks your generic competitors fight over on discount alone. The one-of-one nature kills price comparison and change-of-mind returns at the same time. And the product itself becomes marketing: a monogrammed bag is a walking referral, and customers photograph and share personalised products at a rate plain ones never see.
That is why the brands that own this space, July with initials, Frank Green with colour studios, TDE with gold foil, kept doubling down on it. It was never a gimmick. It was the moat.
The Ops Reality: What Personalisation Does to Pick and Pack
The margin case for personalisation is easy. The operational case is where brands come unstuck, usually in their first December.
A standard order takes 90 seconds to pick and pack. A monogrammed order takes 6 to 12 minutes once you include reading the customisation field, setting up the machine or printer, running the job, quality checking it, and reworking the ones that are wrong. That is a 5 to 8x increase in labour per order. At $32 an hour, you have added $3 to $6 of direct labour to every personalised unit, which needs to come out of the premium you are charging, not out of your gross margin.
Three things keep this manageable. Batch personalised orders into one or two production windows a day rather than picking them as they land. Cap the character count and the font choices so the setup is repeatable, since unlimited options are what turn a 6-minute job into a 20-minute one. And quote a separate dispatch window on personalised items, typically 3 to 5 business days against your standard next-day, and say so clearly on the product page. Shoppers accept a longer wait on something made for them, but only if you told them before checkout rather than in an apology email. Our mystery shop playbook is the fastest way to see whether that promise is actually landing where customers read it.
The Returns Rule Nobody Reads Until It Bites
Under Australian Consumer Law you do not have to accept a change-of-mind return on a genuinely personalised item, because it cannot be resold. You absolutely still have to remedy a fault, a misspelling you caused, or a product that does not match its description.
That distinction needs to live in three places: your returns policy page, the product page near the customisation field, and the order confirmation email. Stating it once buried in a policy nobody opens is what generates the chargeback.
Then build the confirmation step that prevents the argument entirely. Show the customer their exact text, in the exact font, on a live preview, and make them tick a box confirming the spelling before they can add to cart. Stores that add a preview and confirm step typically cut personalisation rework from 8 to 12% of orders down to 2 to 3%. That single change is usually worth more than the price rise you were considering, and it protects the premium positioning you built the range on in the first place. If you are pushing that premium further, our price increase playbook covers how to move without losing the customers you already have.
Your Personalisation Launch Checklist
Work through this in order. Most brands can go from zero to live in a fortnight.
- Pick one hero product that people keep or gift, and one personalisation type (start with marking).
- Set the price at a gifting anchor ($15 to $25), never free.
- Install and configure the options app with character limits, price add-on and live preview.
- Shoot the personalised version and add it to the PDP gallery.
- Build the ops lane: Flow tag, confirmation echo email, daily production batch, stated SLA.
- Update your returns policy for change-of-mind on custom items.
- Launch quietly, measure attach rate for 60 days, then roll out to the next product and plan your first gifting-season push.
Inside eCommerce Circle, product differentiation levers like this are one of the core pillars we work on with every member, because they compound across pricing, conversion and retention at once. If you want a second opinion on whether personalisation fits your range, let’s talk.