Your email list is the best asset you own. It is also the smallest version of your audience.
What’s in This Article
Somewhere between 2 and 4% of the people who land on your Shopify store will hand over an email address. The rest browse, compare, add to cart and vanish. You paid for every one of them through Meta, Google or the slow grind of SEO. You can only follow up with a sliver.
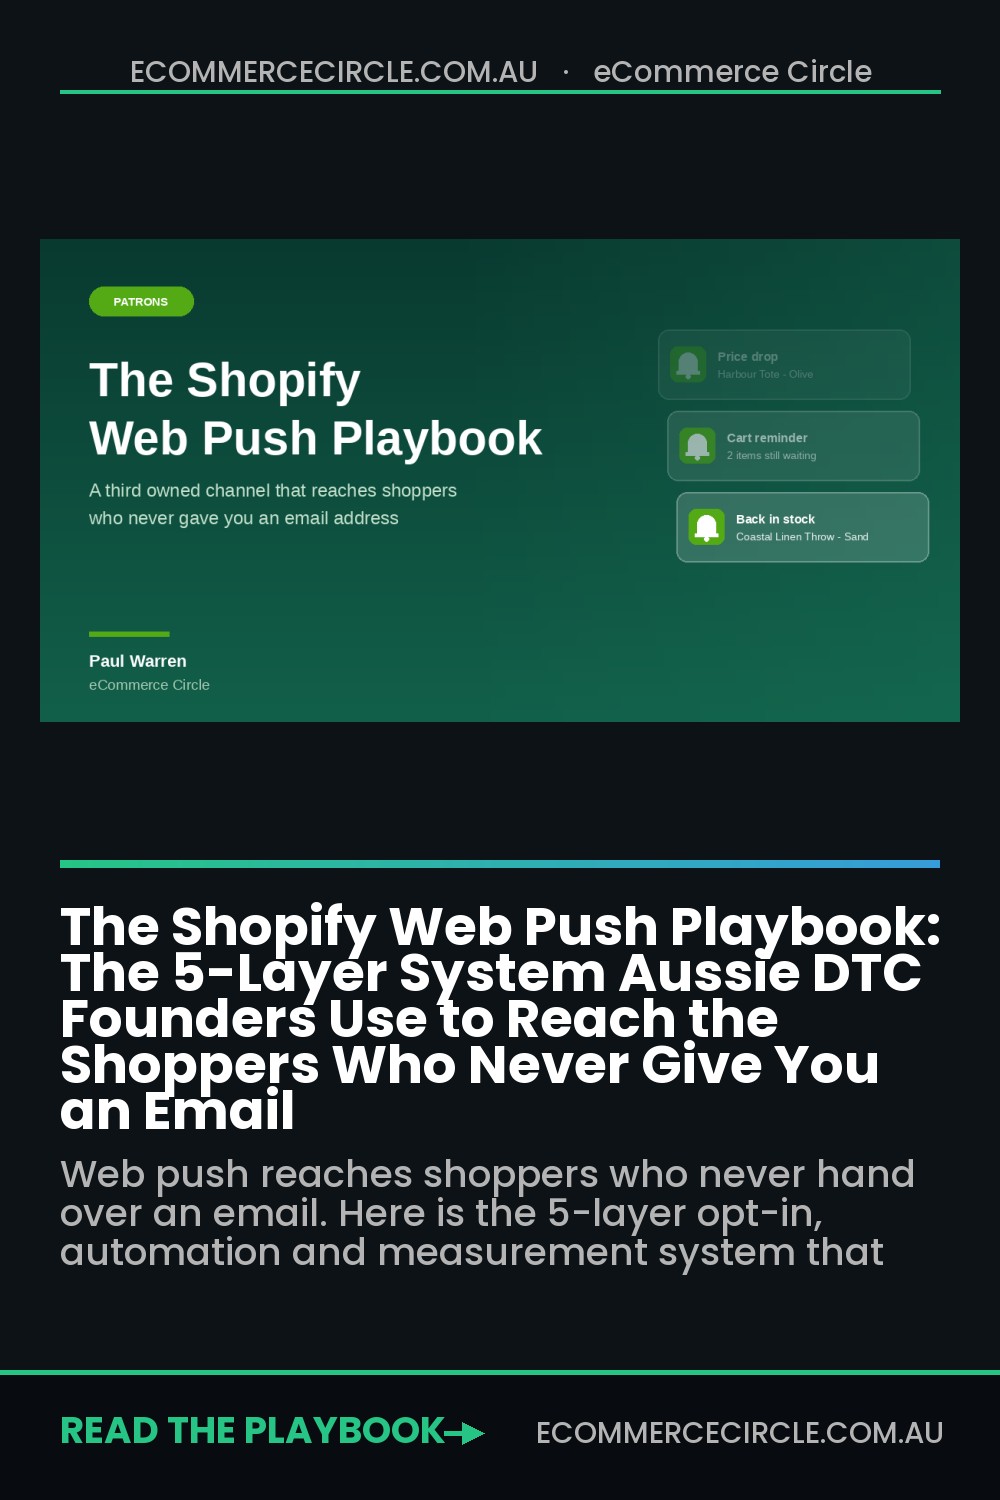
Web push is the channel that closes part of that gap, and almost nobody in Australian DTC runs it properly. It needs no email address, no phone number and no personal data at all. A shopper taps Allow once, and you have a direct line to their device until they take it away.
The numbers are not small. Ishka, the Australian homewares brand with 38 stores and a Shopify Plus site, ran 30 flash sale campaigns through web push over three months and averaged 2,875.90 AUD in revenue per campaign off roughly 217 clicks each. A smaller brand, Vice City Breaks, pulled more than 77,000 dollars in six months from a list of just 208 push subscribers, with 14% of all orders attributable to push.
Here is what most stores do instead. They install a push app, leave every default switched on, fire the native browser permission prompt at cold visitors within two seconds of landing, collect a 1% opt-in rate and a pile of permanent blocks, then decide push does not work. The channel did not fail. The setup did.
This playbook is the five-layer build we walk Aussie founders through: the opt-in, the automations, the campaign layer, the send discipline, and the measurement. Run all five and push becomes a third owned channel sitting alongside email and SMS. Run one of them and you have a notification nobody asked for.
What Web Push Actually Is (And Where It Does Not Work)
A web push notification is a message delivered by the browser itself, straight to the operating system notification tray. It appears whether or not the shopper has your site open. There is no inbox, no spam folder, no deliverability score to protect and no per-message carrier cost.
That last point matters more than founders expect. Australian SMS runs at real cents per message, so most brands ration it to launches and cart recovery. Push costs effectively nothing per send, which changes what you are willing to test.
The trade-off is reach, and you need to be honest about it before you build. Here is where push lands today:
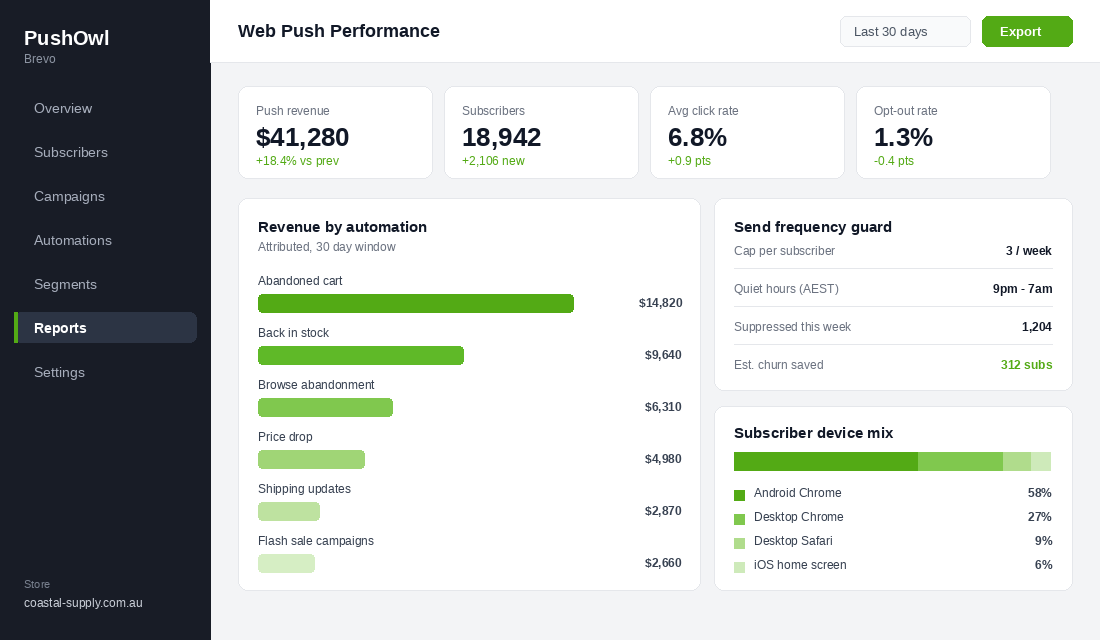
- Android Chrome. Full support, no friction. This is the bulk of your subscriber base and where the revenue comes from.
- Desktop Chrome, Edge and Firefox. Full support on Windows and macOS. Strong for considered purchases where people research on a laptop.
- Desktop Safari. Supported. Smaller share, still worth having.
- iPhone and iPad. This is the catch. Since iOS 16.4 in March 2023, Safari supports web push, but only for sites the shopper has added to their home screen via Share then Add to Home Screen. Safari 18.4 simplified the plumbing with Declarative Web Push, but the home screen requirement stands.
So on a market where the Australia Post eCommerce Report 2026 puts 77% of site visits and 68% of orders on smartphones, a meaningful slice of your mobile traffic is unreachable by push. Plan around it. Push is an Android and desktop channel with an iOS bonus, not a replacement for email.
It is also not a replacement for your email program. Klaviyo data across 183,000 brands has abandoned cart emails converting at 10.7% and earning 3.65 dollars per recipient. Push does not beat that. It stacks on top of it and catches the people email never had.
Layer 1: The Opt-In Primer That Protects Your One Shot
This is the layer that decides whether the other four are worth building. Browser permission is a one-shot request. If a shopper hits Block, the browser locks that decision at the domain level and you cannot ask again. Not next visit, not next month. That subscriber is gone permanently.
Which is why firing the native prompt at a cold visitor is the single most expensive mistake in this channel. You are spending an irreversible ask on someone who has no idea who you are.
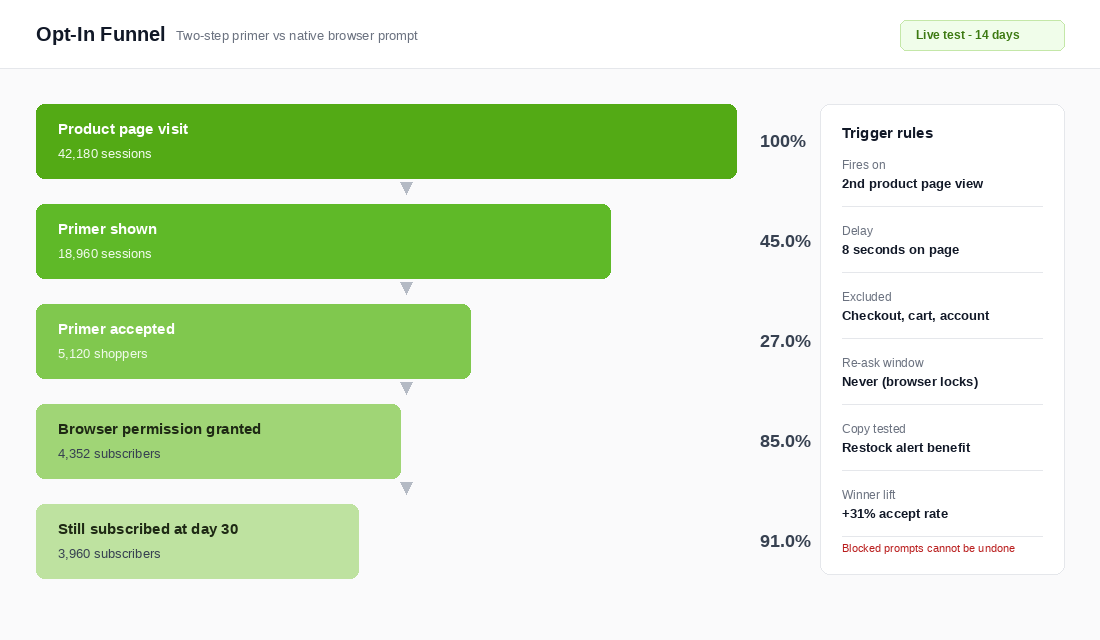
The fix is a two-step primer. You show your own branded panel first, explaining the benefit in one line. Only when the shopper accepts your panel do you trigger the real browser prompt. Anyone who declines your panel never touches the native prompt, so their permission stays available for a future visit when they are warmer.
Set your trigger rules like this:
- Fire on intent, not arrival. Second product page view, or a return visit. Not the homepage, not the first three seconds.
- Add a delay of 5 to 10 seconds on page. Instant prompts get dismissed reflexively. Eight seconds is a solid starting point.
- Exclude cart, checkout and account pages. Never interrupt someone who is already buying.
- Lead with a specific benefit. “Get an alert the moment your size is back” beats “Subscribe to notifications” every time. The benefit you promise should match an automation you actually built.
- Suppress on repeat declines. If someone dismisses your primer twice, stop asking for 90 days.
Done well, a primer on an intent trigger converts around 25 to 30% of the people who see it, and roughly 85% of those accepts convert into a granted browser permission. That produces a steady-state opt-in of about 5% of total sessions for a typical ecommerce store, with well-optimised setups reaching 10 to 15%.
Quality beats volume here. A subscriber who opted in because they wanted restock alerts on a specific product is worth several times a subscriber who tapped Allow to make a popup go away. The first group clicks. The second group churns and drags your averages down.
Layer 2: The Four Automations That Earn Most of the Money
This is where the channel pays for itself. Across the combined PushOwl and Omnisend ecommerce benchmark data, automated push accounts for only about 5% of total sends but drives 28% of all push-attributed orders. Build the automations before you send a single campaign.
Four flows do the heavy lifting. Build them in this order.
1. Abandoned checkout push
Baymard’s meta-analysis of 50 studies puts the documented cart abandonment rate at 70.22%. Your email flow already chases those people. Push chases the ones who never gave you an email, which on most stores is the majority of abandoners.
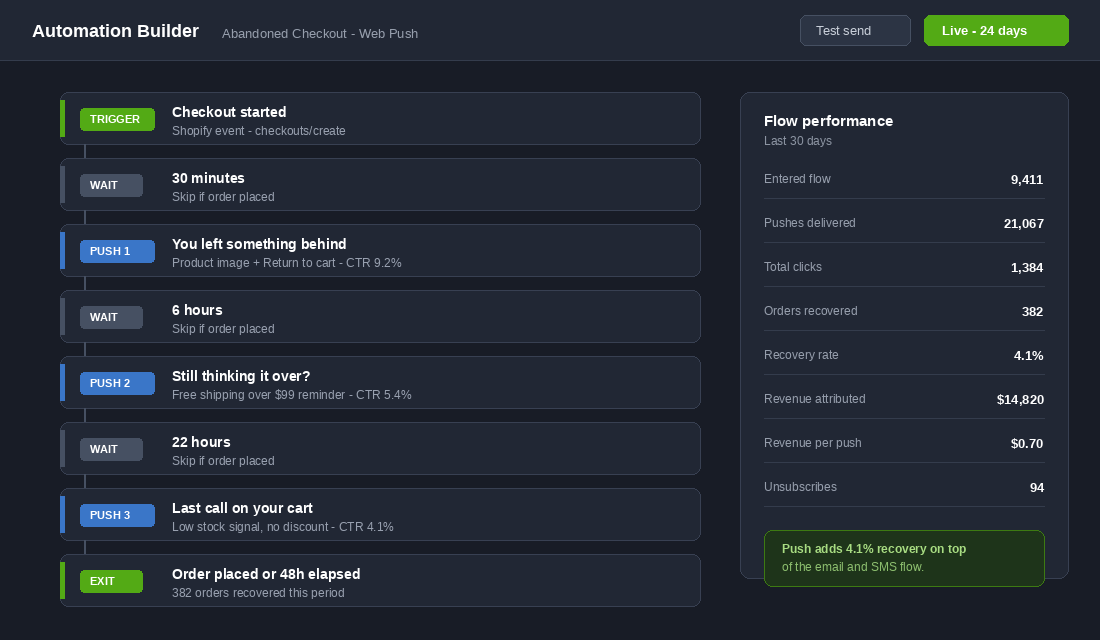
A three-message sequence works: 30 minutes, 6 hours, then 22 hours. First message carries the product image and a plain return-to-cart line. Second reminds them of a real reason to finish, like your free shipping threshold. Third is a last call with a genuine low-stock signal if you have one, and no discount. Expect 2 to 5% recovery on top of whatever email and SMS already deliver.
Pair this with your existing abandoned cart recovery flow so the two channels do not send the same message within the same hour.
2. Back-in-stock alerts
This is the highest-intent message in the whole channel and the easiest opt-in you will ever collect. Someone taps a Notify Me button on a sold-out variant. They have told you exactly what they want, at the price they already accepted.
Fire within 60 seconds of the restock, name the specific variant, and let the link land on the product page with the variant preselected. Do not batch these into a morning digest. The whole value is speed. If you have not built the surrounding system yet, start with the back-in-stock system and bolt push onto it.
3. Browse abandonment
Someone viewed a product two or three times across separate sessions and did not add to cart. That is a considered purchase stalling, not a bounce. A single push 24 hours later that surfaces the product plus a piece of proof, such as a review count or a size guide link, converts far better than founders expect.
One message. Not a sequence. If it does not land, they were not ready.
4. Price drop and low stock alerts
Two automations off the same trigger family. Price drop fires when a product a subscriber viewed goes on sale, which is how you clear slow stock without emailing your whole list a discount. Low stock fires when a viewed variant drops below a threshold you set, usually five units.
Both only work if they are true. A false scarcity signal will cost you more in trust than it earns in orders, and under Australian Consumer Law a misleading scarcity or sale claim is a real compliance exposure, not just a brand risk.
A fifth automation is worth adding once the first four are live: shipping and delivery updates. These earn some of the highest click rates in the channel because people genuinely want them, and they build the habit of tapping your notifications, which lifts every promotional message that follows.
Layer 3: The Campaign Layer, Where Flash Sales Live
Automations run in the background. Campaigns are the manual sends, and push has one structural advantage over email here: it arrives instantly, on the lock screen, with no inbox competition. That makes it the best channel you own for anything genuinely time-boxed.
The Ishka approach is the clearest template. They had slow midweek trading, so they ran a 12-hour Wednesday sale, alternating between a 50% coupon on one product and free shipping storewide, and pushed it to subscribers with an expiry set so the message stopped sending the moment the window closed. Thirty campaigns over three months, averaging 2,875.90 AUD each.
The campaigns worth sending:
- Time-boxed flash sales. Under 24 hours. Always set an expiry so late deliveries do not send people to a dead offer.
- Product drops and restock waves. Push beats email on drop day because the whole point is arriving first.
- Final hours reminders. The last-day push on a sale that has been running for a week routinely outperforms the launch push.
- Sold-out and back-again news. Treat a big restock as an event, not an inventory update.
What is not worth sending: a weekly newsletter equivalent, restocks of low-demand SKUs, blog posts, and anything that would be fine as an email. Push interrupts. Only spend it on things that deserve an interruption.
Heading into peak, this becomes your Boxing Day and Black Friday hour-by-hour channel. Aussie shoppers spent a record 82.6 billion dollars online in 2025, up 14% year on year, and the competition for inbox attention in late November is brutal. A notification on the lock screen does not queue behind 40 other emails.
Layer 4: Segmentation and Send Discipline
Push has an unforgiving failure mode. There is no unsubscribe link that quietly removes someone from a list. A subscriber who gets annoyed turns off notifications at the browser or OS level, and you never get them back. Over-sending does not reduce engagement. It destroys the asset.
So build guardrails before you build volume.
- Cap promotional sends at 2 to 3 per subscriber per week. Transactional messages like shipping updates sit outside the cap.
- Set quiet hours. Nothing promotional between 9pm and 7am local time. Push wakes phones up. Respect that.
- Suppress recent purchasers. Anyone who bought in the last 72 hours should not get a discount push on the thing they just paid full price for.
- Segment by behaviour, not demographics. Viewed a collection, abandoned in the last 30 days, purchased more than 90 days ago, spent above your AOV. These are the segments that change what you send.
- Sunset the dead. Subscribers with zero clicks across 20 consecutive sends are inflating your list and deflating your rates. Move them to a low-frequency segment.
Track opt-out rate as a leading indicator. Under 2% per campaign is healthy. Above 4% means your frequency, your targeting or your offer is wrong, and you are burning subscribers you cannot replace.
Segmentation also improves the raw numbers. A well-targeted ecommerce push should click at 4 to 8%, with 10% and above marking an excellent send. The all-industry average sits closer to 2.25%. The gap between those two numbers is almost entirely targeting and offer relevance.
Layer 5: Measuring Push Honestly
Push apps report attributed revenue generously by default. Most use a click-based window of 7 days or more, which means a subscriber who clicked a push on Monday and bought on Friday after seeing a Meta ad gets counted fully to push.
Do not run your channel decisions off that number. Track four things instead.
- Revenue per subscriber per month. The only number that tells you whether the list is an asset. Total push revenue divided by active subscribers. Watch the trend, not the absolute.
- Revenue per push sent. Divides the vanity out of big sends. If it falls as you increase frequency, you have found your ceiling.
- Incremental recovery rate on the cart flow. Turn push off in the abandoned checkout flow for 20% of eligible traffic for two weeks. The difference in recovery between the two groups is your real number.
- Opt-out rate per campaign. Your early warning that frequency has outrun value.
Tighten the attribution window to 24 or 48 hours for click-based conversions. It will make the reported number smaller and far more useful. A push list of 15,000 producing 2 to 4 dollars per subscriber per month is a genuinely good outcome, and you want to know if you are actually there.
If you cannot turn a channel off for two weeks and see the difference in total revenue, you do not know what it is worth. You only know what its reporting says.
How to Set This Up in an Afternoon
The tool most Aussie Shopify stores land on is PushOwl, now part of Brevo. It has a free tier that covers 500 notification impressions a month with unlimited subscribers, which is enough to build and validate the whole system before you pay anything. Paid plans start around 19 US dollars a month for 10,000 impressions.
Klaviyo does not offer browser push natively, so if you run Klaviyo for email and SMS you are adding push as a separate app rather than another channel inside the same tool. Plan the coordination manually.
The build order:
- Install and verify. Add the app from the Shopify App Store and confirm the service worker is registering. Open your storefront in Chrome, open DevTools, go to Application then Service Workers, and check for an active worker.
- Switch off the default prompt. Every app ships with an aggressive on-load native prompt enabled. Turn it off before a single visitor sees it.
- Build the primer. Set the trigger to second product page view with an 8 second delay. Write the benefit line to match a real automation. Exclude cart, checkout and account pages.
- Turn on abandoned checkout. Three messages at 30 minutes, 6 hours and 22 hours. Add the exit condition on order placed so nobody gets chased after buying.
- Turn on back in stock. Enable the Notify Me button on sold-out variants across your catalogue, and set the alert to fire immediately on restock.
- Add browse abandonment and price drop. Single message each. Set the low stock threshold to a number that is actually true for your fulfilment.
- Set the guardrails. Frequency cap, quiet hours in AEST, recent purchaser suppression. Do this before your first campaign, not after your first complaint.
- Send one test campaign. A single time-boxed offer to your whole list. Record click rate, revenue and opt-out rate. That is your baseline.
Two things to check on day one that people miss. First, your notification icon renders at 192 by 192 pixels on most devices, so a wordmark will be illegible. Use the mark, not the logotype. Second, if you run a headless or custom-domain setup, confirm the service worker is served from your root domain or push will silently fail on a subset of browsers.
The 30-Day Web Push Build Sheet
Copy this into your project tool and work it week by week. Nothing here needs a developer.
Week 1: Foundation
- Install push app, verify service worker is active
- Disable the default native prompt
- Build and publish the two-step primer on a second product page view trigger
- Exclude cart, checkout and account pages from the prompt
- Set frequency cap at 3 per week and quiet hours 9pm to 7am AEST
Week 2: The money automations
- Abandoned checkout, 3 messages at 30 minutes, 6 hours, 22 hours
- Back in stock, Notify Me enabled catalogue-wide, instant send on restock
- Exit conditions set on order placed for every flow
- Coordinate timing against your existing email and SMS flows
Week 3: Depth and discipline
- Browse abandonment, single message at 24 hours
- Price drop and low stock alerts with honest thresholds
- Shipping and delivery update notifications live
- Behaviour-based segments built: abandoners, lapsed buyers, above-AOV spenders
- Recent purchaser suppression rule active
Week 4: Prove it
- One time-boxed campaign sent, results recorded
- Attribution window tightened to 48 hours
- Holdout test started on the abandoned checkout flow
- Baseline logged: revenue per subscriber, revenue per push, opt-out rate
- Peak season campaign calendar drafted for October through December
Why the Layers Compound
Look at what happens when the five layers run together, because the value is not additive.
A clean primer on an intent trigger produces subscribers who actually want your alerts. Those subscribers click at the top of the benchmark range instead of the bottom, which makes every automation more profitable per send. Higher engagement means you can send a little more without the opt-out rate moving, which gives the campaign layer more room. More room in the campaign layer means more revenue per subscriber, which makes the list worth investing in growing.
Then it feeds the rest of your stack. A back-in-stock push subscriber who buys becomes an email subscriber at checkout. That email subscriber becomes a logged-in account holder if your customer accounts playbook is doing its job. Now you have three channels on one customer instead of one, and the cost of reaching them for the second purchase drops to near zero.
Run it the other way and the same compounding works against you. A blasted native prompt gives you low-quality subscribers who never click. Low click rates push you to send more to hit the same revenue. More sending drives opt-outs. Opt-outs are permanent, so the list shrinks and your only lever is sending harder to the people left.
Same app, same catalogue, same audience. The difference is entirely in the build.
Most Aussie stores at 40k to 500k a month have a push app installed and switched on with defaults. If that is you, the fastest win in your entire marketing stack this quarter is spending one afternoon on layers 1, 2 and 4 before peak season arrives.
The Stacking Rules: Push, Email and SMS Without Hitting the Same Person Three Times
Here is the failure nobody plans for. A shopper abandons checkout at 7.10pm. At 7.40pm they get a push. At 8.10pm Klaviyo sends the abandoned cart email. At 9pm an SMS lands. Three nudges in two hours for one $60 cart, and the shopper who was probably coming back tomorrow now unsubscribes from all three. Once you add push to a store that already runs email and SMS, channel orchestration is not optional.
Four rules keep the stack polite and profitable:
- One trigger, one lead channel. Decide which channel owns each event. Push takes the first abandoned checkout nudge because it is cheapest and fastest (30 to 60 minutes). Email takes the second touch at 24 hours because it can carry the full cart, reviews and a guarantee. SMS is reserved for the final touch at 48 to 72 hours, and only if the cart is over $80, because at 8 to 12 cents a send it needs a real order behind it.
- Suppress across channels, not just within them. If the shopper opened the push and returned to the cart, the email should not fire as a “you forgot something.” Most push tools (PushOwl, Firepush, Aimtell) can write a Klaviyo profile property or event on click. Use it as a flow filter so email picks up where push left off rather than repeating it.
- Cap total touches per week. Across all three channels, a subscriber should get no more than five marketing touches in seven days unless they are mid-flow. Set push frequency caps in the app, email caps in Klaviyo’s smart sending, and treat SMS as one touch a week at most. Stores that go past this see opt-out rates climb from a healthy 0.2 to 0.3% per campaign to over 1%, and a lost push subscriber costs you the whole channel for that browser.
- Let people choose. A preference centre that includes push and SMS alongside email cuts unsubscribes noticeably, because “send me less” beats “send me nothing.” Link it from every push campaign landing page and from the SMS opt-out reply.
Measure the stack, not the channel. Run the abandoned checkout sequence as push then email then SMS for one month and log recovered revenue per 100 abandoned checkouts. A well-tuned three-channel sequence on an Aussie store recovers 8 to 12% of abandoned checkouts, versus 4 to 6% for email alone. If your combined number is not clearly higher than email alone was, the channels are cannibalising each other and the fix is almost always longer gaps between touches, not more messages.
The same logic applies to browse abandonment, which is the flow most likely to feel like stalking when three channels run it at once. The browse abandonment playbook covers the thresholds for when a browse actually deserves a follow-up. As a rule, push is the only channel that should touch a single product view; email and SMS wait for two or more views or a return visit.
Inside eCommerce Circle, owned channel architecture is one of the core pillars we work on with every member, and web push is usually the gap nobody has looked at. If you want a second opinion on yours, let’s talk. If you want to see which of the 10 P’s is capping your orders right now, take the free More Orders Scorecard. It takes two minutes and tells you exactly where to start.