Your product catalogue knows the answer to almost every question a shopper asks before they buy. What is it made of? Will it fit in my bag? Is it made here? How long is the warranty? How heavy is it? You know all of it. It is sitting in a supplier spec sheet, a Google Doc, or your head.
What’s in This Article
What it is not sitting in is your Shopify product data. So the shopper cannot filter by it, your theme cannot show it, your Google feed cannot carry it, and your support inbox cops the question instead. Baymard Institute research found that 30% of shoppers abandon because of insufficient or inappropriate product information, and that sites with mediocre product list usability see abandonment as high as 67 to 90%, compared with 17 to 33% on sites with even slightly better filtering tools.
Most Aussie founders treat product data as admin. Something the VA does badly on a Friday. The brands that pull ahead treat it as infrastructure. They build it once, in Shopify, in structured fields, and then spend the next two years pointing filters, flows, feeds and AI answers at it. That is the difference between a catalogue and a merchandising system.
This is the six-layer build we run with members. It takes a weekend for a 400-SKU catalogue and it keeps paying for years.
Why Product Data Is a Conversion Asset, Not Admin Work
Shopify gives you a product title, a description, images, price, and variant options. That is it. Everything else about your product, and there is a lot, has nowhere structured to live.
Most stores respond by dumping it into the description as prose. That feels productive. It is close to useless, because prose cannot be filtered, sorted, compared, or reliably parsed by anything downstream. A shopper who wants “merino, relaxed fit, made in Australia, under 600 grams” has to read 40 product pages to find it.
Structured data changes what is possible. Metafields are extra fields you attach to a resource: a product, a variant, a collection, a customer, an order. Think of them as extra columns on your product spreadsheet. Metaobjects are standalone records with their own structure that many products can reference. Think of them as lookup tables.
The practical rule we give members: if the value is unique to the product, it is a metafield. If the same block of content is shared by dozens of products, it is a metaobject that products reference. Material is a metafield. Your “Care and Washing” guide, which 80 products share word for word, is a metaobject. Get that call right and you will never update the same paragraph 80 times again.
Bellroy is the obvious Australian reference point here. Every wallet and bag page carries hard numbers: exact dimensions, weight, what fits inside, material composition, warranty term. It is not marketing copy, it is spec data, and it is the reason their product pages answer questions instead of raising them. Koala does the same on Shopify Plus with mattress and sofa dimensions, firmness ratings and delivery timeframes, which is exactly the data a furniture buyer needs before they will commit to a $2,000 order.
Layer 1: Decide What Questions Your Data Has to Answer
Do not start in the Shopify admin. Start in your support inbox. Every field you build should retire a question you are currently answering by hand.
Pull your last 200 pre-purchase support conversations, whether they are in Gorgias, Zendesk, Shopify Inbox or plain email. Ignore anything about order status. Tally only the questions asked before the sale. You will usually find 6 to 10 questions carrying 80% of the volume.
- Fit and sizing. “Is this true to size?” becomes a Fit metafield plus a shared Size Guide metaobject.
- Material and composition. “Is this cotton or a blend?” becomes a Material metafield with a controlled list of values.
- Provenance. “Is this made in Australia?” becomes a Made In metafield, which is also a strong filter for local buyers.
- Physical specs. Weight, dimensions, capacity. Numeric field types, not text, so you can build range filters.
- Care and compatibility. Washing, storage, what it fits, what it does not.
- Warranty and returns nuance. Where terms differ by product line, this belongs in data, not in a footer page.
Write the list down and stop at ten fields. Founders who start with 40 definitions never finish populating them, and a half-populated field is worse than no field because it produces filters that hide products that actually qualify.
Layer 2: Build the Definitions Properly the First Time
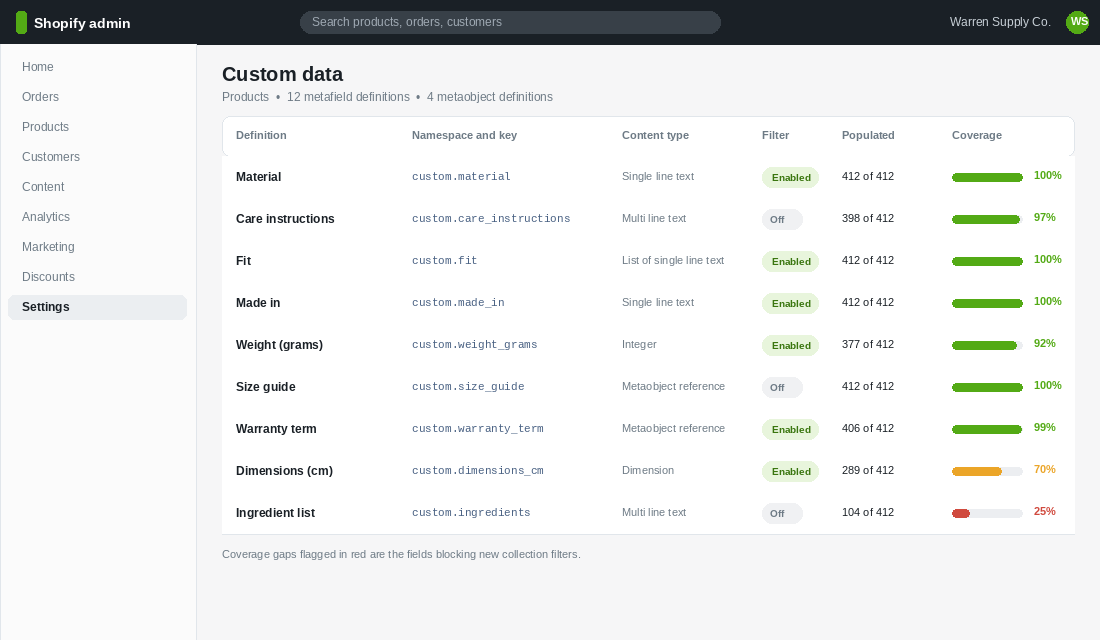
In Shopify admin, go to Settings, then Custom data. Pick the resource (usually Products), then Add definition. Three decisions matter more than the rest.
One: pick the right content type. This is the decision people get wrong, and it is painful to reverse once 400 products are populated. Weight should be Integer or Decimal, not Single line text, or you can never build an “under 600 g” range filter. Fit should be “List of single line text” if a product can be both Relaxed and Oversized. Dimensions has a dedicated Dimension type that carries units. Your size guide should be a Metaobject reference, not a pasted block of text.
Two: constrain the values. On text fields, use the “Choice of preset values” validation and type your allowed list. This is the one setting that matters most in the whole build. Without it you will end up with “Merino”, “merino”, “Merino wool” and “100% Merino” as four separate filter values, and your filter list will look broken. Free text on a filterable field is how catalogues rot.
Three: check “Storefronts” access. A definition that is not exposed to storefronts cannot be read by your theme, by Search & Discovery, or by most apps. Tick it at creation time and save yourself an afternoon of wondering why nothing renders.
Use a consistent namespace. Shopify’s custom namespace is fine for merchant-created fields, and keys should be lowercase with underscores: custom.material, custom.made_in, custom.weight_grams. Putting the unit in the key name stops the “is this grams or kilos?” argument in six months.
You have room to work. Shopify allows up to 256 metafield definitions per resource type, and metaobject definitions are capped at 128 on Basic, Shopify and Advanced plans, rising to 256 on Plus and Enterprise. Metaobject entries now allow up to 1,000,000 per definition, which removed the older plan-based caps of 64,000 and 128,000. You will not hit these. The constraint is your patience, not the platform.
One technical note worth knowing if you have an app or developer writing large payloads: from API version 2026-04 the limit is 128KB for JSON metafields and 64KB for all other types. Apps using JSON fields before 1 April 2026 were grandfathered at the old 2MB limit. Standard product data belongs nowhere near those ceilings, but bulk-imported spec blobs sometimes get close.
Layer 3: Populate 400 Products Without Losing a Week
This is where the project usually dies. Editing metafields one product at a time is soul-destroying and you will stop at product 60. Do not do it that way.
Option one, the free path: the Shopify bulk editor. Go to Products, filter to a group that shares a value (say, a collection or a vendor), select all, then choose Bulk edit. Add your metafield columns to the editor and you can paste values down a column the way you would in a spreadsheet. For a catalogue where whole product lines share the same material and origin, this handles most of the work in an hour.
Option two, for real scale: Matrixify. This is the tool we recommend for any catalogue over roughly 200 SKUs, and the setup is genuinely simple.
- Install Matrixify from the Shopify App Store and open it.
- Run an Export, choose Products, and tick the Metafields option. You get a spreadsheet with one row per product and one column per metafield definition.
- Fill the columns in Excel or Google Sheets. Use lookup formulas to map values from your supplier spec sheet instead of typing. Keep the
IDandHandlecolumns untouched. - Delete every column you are not changing. Matrixify only updates what you send, and a slimmer file imports faster and safer.
- Run Import in test mode first. Read the report. Fix any value that failed validation, which is usually a typo against your preset value list.
- Import for real, then spot-check ten products in the admin.
Set a coverage standard before you start: a field is not live until it is populated on at least 90% of products in the collections where it applies. Below that threshold, turning it into a filter actively hurts you. A shopper filters for “Made in Australia”, your genuinely Australian-made hero product has a blank field, and it vanishes from the results. You have just hidden your best product from your most motivated buyer.
Layer 4: Get the Data Onto the Page
Data nobody sees converts nobody. With Online Store 2.0 themes you can surface most of this without touching code.
Open the theme editor on a product template. Add a block, choose Text or Collapsible row, then click the dynamic source icon (the small database symbol next to the field) and pick your metafield. The theme now pulls that value per product automatically. Collapsible rows are the right home for specs, care and warranty because they keep the page tight while making the detail one tap away.
Three placement rules we apply on every build:
- Purchase-blocking data goes above the fold. Fit, sizing and dimensions belong near the variant picker, not buried in a tab at the bottom.
- Trust and reassurance data goes immediately below the add to cart. Warranty term, made in, returns nuance. This is where hesitation peaks.
- Reference data goes in collapsible rows. Full material composition, care instructions, ingredient lists. Available, not shouting.
If you want the full above-the-fold layout logic, we broke it down block by block in the Shopify product page conversion architecture. Metafields are what make that layout scale past 20 products without a developer.
Layer 5: Turn Your Data Into Filters
This is the layer that shows up in revenue fastest. Filters built on your own product data let a shopper go from 400 products to the 30 that actually suit them in three taps. Fact-Finder’s analysis of faceted search implementations puts the conversion lift at up to 26%, and 61% of visitors abandon a site if they cannot find what they want within five seconds.
The tool is free and it is Shopify’s own. Here is the exact setup.
- Install the Shopify Search & Discovery app from the App Store. No cost, no plan requirement.
- Open the app and go to Filters.
- Click Add filter. Choose your source: a product option, a metafield, or a metaobject. Your populated definitions appear here.
- Name the filter in shopper language, not internal language. “Fabric” beats “custom.material” and “Made in” beats “provenance_iso”.
- Drag the filters into intent order. Whatever your buyers narrow on first goes at the top. For apparel that is usually size and fit, not price.
- Save, then open a collection page on your live storefront and use it on your phone. If it takes more than three taps to get to a shortlist, the order is wrong.
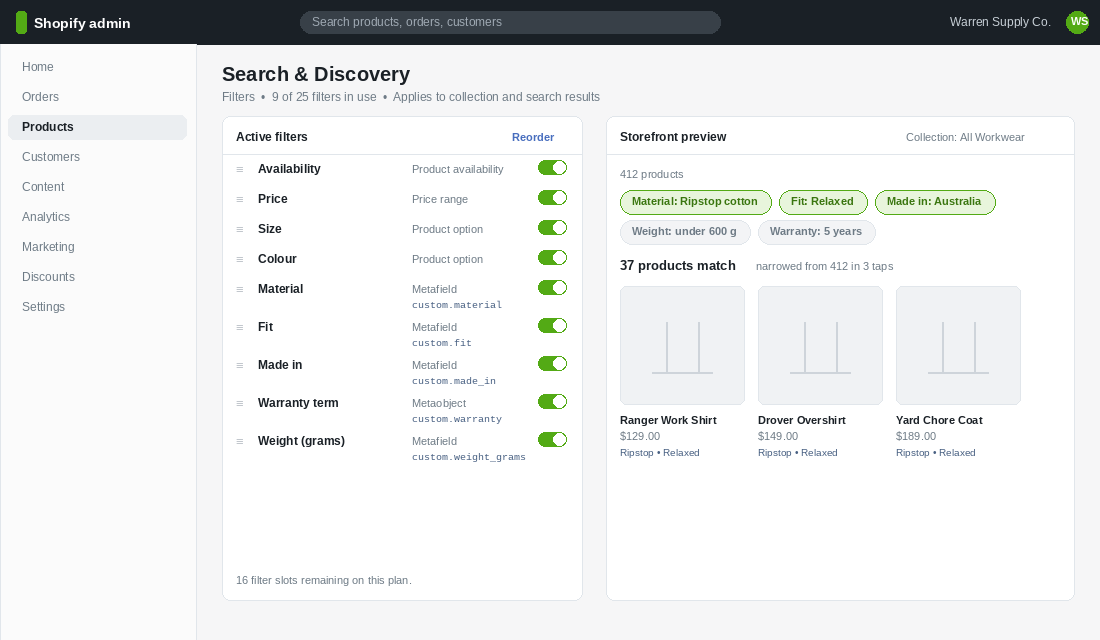
Two constraints to plan around. You get 25 filters in total across standard and custom, which sounds tight until you realise nobody should be shown 25 filters anyway. And collections with more than 5,000 products lose filter support entirely, which is a strong argument for splitting oversized collections rather than letting one “All Products” page carry everything.
Once filters are live, watch which values shoppers actually use and which combinations return zero results. A zero-result combination is not a shopper problem, it is either a gap in your range or a gap in your data. We go deeper on the diagnostics in the Shopify collection filtering playbook.
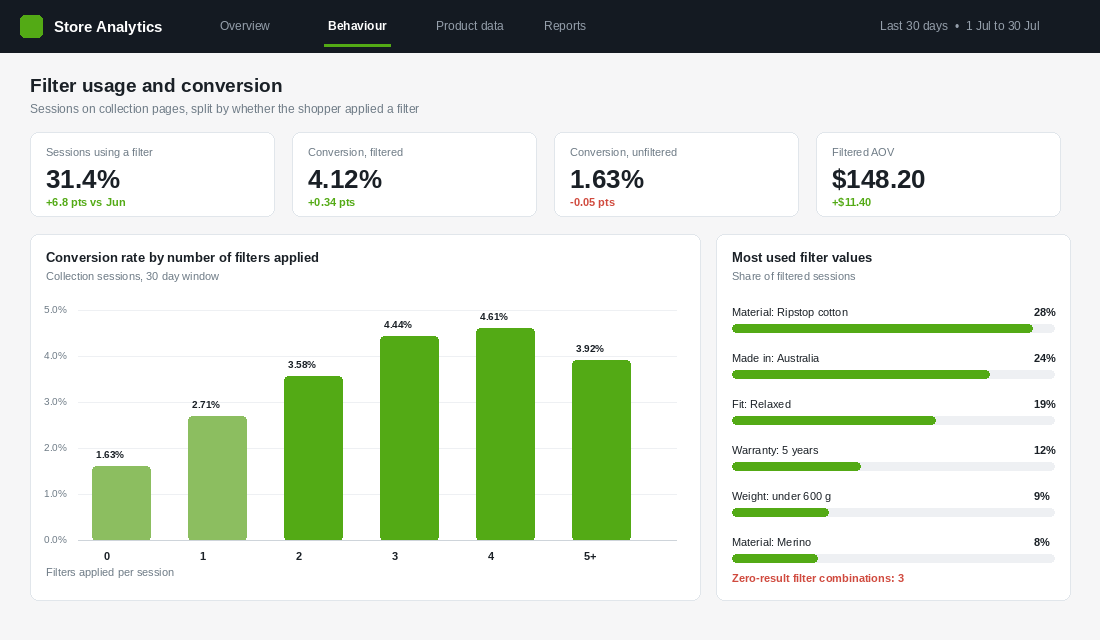
Note the shape of that curve, because it is the pattern we see across member stores. Conversion rises sharply from zero to three filters, plateaus at four, then falls at five or more. Shoppers who over-narrow hit empty or near-empty result sets and bail. That is your cue to cap the filter list and make sure your top filters carry deep inventory behind every value.
Layer 6: Spend the Same Data Five More Times
Here is where the build stops being a filter project and starts being infrastructure. The same fields you populated once now feed everything else you run.
- Google Shopping feed. Map your Material, Made In and Weight metafields into the corresponding Merchant Center attributes. Richer feed data improves matching on long-tail queries, and weight fixes the shipping estimates that get feeds disapproved.
- Site search. Metafield values become searchable and boostable in Search & Discovery, so someone typing “merino relaxed” finds the right products instead of nothing.
- Email and SMS. Klaviyo can pull product metafields into templates. A back-in-stock email that carries the fit and material next to the image gets clicked more than one showing a bare image and price.
- Support macros. Every field you populate is a question your team stops answering manually. That is the cheapest headcount saving in the business.
- AI answer engines. Structured specs on the page are what ChatGPT, Perplexity and Google AI Overviews can actually parse and cite. Prose buried in a description does not compete. If that channel matters to you, our AEO playbook covers how citation actually works.
None of those five require new work. They require the data to exist in a structured form. That is the whole argument.
The Compound Effect: One Build, Five Channels, Zero Repeat Work
Run the maths on a $150k per month store doing a 2% conversion rate. Filters that lift collection-page conversion by even 15% on the third of sessions that use them is roughly $7,500 a month in extra revenue, with no added ad spend. Fewer pre-purchase support tickets. Fewer returns from shoppers who bought the wrong fit because the spec was not on the page. A cleaner Google feed. Product pages that AI tools can actually quote.
The reason so few stores do this is that it looks like data entry and feels like nothing. There is no dopamine hit in populating a Material field on 412 products. But this is the kind of work that keeps compounding while your competitors keep buying traffic to send at product pages that cannot answer a basic question.
Build it once. Point five channels at it. Then leave it alone except to add the new SKUs.
Your 90-Minute Product Data Audit
Block out a morning and work through this in order. Do not skip to layer five, because filters built on thin data make your store look worse, not better.
- Minutes 0 to 20. Pull your last 200 pre-purchase support conversations. Tally the recurring questions. Write down the top ten.
- Minutes 20 to 30. Open Settings, then Custom data. List what already exists. Note which definitions are exposed to storefronts and which are not.
- Minutes 30 to 45. Decide metafield or metaobject for each of your ten. Shared content becomes a metaobject. Product-specific values stay metafields.
- Minutes 45 to 60. Create the definitions. Correct content type, preset value lists on anything you plan to filter, storefront access ticked.
- Minutes 60 to 75. Export with Matrixify or open the bulk editor. Populate one field completely across the whole catalogue before starting the next one.
- Minutes 75 to 85. Check coverage. Anything under 90% does not become a filter yet.
- Minutes 85 to 90. Install Search & Discovery. Turn on filters for the fields that cleared 90%. Test on your phone.
Then set one recurring rule for the team: no product goes live with an empty required metafield. Put it in the product-launch SOP. That single rule is what stops the catalogue drifting back into a mess within six months.
The Five Metafield Mistakes That Cost Aussie Stores the Most
Most metafield projects do not fail at the build. They fail six months later, when the structure quietly stops matching the catalogue. These are the five failures we see most often, and what each one actually costs you.
- Using single line text where a list of values belongs. Free text means “Merino Wool”, “merino wool” and “100% Merino” all become separate filter options. Once that happens, Search & Discovery renders a filter nobody can use and shoppers stop trusting it. Preset value lists on anything filterable, every time, no exceptions.
- Building definitions without storefront access ticked. The data populates perfectly, the theme shows nothing, and someone spends an afternoon debugging Liquid that was never the problem. Check the storefront access box at definition time.
- Coverage below 90% turned into a live filter. If only 60% of products carry a “Fabric” value, filtering on fabric hides 40% of your catalogue from anyone who uses it. That is a direct revenue cut dressed up as a feature. Populate first, filter second.
- No launch rule, so the structure decays. A catalogue that was 95% complete at launch drifts to 70% within two quarters because new products ship with empty fields. One line in the product-launch SOP prevents the entire problem.
- Duplicating shared content as metafields instead of metaobjects. If forty products share the same care instructions, storing that text forty times means forty edits when the wording changes. Metaobjects exist precisely for this, and the difference shows up the first time legal asks you to change a claim.
Run these five as a checklist against your existing setup before you build anything new. Fixing a structural mistake on 400 products is a morning’s work today and a fortnight’s work once three channels are reading from it. The same discipline underpins good collection filtering, and it is what makes the rest of the six-layer build hold its shape.
The Limits Nobody Mentions Until You Hit Them
Metafields feel free until the day they are not. Know the ceilings before you design your data model, because migrating a naming convention across 4,000 SKUs is a job nobody enjoys twice.
- Definitions per resource. Shopify allows a few hundred metafield definitions per resource type. That is generous, but it is not infinite, and stores that create one definition per product variant attribute burn through it fast.
- Value size. A single metafield value caps out well below what people expect when they try to store full HTML blocks. Rich text and long descriptions belong in a dedicated field type, not stuffed into a single line text field.
- Namespace discipline. Once an app writes to a namespace, you do not own it. Keep your own data under a namespace you control, such as your brand name, and never write into an app namespace even when it looks convenient.
- Type changes are one-way in practice. Converting a definition from single line text to a list or a reference type usually means recreating it and re-importing every value. Pick the type once, deliberately.
The practical rule: sketch your full metafield schema in a spreadsheet before you create a single definition in Shopify. Columns for namespace, key, type, which templates use it, and whether it needs to be filterable. Twenty minutes of planning saves a rebuild.
The Bulk Editing Stack That Makes Metafields Survivable
Entering metafields one product at a time is how these projects die at product 60 of 900. Three tools do the heavy lifting on Australian stores.
Matrixify is the workhorse for bulk import and export. Export your catalogue to a spreadsheet, fill the metafield columns, import it back. It handles thousands of rows and gives you a rollback file, which matters the first time you import the wrong column mapping.
Shopify bulk editor is built in and free. It is fine for editing one metafield across a filtered set of products, and it is the fastest option when you are correcting a small batch rather than loading a new field.
Shopify Flow handles the ongoing part. Set a rule so that when a product is tagged a certain way or a variant hits a stock threshold, the relevant metafield updates automatically. This is what stops your data drifting out of date three months after launch.
Budget realistically. A 500-SKU catalogue with six metafields per product is roughly a day of focused work to populate properly, plus a half day to QA. Brands that try to squeeze it into an afternoon end up with 70% coverage, which is worse than none because your filters then silently hide products.
The Rollout Order That Avoids a Rebuild
Do it in this sequence and you will not have to unpick anything. First, define the fields and populate the data. Second, verify coverage is at or near 100% on the products that matter, because a filter built on 60% coverage will make your best sellers disappear. Third, wire the fields into collection filtering. Fourth, surface them on the product template. Last, expose them to search and to structured data.
The temptation is to build the visible template work first because it is the part you can show people. Resist it. Every store that starts with the template ends up rewriting it once the data model changes underneath, and the data model always changes once real product data meets it.
Inside eCommerce Circle, product data architecture is one of the Platform pillars we work on with every member, usually right before a filtering or search project. If you want a second opinion on yours, let’s talk.