Most Aussie founders I speak to think their Meta catalogue ads are a creative problem. Their retargeting is soft, their Advantage+ campaigns will not scale past a certain spend, and the instinct is always the same: brief more creative, test more hooks, hire another editor.
What’s in This Article
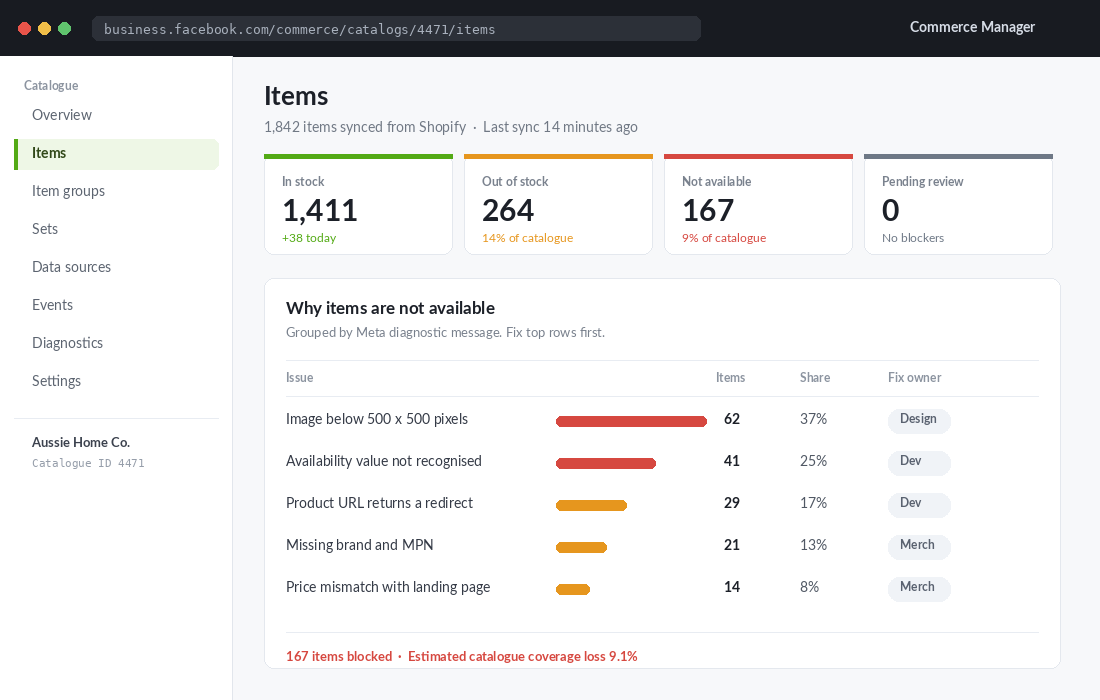
Then we open Commerce Manager together and find 167 products sitting in “Not available”. Nine per cent of the catalogue is invisible to the algorithm. Half the images are below Meta’s resolution floor. Nobody has ever touched a custom label, so a clearance line with 4% contribution is bidding against the hero product with 61% contribution, and Meta has no idea there is a difference.
That is not a creative problem. That is a data problem, and it is the cheapest fix in your entire ad account. Advantage+ Shopping campaigns average 4.52x ROAS against 3.70x for manual campaigns, and retargeting through a dynamic catalogue typically returns 6x to 12x.
But those numbers assume Meta can actually see and rank your products. A dirty feed means you pay premium CPMs to show the wrong items to the right people.
This is the seven-layer audit I run on a Shopify catalogue before I let anyone touch the creative. It takes about half a day the first time and twenty minutes a month after that.
Why the catalogue matters more in 2026 than it did two years ago
Australians spent 82.6 billion dollars online in 2025, up 14% year on year, and 24% of all retail spend now happens online. That sounds like a rising tide. Look closer and it is a knife fight.
The Australia Post eCommerce Report 2026 found spend went up while basket sizes went down. Shoppers made four more purchases than the year before, from more brands, and eight in ten are actively hunting for the best deal. They are buying more often and committing less each time.
That behaviour is exactly what catalogue ads are built for. Someone views three products, leaves, comes back four days later, buys one. The catalogue is what carries that memory. If your feed is broken, Meta shows them a generic brand ad instead of the exact item they were looking at, and you have handed the sale to whoever did their homework.
Meanwhile Meta has moved almost all of its delivery to automated products. You no longer choose which product to show. You choose what goes into the pool and how good the data is. The control point moved from targeting to feed quality, and most brands have not caught up.
Layer 1: Fix availability before you touch anything else
Open Commerce Manager, go to Catalogs, select your catalogue, open the Items tab and filter by Availability: Not Available. Click into any blocked item and Meta will tell you in plain English why it is out.
Founders confuse two things here, and the distinction matters. Out of stock means Meta knows the SKU exists and inventory is zero. That fixes itself when you replenish. Not available is much broader. It covers stock, plus URL problems, image problems, price problems and policy problems.
Out of stock is a merchandising issue. Not available is usually a bug.
The most common cause on Shopify is the availability value itself. Meta accepts exactly four values:
in stockout of stockavailable for orderdiscontinued
Anything else fails at parse time. If you run a third-party feed app or a custom export and it is pushing Shopify’s own active and draft values, or WooCommerce-style instock and outofstock from a legacy migration, Meta rejects the row before it ever reaches the auction. The native Facebook and Instagram sales channel handles this correctly. Custom exports frequently do not.
Two more traps worth knowing. Products that continue selling when out of stock in Shopify should map to available for order, not in stock, or you will run ads to a product page that promises immediate dispatch you cannot deliver. And products on a preorder tag need their own treatment, because a customer clicking a catalogue ad expecting delivery this week and landing on a February shipping notice is a refund waiting to happen.
The fix: filter Not Available, group the diagnostic messages, and fix by root cause rather than item by item. One mapping error usually explains dozens of blocked SKUs.
Layer 2: Get every image above the resolution floor
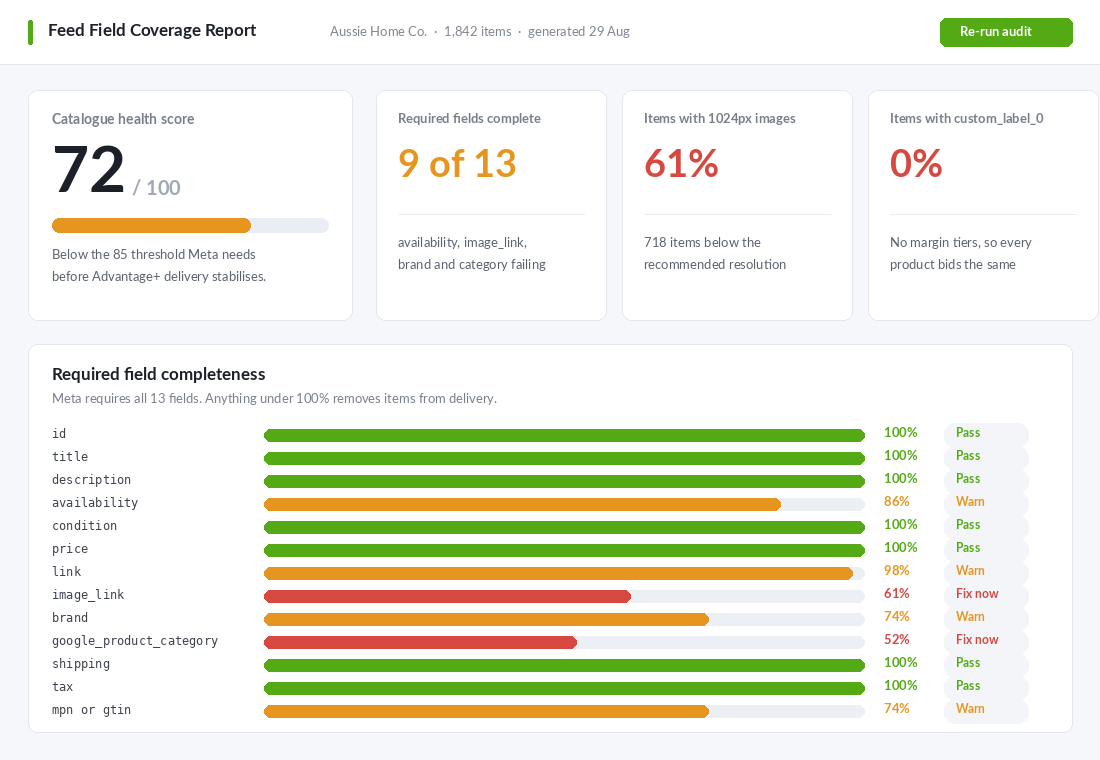
Meta’s hard minimum is 500 by 500 pixels. That is the floor for acceptance, not the target for performance. The practical target is 1024 by 1024 or larger, because catalogue ads get cropped into square, vertical and story placements automatically, and a low-resolution source turns to mush the moment Meta resizes it.
This is the single most common blocker I find on Australian Shopify stores, and it is almost always historical. The brand launched five years ago, shot the first fifty products on a phone, and those images are still sitting in the catalogue while everything shot since 2023 is beautiful. Meta does not care that your new range looks great. It quietly stops serving the old SKUs.
Think about how this compounds for a brand like Bared Footwear, the Melbourne footwear label that sells the same style across multiple widths and a dozen colourways. One style can generate forty or more variants. If the parent product image is weak, every one of those variants inherits the problem. Fixing one photo repairs forty rows in the feed.
Three rules that make the difference:
- Square source, always. Upload 1200 by 1200 minimum. Let Meta crop down rather than scale up.
- Product fills 70 to 80% of the frame. Catalogue ads render small in feed. A product floating in white space at thumbnail size reads as nothing at all.
- No text overlays baked into the primary image. Sale badges and shipping promises burned into the image file will follow that product into every ad, long after the promotion ends.
If you are running a large catalogue, sort your Shopify products by created date, pull everything older than two years, and audit that batch first. That is where the failures cluster.
Layer 3: Close the gap between the feed link and the landing page
The link field is where a surprising amount of budget quietly evaporates. Meta crawls that URL. If it returns a redirect, a 404, or a non-HTTPS response, the item gets flagged and delivery suffers.
Redirects are the usual culprit on Shopify. You rename a product, Shopify creates a redirect from the old handle, and if your feed was built from a static export it is still pointing at the old URL. The customer still lands on the right page, so nothing looks broken from the outside. But every click now pays a redirect hop, load time goes up, and Meta’s crawler flags the mismatch.
Price mismatch is the other one, and it is worse because it costs you trust as well as delivery. Feed says 89 dollars, page says 99 dollars, customer bounces and never comes back. This happens most often around sale periods, because the feed sync lag is real. Both Shopify and Meta feed methods carry a sync delay of anywhere from 15 minutes to 24 hours, and after you push fixes the catalogue rebuilds over roughly 4 to 12 hours.
That lag has a practical consequence most brands learn the hard way during a flash sale. If you drop prices at 9am and launch ads at 9:05am, you are advertising yesterday’s prices. Set your discounts the night before, confirm the catalogue has rebuilt, then turn on spend. The same discipline applies at the end of a sale, where the risk flips: you are advertising a discount you no longer honour.
If you have gone through a theme migration or a URL restructure recently, this layer deserves an hour on its own. The same principle applies to your Google feed, and I have covered that side of it in the Shopify Google Shopping feed playbook.
Layer 4: Write titles for the algorithm, not for your website
Your product titles were written for your collection page, where the customer already has context. In a catalogue ad they appear cold, next to a small image, in someone’s feed between a mate’s holiday photos and a news post. “The Alma” means nothing there.
Meta uses the title and description to understand what the product is and who to match it with. Generic titles produce generic matching. The structure that works:
- Brand, then product type, then key attribute, then style name. “Bared Footwear Leather Ankle Boot, Wide Fit, The Alma” beats “The Alma” every time.
- Front-load the first 40 characters. That is roughly what shows before truncation in most placements.
- Use the words customers search, not your internal naming. If your team calls it a “shacket” and your customers call it an overshirt, put the customer’s word first.
- Skip the marketing adjectives. “Luxurious”, “premium” and “iconic” carry no matching signal and eat your character budget.
The description field matters less for display and more for classification. Use the first sentence to state plainly what the product is and what it is for. Save the brand story for the product page.
On identifiers, Meta is more forgiving than Google. Meta requires one of brand, MPN or GTIN, whereas Google generally insists on a GTIN for branded goods. If you are an Australian brand manufacturing your own range, populate brand and MPN and you are compliant. Do not invent barcodes to satisfy a validator.
One caution for anyone with a heavy variant structure. Every colour and size combination becomes its own catalogue row, which means a badly structured product can flood your feed with near-duplicate items competing against each other. If that sounds like your store, the Shopify variant architecture guide is the prerequisite to this whole exercise.
Layer 5: Build product sets on profitability, not on collections
This is the layer that separates brands making money on catalogue ads from brands making revenue on them, and almost nobody does it.
By default your product sets mirror your Shopify collections. Womens, Mens, New Arrivals, Sale. Those categories are built for how customers browse your site.
They tell Meta nothing about which products actually make you money, so the algorithm optimises toward whatever converts most easily. That is usually your cheapest, lowest-contribution item.
The fix is custom labels. Meta gives you five custom label fields per item, and they are yours to define. The highest-value use is a contribution tier.
Here is how to set it up on Shopify:
- Calculate contribution per product. Selling price, less COGS, less freight, less payment fees, less any pick and pack cost. Not gross margin. Contribution.
- Sort your catalogue by contribution dollars and split it into four bands. Tier A is your top 20%, Tier B the next 30%, Tier C the next 30%, and Clearance is anything at or below breakeven once you add ad cost.
- Create a product metafield in Shopify Settings, Custom data, Products. Namespace
meta, keymargin_tier, type single line text. Populate it via a bulk CSV import. - Map the metafield to custom_label_0. The native Facebook and Instagram channel does not expose custom label mapping, so this step needs a feed app such as Flexify or Feedarmy that supports metafield-to-field mapping rules.
- Build the sets in Commerce Manager. Catalogue, then Sets, then filter on
custom_label_0equals Tier A, and repeat for each band. Build a dedicated exclusion set for Clearance. - Rebuild the tiers monthly. Costs move, prices move, and a stale label produces confidently wrong bidding.
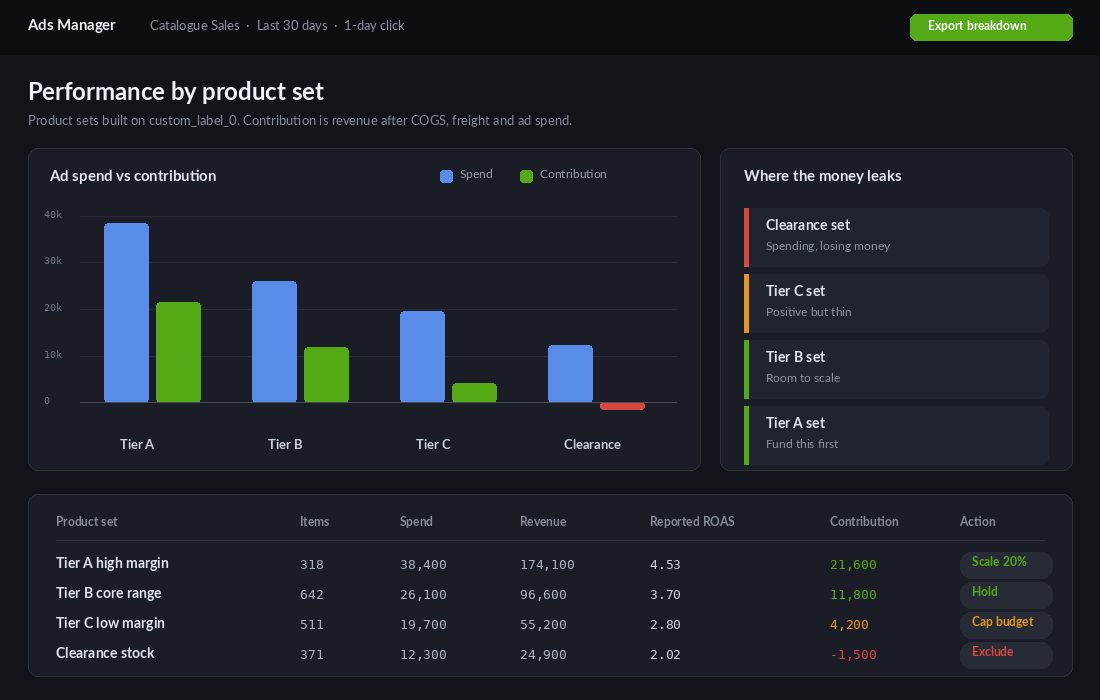
Now you can fund Tier A aggressively, hold Tier B, cap Tier C, and exclude Clearance from prospecting entirely. Brands that shift to inventory-based bidding this way typically report 25 to 40% ROAS improvement within 30 days, not because the ads got better but because the budget stopped chasing the wrong products.
If you have never run these numbers properly, do that first. The contribution margin audit walks through the exact calculation, and there is no point labelling tiers off numbers you do not trust.
Layer 6: Let the catalogue do the personalising, not your targeting
Once the feed is clean and the sets are built on contribution, audience structure gets simpler, not more complex. The catalogue handles the personalisation. Your job is to define the intent bands and stop there.
Three bands is enough for most Australian brands doing between 40k and 500k a month:
- Product viewers, 1 to 14 days, excluding purchasers. Warm, specific, and the catalogue shows them the exact SKU they looked at plus complements.
- Add to cart and checkout initiated, 1 to 7 days, excluding purchasers. Your highest intent pool. This is where dynamic retargeting earns the 6x to 12x range.
- Past purchasers, 30 to 180 days. Feed this a cross-sell or replenishment set, never the item they already bought.
Segmenting this way rather than lumping everyone into one retargeting audience typically lifts overall catalogue campaign ROAS by 20 to 35%. The gain comes from budget allocation, not clever targeting: the checkout-abandoner pool is small and hot, and it deserves its own budget line rather than competing with a much larger pool of casual browsers.
Think about a brand like Who Gives A Crap, the Melbourne B Corp selling recycled toilet paper and tissues. Their catalogue mixes one-off bundles with subscription products, and the same customer might buy a 48-roll box or start a recurring order. Showing a repeat customer the exact box they bought six weeks ago is a replenishment prompt.
Showing a first-time visitor the same box is a cold pitch. Same product, two completely different jobs, and only the audience split tells Meta which one it is doing.
Resist the urge to build twelve audiences. In an automated delivery environment, more audiences means thinner data and slower learning. Three well-defined bands with clean product sets behind them will outperform a sprawling account structure every time.
Layer 7: Judge catalogue ads on contribution, not on reported ROAS
Here is the uncomfortable part. Catalogue retargeting is the most flattered campaign type in your account. It shows ads to people who already visited your site, many of whom would have come back anyway, and then claims the sale.
Platform-reported ROAS currently overstates performance by 15 to 40% once you account for conversion modelling, cross-device behaviour and view-through credit. Retargeting is the worst offender because the overlap between “people who saw the ad” and “people who were going to buy” is enormous.
Three changes that give you an honest read:
- Set retargeting campaigns to 1-day click, 0-day view. Reported ROAS will drop hard. That drop is the illusion leaving, not performance falling.
- Report contribution, not revenue. A 4x ROAS on a Tier C product with 22% contribution is a worse outcome than a 2.8x on a Tier A product at 61%. Revenue-based reporting hides this completely.
- Run a holdout at least once a quarter. Turn catalogue retargeting off for a week and watch total store revenue, not platform-reported revenue. Most brands find some incremental lift. Almost nobody finds as much as the platform claims.
Benchmarks are useful context here rather than targets. Meta’s median across ecommerce sits around 2.79x ROAS in 2026. If your catalogue retargeting is showing 9x on default attribution, that is not a sign you have cracked something. It is a sign you are measuring on a 7-day click and 1-day view window and giving yourself credit for demand you already earned.
The Commerce Manager Errors You Will See, and the Fix for Each
Open Commerce Manager, go to your catalogue, and check the Issues tab. Most Aussie Shopify catalogues we audit have 10-25% of items carrying at least one warning or rejection. Those products simply do not show in your Advantage+ ads, however good your creative is.
Here are the errors that come up most, and what to do about each:
- Price mismatch with landing page. Usually caused by a sale price in Shopify that has not synced, or a currency setting in the feed. Make sure the feed sends AUD prices that include GST, exactly as shown on the product page.
- Image too small or has text overlay. Meta’s minimum is 500 x 500 pixels, but aim for 1080 x 1080 or larger. Remove promotional text and borders from the main image.
- Missing brand or GTIN. Fill the vendor field in Shopify consistently and add barcodes where you have them. It improves matching and reduces warnings.
- Out-of-stock items still active. Covered in Layer 1, but check it again monthly. Paying to show sold-out products is pure waste.
- Policy rejections. Health claims, before-and-after images and some supplement or adult categories get rejected. Rewrite the title or description and request a review rather than deleting the product.
The Meta sales channel (the Facebook and Instagram app in Shopify) handles the basic sync. If you need custom labels for margin, rewritten titles or supplemental feeds, a feed app such as Simprosys or Flexify gives you that control without touching your Shopify product data.
Worked Example: 400 SKUs, 18% Invisible
Imagine you run a homewares store with 400 SKUs, spending $15K a month on Meta, mostly on Advantage+ shopping. Commerce Manager shows 72 items with issues: 41 image errors, 19 price mismatches from an old sale, and 12 policy flags on candles that mention “relaxation benefits”.
Half a day fixes most of it. You replace 41 images with clean 1080-pixel versions, clear the stale sale prices, and rewrite the candle titles. Then you add a custom label for your top-margin products and build a product set around them.
Within four weeks, the share of spend going to your highest-margin products rises from about 30% to over 50%. Reported ROAS moves a little. Contribution margin from Meta moves a lot more, because the algorithm is finally showing products that make you money. Pair this with the testing process in our Meta creative testing engine and the campaign setup in our Advantage+ shopping playbook.
How the seven layers compound
Any one of these layers on its own is a modest improvement. Stacked, they change what your ad account is capable of.
Layers 1 through 3 are about coverage. Fix availability, images and links and you take a catalogue from 91% eligible to 100% eligible. That alone gives the algorithm nine per cent more inventory to work with, and the items that were blocked are frequently the older, higher-contribution products that have already paid off their development cost.
Layer 4 is about matching. Better titles mean Meta shows the right product to the right person more often, which lifts click-through and drops CPM at the same time.
Layers 5 and 6 are about allocation. Now that every product is eligible and correctly understood, you decide which ones deserve the budget. This is where the profit actually shows up, because you have stopped subsidising your worst products with your best ones.
Layer 7 is about honesty. Without it you will make confident decisions off numbers that are 15 to 40% optimistic, and you will scale the thing that looks best rather than the thing that pays best.
The order matters. Do not build contribution tiers on a catalogue where a fifth of the items cannot serve. Do not chase attribution accuracy before your feed is clean. Coverage, then matching, then allocation, then measurement.
The twenty-minute monthly catalogue audit
Once the first pass is done, this is the recurring checklist. Put it in your monthly operating rhythm and give it to whoever owns paid media.
- Open Commerce Manager, Items, filter Not Available. Record the count and the percentage of total catalogue. Target is under 2%.
- Group the diagnostic reasons. Fix by root cause. Assign each cause an owner: design, dev or merchandising.
- Spot check ten random items against the live product page. Price match, availability match, image loads, URL resolves without a redirect.
- Confirm the last sync timestamp. Anything older than 24 hours means the connection has dropped.
- Rebuild contribution tiers. Re-run the calculation, re-import the metafield, confirm the product sets updated in Commerce Manager.
- Check clearance is still excluded from prospecting. New products get added to sets automatically. Exclusions do not always follow.
- Pull the product set breakdown on a 1-day click window. Compare contribution by tier, not revenue by tier.
- Note the one product set to scale and the one to cap. Two decisions per month is enough.
Twenty minutes. Once a month. It will do more for your Meta performance than the next three creative tests combined, and unlike creative it compounds instead of fatiguing.
The brands quietly winning on Meta right now are not the ones with the best hooks. They are the ones whose catalogue is complete, correctly labelled, and pointed at the products that actually make money. That work is unglamorous and nobody will compliment you on it. It is also the most valuable half day available to most Aussie Shopify stores this quarter.
Inside eCommerce Circle, catalogue and feed health is one of the core pillars we work on with every member under Promotion. If you want a second opinion on yours, let’s talk.