Your order count went up 18% last quarter. Your freight bill went up 34%. Nobody changed a carrier, nobody changed a rate card, and your average order value barely moved. So where did the money go?
What’s in This Article
It went into air. Australia Post, StarTrack, Sendle and every courier worth using in this country bill you on the greater of two numbers: what the parcel actually weighs, and what the space it occupies is worth. That second number is cubic weight, and for most Aussie Shopify brands it is the number doing the damage. Industry teardowns put the average ecommerce package at roughly 40% empty space, and you are paying freight on every cubic centimetre of it.
Here is the part that stings. Shipping should sit somewhere between 5% and 12% of revenue for most product categories, and anything north of 15% is a flashing red light. Most founders who blow past that line assume the fix is a better rate card. It usually is not. The fix is a smaller box, and it costs almost nothing to implement.
This is the six-step cubic weight audit we run with brands inside eCommerce Circle. It takes a weekend, it needs no developer, and it is the closest thing to free margin left on most stores.
How Cubic Weight Actually Works (The Only Formula You Need)
Australia Post calculates cubic weight by multiplying length, height and width in metres, then multiplying that volume by a conversion factor of 250kg per cubic metre. You will never do that maths in metres, so use the shortcut instead.
Length (cm) x Width (cm) x Height (cm) divided by 4,000 = cubic weight in kg.
Run a real example. A 40 x 30 x 25cm carton is 30,000 cubic centimetres, which divided by 4,000 gives a cubic weight of 7.5kg. If you put three candles in that carton and the parcel weighs 1.4kg on the scales, you are still billed at 7.5kg. You just paid for 6.1kg of nothing.
The carrier charges the higher of dead weight and cubic weight, every time. There is no negotiation on which number wins. For large, light products such as apparel, homewares, pet bedding and anything foam-filled, dimensional pricing can inflate the billed weight by 200% to 400%, which is why two brands with identical revenue can have wildly different freight lines.
Worth knowing before you design anything: domestic parcels can go up to 22kg, with a longest side of 105cm and a maximum volume of 0.25 cubic metres. Those are your outer walls. Everything inside them is a choice you are making.
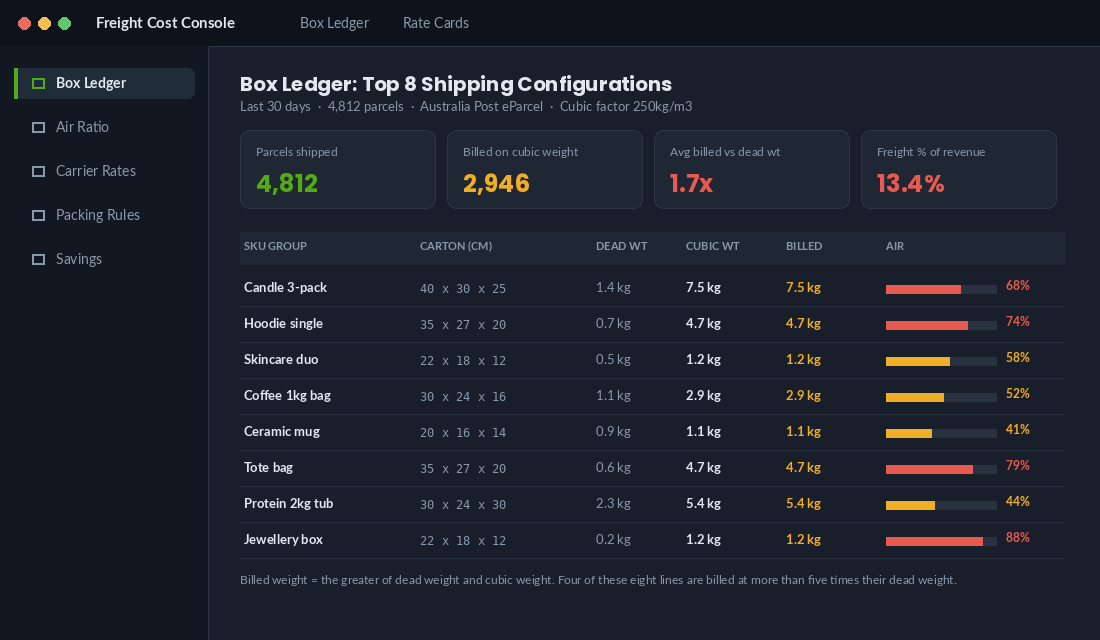
Step 1: Build the Box Ledger (Your 30 Minute Head Start)
You cannot fix what you have not listed. The box ledger is a single spreadsheet that maps every carton and satchel you currently use against what actually goes inside it. Most brands think they have four packaging options. When they count properly, they find eleven.
Export your last 90 days of orders from Shopify, then build these columns:
- Packaging name and internal dimensions. Internal, not external. Measure it yourself with a tape rather than trusting the supplier spec sheet, because carton walls and flaps eat 5 to 10mm per side.
- Cubic weight. Apply the divide-by-4,000 formula once per carton. This never changes, so you only calculate it once.
- Typical dead weight of the orders that ship in it. Take the median, not the average, so one heavy outlier does not distort the picture.
- Billed weight. Whichever of the two numbers is higher.
- Monthly parcel volume through that carton. This is the multiplier that tells you which problem to fix first.
- Cost per parcel at your current rate card. Pull the real invoiced figure, not the quoted rate. Fuel levies and residential surcharges are part of your cost whether you like them or not.
Sort the ledger by monthly volume, high to low. The top three rows are where 70% of your savings live. Everything below row six is a rounding error and you should ignore it until the big rows are fixed.
Step 2: Calculate Your Air Ratio and Find the Real Offenders
Air ratio is the single number that turns a vague feeling into a decision. It is the share of your carton volume that is not product.
Air ratio = (carton volume minus product volume) divided by carton volume.
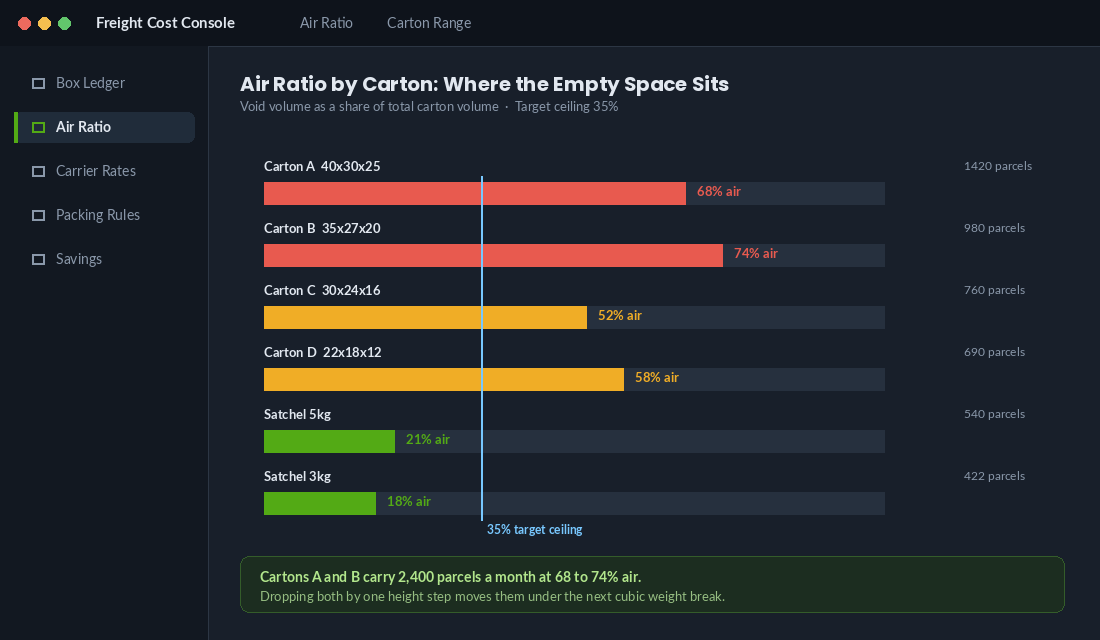
Take five real orders that ship in each carton, measure the product footprint, and work out the percentage. A carton running at 68% air is not a packaging preference, it is a monthly invoice you volunteered for.
Set your ceiling at 35% air. That leaves genuine room for protective material without paying freight on a void. Shippit’s own packing guidance recommends adding roughly 50mm to each side of the product when you use void fill or bubble wrap, and 50mm is a lot less than the 120mm most stores are actually running.
Colour-code the ledger. Green under 35%, amber 35 to 59%, red at 60% and above. Any red row carrying more than 300 parcels a month goes to the top of your fix list, no debate.
Step 3: Cut Your Carton Range Back to Four Sizes
Every extra carton size in your pick and pack area is a decision your packer has to make under time pressure. More options do not mean better fits, they mean slower packing and more mistakes. The brands with the cleanest freight lines run a deliberately narrow range.
Four sizes is the sweet spot for most Aussie DTC brands doing under 15,000 parcels a month:
- Size 1: single small item. Usually a satchel or a padded mailer. Covers your entry product and one-item repeat orders.
- Size 2: one to two items. Your highest volume configuration and where the biggest single saving usually sits.
- Size 3: three to four items. The bundle box. Design it around your most-purchased bundle, not around a generic multiple.
- Size 4: bulk or oversized. Deliberately unattractive to use, because it should be the exception rather than the default.
When you spec the replacements, work in reverse. Decide the cubic weight band you want to land in, then work back to the maximum dimensions that keep you there. If dropping a carton from 25cm to 18cm high takes the cubic weight from 7.5kg to 5.4kg, that is a pricing tier, not a cosmetic change.
One more thing most founders miss: your carton range is a product decision, not a warehouse decision. If a new SKU cannot fit an existing carton, that is a cost you should be pricing into the product before you commit to inventory, the same way you would with landed cost on the way in.
Step 4: Get Rid of the Box Entirely Where the Product Allows
The cheapest carton is no carton. Satchels and poly mailers deliver a 15% to 20% shipping cost reduction versus boxes on the same contents, because a soft pack collapses around the product instead of holding a rigid void.
Work through your catalogue and sort every SKU into three buckets:
- Soft pack ready now. Apparel, textiles, flat accessories, anything that survives a squeeze. Move these immediately.
- Soft pack with a design change. Products that only need a box because the retail packaging is rigid. Ask whether that retail box is earning its freight, especially for a DTC-only line where nobody ever sees it on a shelf.
- Genuinely needs a carton. Glass, ceramics, electronics, anything with a real breakage risk. Fine. Just make sure it is in the smallest carton that clears your protection requirement.
Two Aussie brands show how far this thinking goes when it starts at the product stage rather than the packing bench. Koala compresses, rolls and vacuum seals its mattresses into a box that one person can carry, and splits the larger sizes across two boxes rather than shipping one oversized unit. Who Gives A Crap built an entire business on a product with terrible freight economics by selling in bulk cartons on a subscription cadence, so the freight cost is spread across dozens of units instead of one.
Both made the same call: change the shape of what you ship, not just the shape of what you ship it in.
Step 5: Automate Carton Selection So Your Packer Cannot Get It Wrong
Here is where most audits quietly die. You spec beautiful new cartons, and six weeks later a casual on a Friday afternoon reaches for the big one because it is easier. The savings evaporate and nobody notices until the invoice lands.
The fix is to take the decision away from the human. Starshipit connects Shopify to more than 60 couriers including Australia Post, StarTrack, Sendle and DHL, starts at around 30 dollars a month, and includes onboarding at every plan level. Its packaging presets let you define carton rules that fire automatically at label print.
Set it up like this:
- Load every SKU dimension into Shopify first. Go to each product variant and fill the weight field accurately, then hold the length, width and height in a metafield or in your shipping app. Rules built on missing data will always default to the biggest box.
- Create one preset per carton in Starshipit under Settings, then Packaging Presets. Enter the internal dimensions and the empty weight of the carton itself, which most stores forget and which quietly adds 200 to 400 grams per parcel.
- Order the rules smallest to largest. The engine applies the first preset that fits, so a satchel rule sitting below a carton rule will never fire.
- Write conditions on item count and longest side, not on price or collection. A 200 dollar order and a 40 dollar order can be the identical parcel.
- Turn on cheapest-rate selection across carriers so the app compares live rates once the carton is chosen, rather than defaulting to one carrier out of habit.
- Route unmatched orders to a manual review queue. Never let the fallback be the largest carton. Aim for 95% or better automatic preset coverage within the first month.
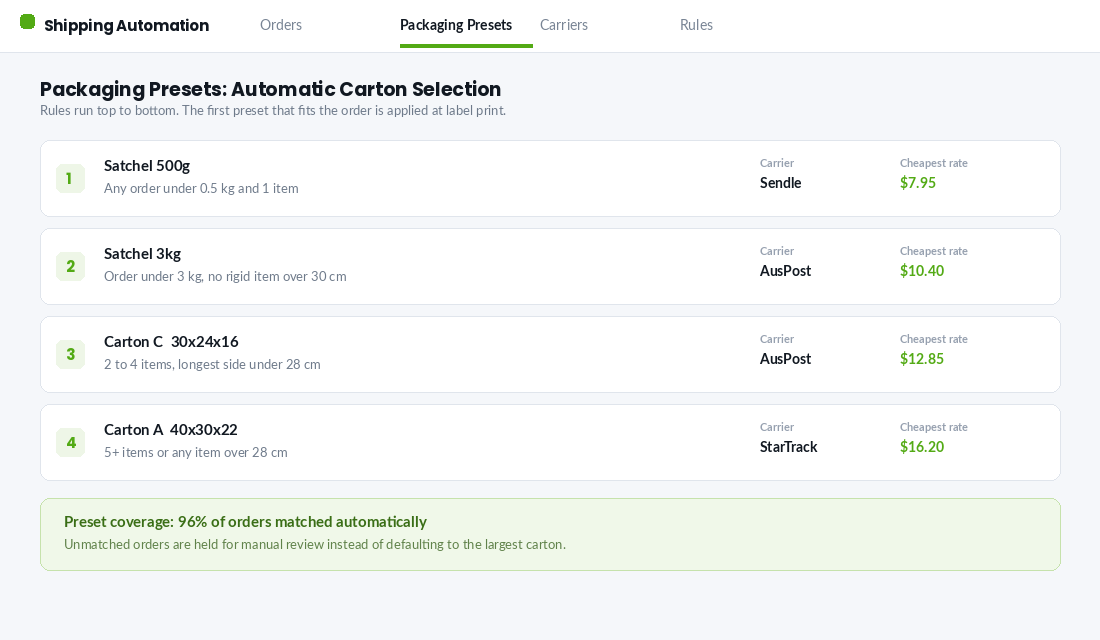
Once the rules are live, spot check twenty parcels a week against what the rule said should have been used. Packing drift is real, and a five minute check protects a four figure monthly saving.
Step 6: Re-rate With Real Numbers Before You Renegotiate
Now you go back to the carriers, and you go back with a different story. Before the audit, your profile was a set of bloated parcels. After it, your average billed weight has dropped and your parcel mix is predictable. That is a genuinely more attractive account and you should price it that way.
Timing matters here. Carrier general rate increases landed at roughly 5.9% headline for 2026, and once fuel, residential and peak surcharges are layered on, the effective increase for most shippers sits closer to 7 to 8%. If you renegotiate off your pre-audit profile, you are simply agreeing to pay more for the same air.
Bring three things to the conversation:
- Your new parcel profile as a distribution, not an average. Carriers price on the shape of your volume across weight bands.
- Twelve months of forecast volume by band, with seasonality marked. A brand that can predict its November peak is easier to price than one that cannot.
- A live alternative. Quotes from at least two other carriers on the same profile. Operations that right-size cartons and measure every shipment typically reduce dimensional impact by 15% to 25%, and that is before a single cent comes off the rate card.
Then feed the new numbers back into the business. Your free shipping threshold was set against your old cost per parcel, so if freight has dropped 20% you may be able to lower the threshold and lift conversion without touching profitability.
The Compound Effect: Why This Beats Almost Every Other Margin Project
Choosing the wrong packaging type adds somewhere between 50 cents and 3 dollars per order in avoidable cost. Take the middle of that range on a store shipping 3,000 parcels a month and you are looking at more than 60,000 dollars a year evaporating into cardboard and air.
What makes this different from most margin projects is that the saving is structural. A discount you stop running has to be defended every month. A price rise has to survive customer reaction. A right-sized carton keeps paying you every single parcel, forever, with no ongoing effort.
It also compounds sideways. Smaller parcels are cheaper to store, faster to pack, and cheaper to move inbound from your supplier. They break less in transit, which cuts replacement shipments and support tickets. They use less material, which is a real sustainability claim you can make honestly rather than a vague one. And a lower cost per parcel gives you room to fund the delivery promise that actually wins the sale.
Every one of those effects flows into the same place: contribution margin per order. That is the number that decides how much you can afford to pay for a customer, which decides how fast you can grow. Freight is not a logistics line item. It is an acquisition constraint wearing a hi-vis vest.
The Cubic Weight Audit Scorecard
Work through this in order. Give yourself one point per line. Anything under 9 out of 12 means there is money sitting in your packing area right now.
- Every carton and satchel is listed with accurate internal dimensions, measured by hand.
- Cubic weight is calculated for each one using the divide-by-4,000 formula.
- Median dead weight is recorded for the orders that ship in each carton.
- Billed weight, cost per parcel and monthly volume sit beside each row.
- Air ratio is calculated for every carton and colour-coded against a 35% ceiling.
- No carton above 60% air is carrying more than 300 parcels a month.
- The carton range is four sizes or fewer.
- New carton specs were reverse engineered from a target cubic weight band.
- Every SKU has been sorted into soft pack, redesign or genuine carton.
- All variant weights and dimensions are loaded in Shopify.
- Packaging presets are live, ordered smallest to largest, with a manual review fallback.
- Carriers have been re-quoted on the post-audit parcel profile, not the old one.
Run it once properly and you will not need to run it again for a year. Run it before you spend another dollar trying to negotiate your way out of a problem your cartons created.
Inside eCommerce Circle, freight and packaging economics is one of the core Profit pillars we work through with every member, because it is almost always the fastest unclaimed margin in the business. If you want a second opinion on yours, let’s talk.