You have spent money on a theme upgrade. You have paid someone to tidy the navigation. You have probably trialled a search app or two. And customers still cannot find the thing you know is sitting in your catalogue.
What’s in This Article
Most Aussie founders diagnose that as a design problem. It almost never is. Empty filter panels, useless search results and product feeds that get half your catalogue rejected all trace back to the same root cause: the data behind your products is inconsistent, incomplete, or written in a language your customers do not use.
The numbers on this are brutal. Akeneo’s 2025 shopper research found 66% of shoppers have abandoned a purchase because product information was missing or inaccurate, and 73% of consumers say inaccurate product content damages their trust in the brand. That is not a theme issue. That is a spreadsheet issue that happens to be wearing a storefront.
Here is the six-layer system we work through with founders who are tired of paying for tools that cannot fix a data problem.
Layer 1: Assign every product to a category (this is the switch that turns filters on)
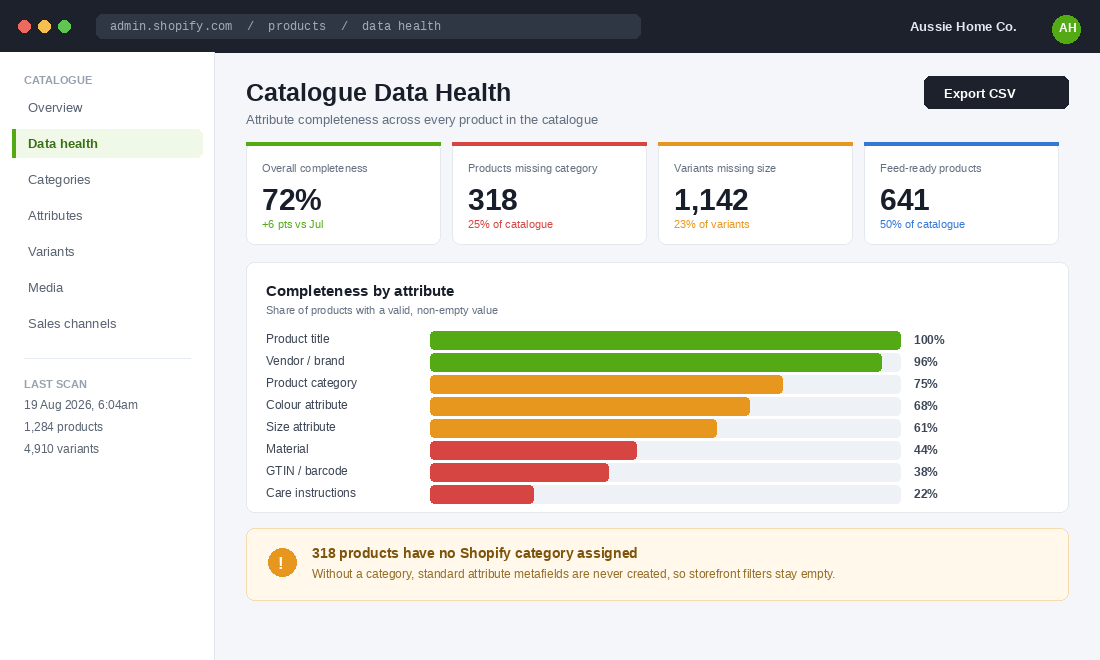
Shopify’s Standard Product Taxonomy is the single most under-used feature in the entire admin. When you assign a product to a category, Shopify automatically creates the standard attribute metafield definitions for that category. Shoe gets width and heel height. Bedding gets thread count and material. Skincare gets skin type and volume.
Skip the category and none of that exists. Which means your storefront filters have nothing to filter on, your Search & Discovery app has nothing to work with, and your Google feed has no reliable product type to match queries against.
The taxonomy is not static either. The February 2026 release added more than 700 new categories and 600 new attributes, plus 468 return reasons mapped across the category tree. If you assigned categories eighteen months ago and never looked again, there is very likely a more specific category available for your products now.
What to actually do
- Run the gap report first. In Shopify admin, go to Products, add the Category column to your product list view, then sort by it. Every product with a blank category is a product invisible to filters.
- Go as specific as the taxonomy allows. “Apparel & Accessories” is close to worthless. “Apparel & Accessories > Clothing > Activewear > Sports Bras” gives you the attribute set you actually want.
- Bulk assign by collection. Select all products in a collection, use the bulk editor, and set the category once. A 1,200 SKU catalogue is usually 15 to 25 category groups, not 1,200 individual decisions.
- Re-check quarterly. Put it in the same recurring block where you review your catalogue and SKU mix. Categories drift as your range expands.
This one layer typically takes a founder or a VA two focused afternoons. It is the highest return-per-hour work in the entire playbook because everything downstream depends on it.
Layer 2: Standardise your option values before you add a single new product
This is where most catalogues quietly fall apart. One product uses “Navy”. Another uses “Navy Blue”. A third says “NVY” because that is what the supplier’s spreadsheet said. Your size options are “Queen” on the sheets, “QB” on the quilt covers, and “210 x 210” on the imported range.
Shopify treats every one of those as a distinct value. So your colour filter shows eleven variations of blue, your size filter is unusable, and a customer filtering for Navy sees a third of your actual navy products.
A filter is only as good as the discipline of the person who typed the value. Tools do not fix taste, and apps do not fix inconsistency.
Build a controlled vocabulary
Open a spreadsheet. One tab per option type. Colour, size, material, fit, scent, whatever your category uses. In each tab, list the only permitted values. Then map every messy variant you currently have to the approved value.
- Colour: pick 12 to 20 parent colours maximum. Customers filter by “blue”, not by “Midnight Harbour”. Keep the poetic name in the variant title if you love it, but the filterable attribute must be the plain word.
- Size: one format per product type. If you sell both AU and US sizing, that is two attributes, not two spellings of one.
- Material: use the taxonomy’s own values wherever they exist. Free-texting “100% cotton” versus “Cotton” versus “Pure Cotton” creates three dead ends.
- Never use a hyphen or slash to jam two attributes together. “Navy-Large” is not a colour. It is two attributes wearing a trenchcoat.
Bared Footwear is a good local example of why this matters. They sell shoes in multiple width fittings, which is genuinely useful information a customer needs before buying. That only works as a filter because width is stored as a consistent, structured attribute across the range rather than buried in a description paragraph. Frank Green is another: a huge colour and size and lid combination matrix that stays browsable only because the option values are disciplined.
Layer 3: Add the attributes that answer the question standing between browsing and buying
Completeness is not the goal. Usefulness is. Nobody has ever abandoned a cart because a product was missing its “Country of Manufacture” metafield. They abandon because they could not work out whether the doona cover fits an Australian king bed.
Sit down and write out the five questions you get asked most in support tickets, live chat and DMs. Those are your missing attributes. Every one of them should be a structured field, filterable and displayed on the product page, not a sentence buried in paragraph four of the description.
The returns data makes the case on its own. Akeneo’s 2025 Consumer Returns Report found 43% of consumers returned a product in the past year because pre-purchase information was incorrect. A returns rate driven by data gaps is the most expensive kind, because you paid the acquisition cost, the pick and pack, the outbound freight and the reverse freight to learn something a metafield could have told them for free.
The attribute test
Before you add a field, run it through three questions:
- Would a customer filter on it? If yes, it belongs in Search & Discovery as a storefront filter.
- Would a customer compare on it? If yes, it belongs in a specifications table on the product page.
- Would getting it wrong cause a return? If yes, it belongs above the fold, near the add to cart button.
If an attribute fails all three, it is admin data. Keep it internal and stop pretending it is content.
Layer 4: Close the language gap between your catalogue and your customers
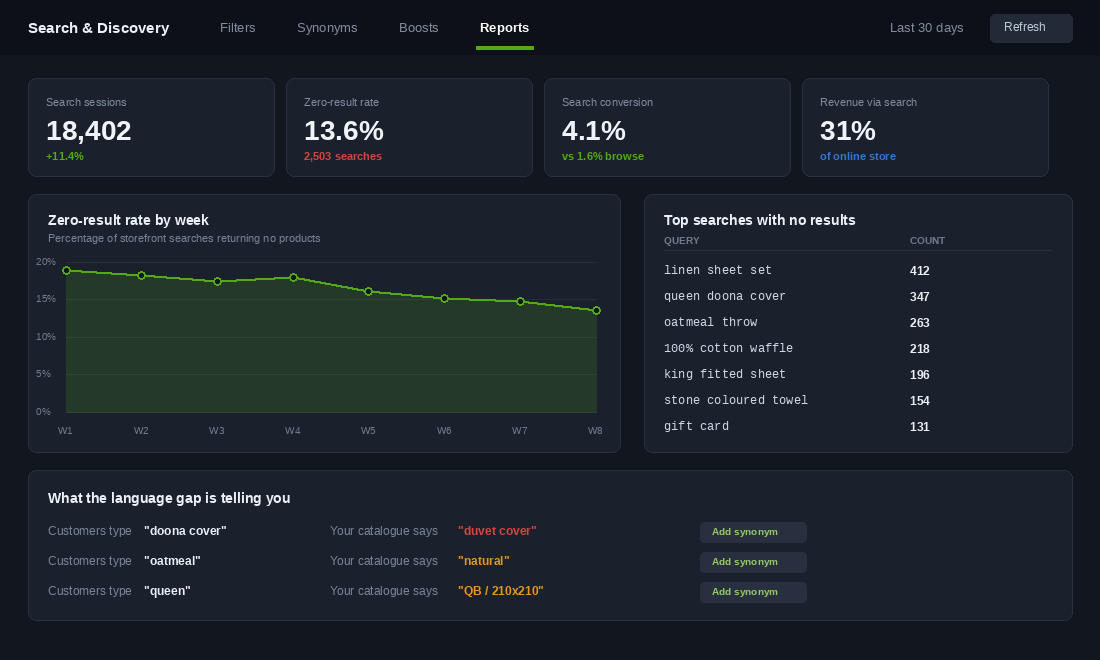
Between 10 and 15% of on-site searches return zero results even on well-maintained stores, and roughly two thirds of stores treat those sessions as dead ends. That matters more than it sounds, because searchers are your best traffic. Shoppers who use site search convert at roughly two to three times the rate of shoppers who browse, and with the average Shopify store converting at about 1.4%, losing your highest-intent segment to a blank results page is expensive.
The fix is not a better search algorithm. It is a vocabulary reconciliation.
Run this in twenty minutes
- Go to Shopify admin, Analytics, Reports, then open Top online store searches with no results. Set the range to the last 90 days.
- Export it. Sort by search volume descending.
- Sort every query into three buckets: a product you sell but name differently, a product you do not sell, and a category or attribute you do not expose.
- Bucket one becomes synonyms. Bucket two becomes a range planning conversation. Bucket three becomes a new attribute or collection.
Australian shoppers give you a lot of bucket one. They search “doona cover” while your catalogue says “duvet cover”. They search “thongs” while you say “flip flops”. They search “singlet” while you say “tank”. They search “esky” while you say “cooler”. Every one of those is a product you already have and a sale you are throwing away over a word.
We go deeper on the full search stack in the site search playbook, but the synonym pass alone is usually the single highest-value hour in a quarter.
Layer 5: Make the same data work for Google, Meta and AI shopping
Here is the part most founders miss. The product data on your storefront is the same data being read by Google Shopping, Meta catalogue ads, Shop, marketplaces, and increasingly by AI assistants answering “what is a good linen sheet set in Australia”.
Google uses GTINs, MPNs and brand values to match your products to search queries. Products with missing or incorrect identifiers get limited performance at best, and outright disapproval in many categories. Products with issues can still appear in free listings and Shopping ads but with materially lower impressions and clicks.
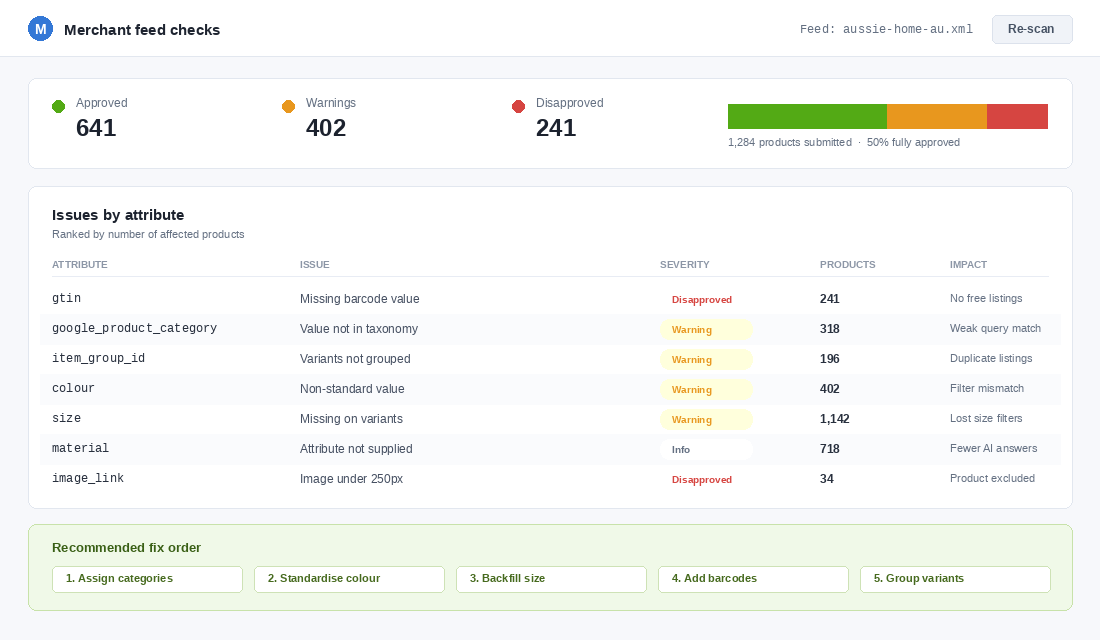
The five feed fields worth fixing first
- gtin. Barcodes from your supplier belong in the Shopify barcode field on every variant. If you manufacture your own product and have no GTIN, set the identifier exists flag correctly rather than leaving it blank.
- google_product_category. Handled automatically if Layer 1 is done properly. Another reason categories come first.
- item_group_id. This groups variants so Google shows one listing with colour options instead of nine competing duplicate listings.
- colour and size. The same controlled vocabulary from Layer 2 flows straight through. Non-standard values cause warnings and weak matching.
- image_link. Images under the minimum resolution get the product excluded entirely, which is a silent and very common leak.
If you want the full feed build, the Google Shopping feed playbook covers structure and troubleshooting in detail. The point here is that you are not doing feed work and storefront work as separate projects. You are doing one data project that pays out in both places.
Layer 6: Governance, or the layer that stops it rotting again
Every founder who has done a big catalogue cleanup has watched it decay within six months. New season lands, a supplier sends a messy spreadsheet, a VA is under pressure to get products live before a campaign, and the standards quietly evaporate.
The fix is boring and it works: a product intake standard, and a definition of done.
The product intake standard
One page. Lives next to your other SOPs. It states the required fields for a product to be published, the approved option vocabulary, the image specs, and who signs off. Anyone loading products follows it or the product does not go live.
- Required to publish: category assigned, all standard attributes filled, barcode present, at least four images at minimum resolution, size or fit guidance where relevant.
- Approved vocabulary: link to the controlled vocabulary spreadsheet from Layer 2. No new option values without approval.
- Definition of done: product appears correctly under every relevant storefront filter, and passes feed validation without warnings.
- Monthly check: a fifteen minute review of the data health report and the zero-result search report. Not a project. A habit.
The tool that does most of this for free
Before you shop for anything paid, install Shopify Search & Discovery. It is first-party, free, and it is where filters, synonyms and boosts are configured. Most stores have it installed and barely configured.
Setup, start to finish
- Install Search & Discovery from the Shopify App Store, then open it from the admin sidebar.
- Go to Filters. Add filters from your standard category metafields, not just from options. If Layer 1 is done, the useful ones will be available here. Reorder them so the top three match your customers’ actual decision order.
- Go to Synonyms. Load every bucket-one term from your zero-result export. Add the Australian language pairs even if you think they are obvious.
- Go to Product boosts. Boost by best selling or by inventory so you are not surfacing out of stock lines at the top of a results page.
- Go to Analytics inside the app after two weeks and compare zero-result rate before and after. That is your proof number.
For bulk data work, Matrixify is the workhorse. Export your full catalogue to a spreadsheet, do the find and replace on option values there, then import back. It handles metafields and variants properly, which the native CSV importer does not.
How the six layers compound
Taken one at a time, each layer looks like tidy-up work. Stacked, they change what your store is capable of.
Categories create attributes. Attributes make filters possible. Standardised values make those filters usable. Customer language makes search actually find things. Identifiers push all of it into Google, Meta and AI answers. Governance keeps it true.
Which is why the payoff shows up in places you were not measuring. Filter usage goes up, so collection page bounce goes down. Search stops dead-ending, so your highest-intent segment converts. Feed disapprovals clear, so the same ad spend reaches more of your catalogue. Returns fall because customers understood what they were buying. Industry analysis puts the ceiling on well-optimised product data at up to a 20% lift in conversion across storefront, marketplace and AI surfaces, and that is before you count the returns saving.
It also compounds against your competitors, because almost nobody does this work. It is unglamorous, it does not photograph well, and no agency pitches it. That is exactly why it is available to you.
Your 30-day product data sprint
Do not try to do all six layers at once. Run this order. Each week is a few hours, not a full time job.
- Week 1: Measure. Export your product list. Count how many products have no category, how many variants are missing size or colour, and how many products have no barcode. Pull the 90 day zero-result search report. Write the four numbers down. This is your baseline.
- Week 2: Categorise. Bulk assign categories collection by collection, as deep into the taxonomy as it will let you go. Confirm the standard attribute metafields have appeared.
- Week 3: Standardise and fill. Build the controlled vocabulary. Export with Matrixify, do the find and replace, reimport. Fill the attributes that answer your top five support questions.
- Week 4: Publish and protect. Configure filters and synonyms in Search & Discovery. Validate the product feed and clear disapprovals. Write the one page intake standard and hand it to whoever loads products.
At the end of the month, re-run the four baseline numbers. That is your report card, and it is a far more honest measure of store health than a conversion rate you cannot attribute.
The stores that win the next few years will not be the ones with the prettiest homepage. They will be the ones whose product data is clean enough that every channel, including the AI ones nobody has fully mapped yet, can read it and recommend them.
Inside eCommerce Circle, product data architecture is one of the first things we audit with every member, because it quietly limits everything else we could work on. If you want a second opinion on yours, let’s talk.