Every time margin gets tight, the same meeting happens. You open the supplier email thread, you ask for another five percent, and they come back with three. You take it, you feel like you did something, and six weeks later freight moves and the win is gone.
What’s in This Article
That is haggling. It is not cost engineering. Haggling moves a number on an invoice. Cost engineering changes the thing you are buying so it costs less to make, less to pack, less to ship, and less to clear through customs, without the person who opens the parcel noticing a single downgrade.
The gap matters more in Australia than almost anywhere. Pure play Australian DTC brands typically run 35 to 50 percent gross margin, and below roughly 35 percent there is not enough contribution left to cover Aussie customer acquisition costs, long domestic freight legs and returns and still bank a profit. Meanwhile Australia Post lifted Parcel Post prices by an average of 4.95 percent on 1 July 2026, and a 40ft container out of China still lands somewhere in the 4,365 to 5,335 USD band. Your costs move whether you touch them or not.
The brands that hold margin through all of that are not the ones with the toughest negotiators. They are the ones who treat landed cost as a design problem. Below is the process we run with operators inside eCommerce Circle, and the eight or so places where the money is actually sitting.
Cost engineering is not the same thing as beating up your supplier
Supplier negotiation is a transfer of margin. You take a slice of theirs. It works once, sometimes twice, and then the relationship gets worse and the quality control gets sloppier. If that is the lever you want to pull, we have a whole piece on doing it properly in the supplier negotiation playbook.
Cost engineering is different. It creates margin that did not exist before, because it removes work, material, volume or friction from the chain. Nobody loses. The factory quotes less because you asked them to make something genuinely cheaper to produce.
Here is the test. If your saving disappears the moment the supplier has a bad quarter, you negotiated. If it survives a change of supplier entirely, you engineered it.
- Negotiated saving. “We got the unit price from 14.90 down to 14.20.” Fragile. Reverses at the next quote round.
- Engineered saving. “We changed the yarn count and dropped a void layer out of the carton.” Permanent. Travels with you to a new factory.
- Structural saving. “We started claiming the free trade agreement preference we were always entitled to.” Permanent, and often retrospective.
Most Aussie operators spend all their energy in the first bucket and never touch the other two. That is the whole opportunity.
Step 1: Rebuild your bill of materials until every line has an owner
You cannot engineer a number you cannot see. Most founders have one figure in Shopify called cost per item, and it is usually the ex works invoice price with freight guessed at and duty forgotten entirely. That single number hides every lever worth pulling.
Rebuild it properly for your top five SKUs. Not all of them. Your hero product almost certainly carries most of the volume, and a five percent win there beats a twenty percent win on a long tail SKU that ships forty units a month.
Break landed cost into these lines, and give each one a named owner and a last reviewed date:
- Raw material or fabric. Split by component if you can. Shell, lining, hardware, trim.
- Conversion. The labour and machine time to turn material into product. Usually quoted as cut, make, trim.
- Retail packaging. Box, sleeve, tissue, card, sticker, poly bag. Every piece.
- Outer carton and pallet. The bit nobody costs, and the bit that quietly sets your freight bill.
- Inbound freight. Sea or air, per unit, at your actual carton cube.
- Customs duty. Most goods entering Australia attract 5 percent of the FOB value unless a concession applies.
- Clearance, insurance and port charges. Small per unit, real per shipment.
- 3PL inbound, storage and pick. Charged on cube in most Australian warehouse contracts.
- Defect, rework and shrinkage provision. If you are not provisioning for this, your margin is a fiction.
If you want the full method for pulling those numbers together, including the freight allocation maths, the landed cost playbook covers it end to end. This article is what you do after that spreadsheet exists.
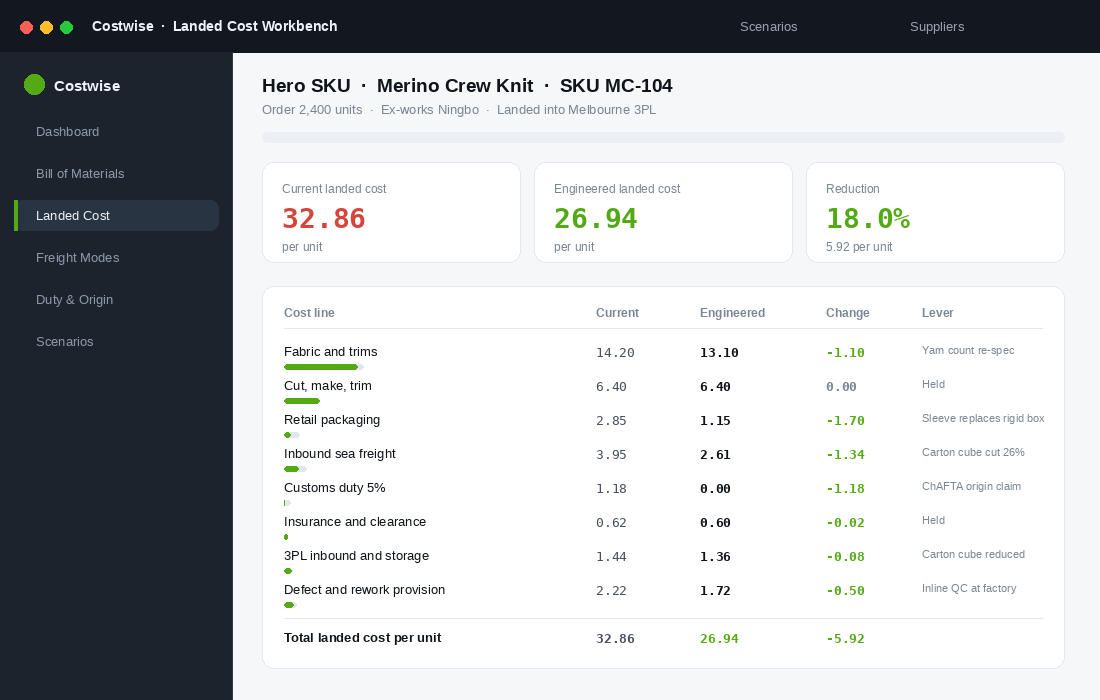
The tool. If you make or assemble anything, get the bill of materials out of a spreadsheet and into software that can hold multi level structures. Katana is the practical choice for most Aussie brands under 5 million a year, because it does visual BOMs, sub assemblies and production costing without the implementation cost of a full ERP. Cin7 Core is the step up when you need landed cost allocation baked into purchasing.
Setting up Katana against Shopify takes about a day:
- Connect the Shopify integration and import your product catalogue. Map SKUs first, variants second.
- Create your material items separately from your finished goods. Fabric, hardware and packaging are materials, not products.
- Build a BOM for each hero SKU listing every material and the quantity consumed per unit.
- Add production operations with a time and a rate so conversion cost is calculated rather than assumed.
- Enter purchase orders with the actual paid unit cost, then add freight, duty and clearance as additional costs on the same order so they allocate across the received quantity.
- Run the product margin view weekly. The moment a component price moves, the finished good cost moves with it.
If you assemble bundles or kits rather than manufacture, a lighter option like the Assemblified BOM app on the Shopify App Store starts around 6 USD a month and will still give you real component level costing.
Step 2: Separate the costs your customer can feel from the ones they cannot
This is the step that separates cost engineering from cost cutting, and it is the one most founders skip.
Take your rebuilt BOM and colour every line one of three ways. Ask a simple question of each: if I halved the spend on this line, would a customer holding the product in their hands notice within thirty seconds?
- Red lines. The customer notices immediately. Hand feel of the fabric, weight of the ceramic, the click of the closure, the print quality on the front of the box. Do not touch these. Ever.
- Amber lines. The customer might notice on the second or third use. Stitch density, zip brand, coating thickness. Only move these with a physical sample in your hands and a customer panel to check it.
- Green lines. The customer will never notice. Inner void fill, carton wall thickness, the number of stickers on the outer, the grade of the poly bag, the tissue GSM, the size of the swing tag string.
Do the whole first pass on green lines only. In practice, green lines are usually 20 to 30 percent of your landed cost and almost none of your perceived value. That is where the free money lives.
The discipline here is the point. Brands that cut without this map end up cheapening the exact thing that justified their price, then wonder why conversion rate fell and returns went up two months later. You did not save 8 percent. You bought a slow decline.
Step 3: Redesign the box before you touch the product
Packaging is where the biggest engineered wins hide, because packaging is charged to you twice. Once as material, and again as air you pay to ship.
Australia Post calculates cubic weight as length times width times height in metres, multiplied by 250, and you pay the greater of cubic or dead weight. A light, bulky parcel bills on volume, not mass. The same maths applies to your inbound container, your pallet count and your 3PL storage line.
The results when brands take this seriously are not small:
- Dell redesigned packaging across multiple product lines and fit 13 percent more laptops per pallet, with combined packaging reduction saving over 13 million USD a year.
- Allbirds designed a shoe box that ships without the usual box inside a box, cutting packaging material by around 40 percent and shrinking the shipped volume with it.
- IKEA saved roughly 1.4 million USD a year by redesigning the packaging for a single sofa.
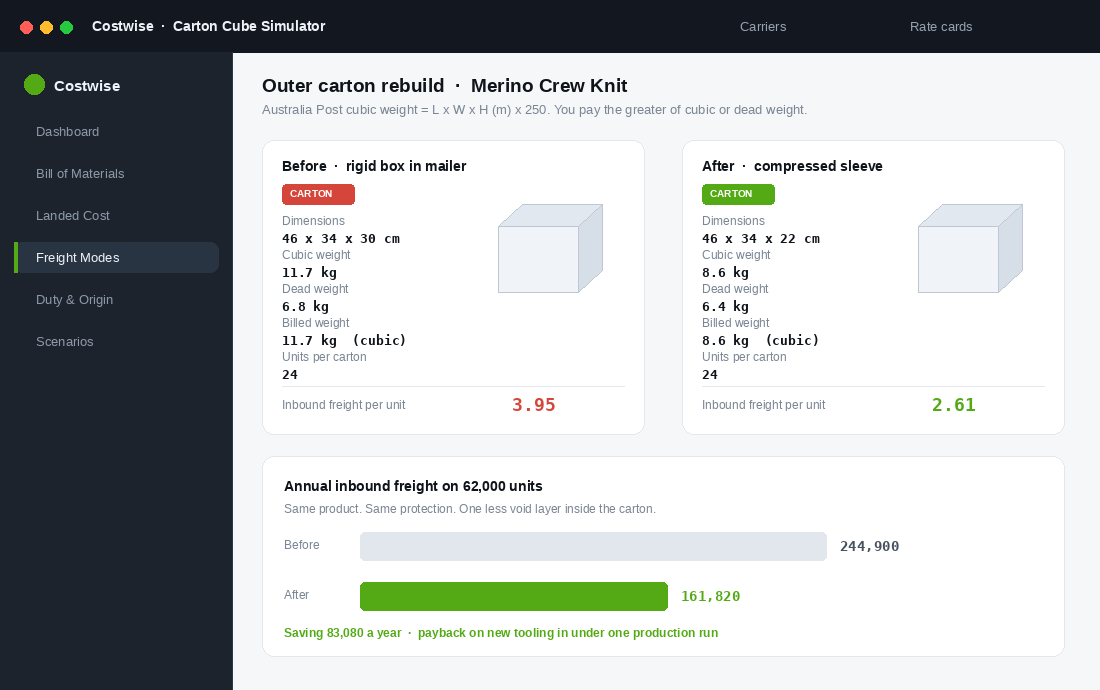
Run this audit on your hero SKU this week:
- Open a received carton and measure the void. Air between the product and the carton wall is money.
- Calculate cubic weight and dead weight for the current carton. Whichever is higher is what you are paying on.
- Ask the factory what the smallest carton is that still passes their drop test with your product inside. They will almost always have an answer, because nobody has ever asked.
- Check whether the new carton dimensions divide cleanly into a standard 1165 by 1165 Australian pallet footprint. Awkward dimensions waste a whole layer.
- Reprice the inbound freight per unit at the new cube, then reprice your 3PL storage, which is usually charged per cubic metre per week.
- Reprice the outbound parcel. If the smaller retail pack drops you into a lower satchel or flat rate band, that saving repeats on every single order forever.
Point six is the one operators underrate. Inbound freight is a per shipment win. Outbound parcel banding is a per order win, and at 62,000 orders a year, twenty cents is 12,400 dollars. We go deeper on the parcel side in the cubic weight audit.
Step 4: Audit your import paperwork, because most Aussie brands are overpaying duty
This is the least glamorous section in this article and it is usually the one that returns the most cash in the shortest time.
Most goods imported into Australia attract 5 percent customs duty on the FOB value, plus 10 percent GST calculated on the customs value, freight, insurance and the duty itself. On a container of stock, that 5 percent is a real number. And a large share of Australian brands importing from China pay it when they did not have to.
Three things to check, in order:
- Free trade agreement preference. Goods that meet the rules of origin under ChAFTA can clear at zero duty instead of the normal rate, but only if the declaration is accompanied by a valid Certificate of Origin or Declaration of Origin. No paperwork, no preference. Your broker will not chase this for you.
- Tariff Concession Orders. A TCO removes duty on a specific description of goods where no substitutable product is made in Australia. TCOs are origin independent, which means if a published TCO matches your goods description, you can claim it straight away without applying for anything.
- Retrospective claims. This is the part that surprises people. Australia allows preferential treatment to be claimed after importation. Refunds can be claimed up to 12 months from shipment where the certificate was issued retrospectively, and up to four years where a certificate of origin was held at the time of import.
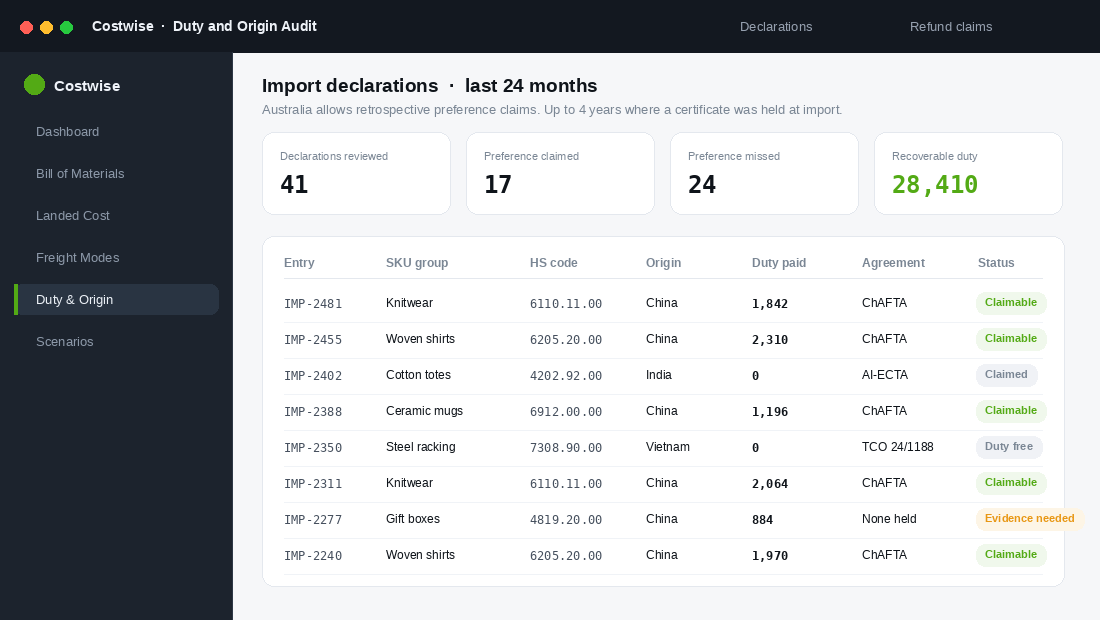
Here is the practical job. Email your customs broker and ask for every import declaration from the last four years as a spreadsheet, with tariff classification, country of origin, duty paid and preference claimed against each line. Then sort by duty paid, descending.
Any line where duty was paid and the origin is a country Australia has an agreement with is a question worth asking. Some will be legitimate, because the goods did not meet the rules of origin. Some will be paperwork that nobody chased. On a brand importing a container a quarter, we regularly see five figures sitting in that column.
Then fix it going forward. Add the Certificate of Origin to your standard purchase order checklist so it arrives with the commercial invoice and packing list every single time, not as an afterthought when the container is already on the water.
Step 5: Change how you buy, not just what you pay
Two brands can buy the identical product from the identical factory at the identical unit price and land it at costs eleven percent apart. The difference is buying behaviour.
The levers that actually move, roughly in order of how quickly you can pull them:
- Consolidate purchase orders. Three orders of 800 units across a quarter costs more in freight, clearance and admin than one order of 2,400. If your cash position allows it, buy in fewer, larger blocks.
- Fill the container. LCL sea freight from China to Australia sits around 35 USD per cubic metre, while a 40ft container is roughly 4,365 to 5,335 USD. If you are shipping LCL repeatedly, work out the cube at which a full container becomes cheaper per unit, and buy to that number.
- Share the container. If you cannot fill it alone, consolidate with another brand using the same origin port. Plenty of Aussie operators do this quietly and never talk about it.
- Split freight modes deliberately. Air freight the first 15 percent of a new range so you can start selling and validate, sea freight the rest. Blended freight cost lands far below full air, and you stop paying air rates out of panic.
- Move the shipping term. If you are buying on a delivered basis, your supplier is marking up freight and you cannot see it. Move to FOB and appoint your own forwarder so freight becomes a line you can shop.
- Pay for tooling once. Brands routinely accept a higher unit price to avoid a tooling or mould charge. Run the numbers over a two year volume. Owning the tooling usually wins, and it makes you portable between factories.
The tooling point is worth sitting with. A mould that costs 6,000 dollars and saves 90 cents a unit pays back at 6,700 units. If you sell 40,000 units a year, that is a seven week payback and then it is pure contribution for the life of the product.
Step 6: Set the guardrails before you cut anything
Every cost engineering programme needs a stop line, agreed in advance, in writing. Otherwise the first quarter of wins turns into a second quarter of quiet quality erosion, and nobody notices until the reviews turn.
Write these four numbers down before you approve a single change, and check them monthly:
- Return rate by SKU. Baseline it now. A change that lifts returns by even one point on a 45 dollar product usually erases the saving that created it.
- Review rating and review volume. Watch the thirty day rolling average, not the lifetime figure. Lifetime averages hide new problems for months.
- Damage and replacement claims. If you shrank the carton, this is the line that tells you whether you went too far. Set a ceiling before you ship, not after.
- Repeat purchase rate at 90 days. The slowest signal and the most honest one. Product quality shows up here before it shows up anywhere else.
And one rule that has never let an operator down: no spec change ships without a physical sample approved by a human in Australia. Not a photo, not a video call held up to a webcam. A sample in your hands, next to the current version, compared side by side.
How six small wins stack into 18 percent
This is where the discipline pays off, and it is why cost engineering beats negotiation over any real time horizon.
No single move in this article is dramatic. A yarn re-spec worth 1.10 a unit. A packaging change worth 1.70. A carton rebuild worth 1.34 on inbound freight and another 8 cents on 3PL. A duty preference worth 1.18. An inline quality check at the factory that cuts the rework provision by 50 cents. Individually, each one is a Tuesday afternoon.
Stacked on a product landing at 32.86, they take it to 26.94. That is 18 percent out of landed cost, and none of it came from a supplier taking a haircut.
Now push that through the rest of the business, because this is the part founders miss. Landed cost sits at the very top of the P and L, which means every dollar removed there is a dollar of contribution, and contribution is what pays for customer acquisition.
- Contribution per unit rises by 5.92 with no change to price, no change to conversion rate, no change to ad spend.
- Your allowable acquisition cost rises with it. You can now afford to pay more for a customer than the competitor selling the identical category, which is a durable advantage in a small, concentrated ad auction like Australia.
- Free shipping thresholds get easier. The threshold that was breaking even at 89 dollars now breaks even at 74, so you can lower it and lift average order value.
- Discounting hurts less. A 20 percent off campaign that was marginal at the old cost base is comfortably profitable at the new one.
- Cash cycle improves. Cheaper stock means the same purchase order ties up less working capital, which means you can buy deeper into your winners.
One brand cutting 18 percent from landed cost does not get 18 percent more profit. It gets a structurally different business, with more room to buy customers, more room to discount when it chooses to, and more room to survive the next freight cycle without a panic price rise.
Your 90 day cost engineering sprint
Do not try to do all of this at once across every SKU. Run it as a sprint on your top three products, then repeat it once a year. Here is the sequence we use.
Days 1 to 14: build the map.
- Rebuild the full landed cost for your top three SKUs across all nine cost lines.
- Colour every line red, amber or green using the customer notice test.
- Baseline the four guardrail metrics so you have a before picture.
Days 15 to 30: chase the free money.
- Request four years of import declarations from your broker and audit the preference column.
- Lodge any retrospective refund claims that stack up.
- Add the Certificate of Origin to your standard purchase order checklist.
Days 31 to 60: redesign the pack.
- Measure carton void, calculate cubic against dead weight, and ask the factory for their minimum safe carton.
- Check the new dimensions against a standard Australian pallet footprint and against your carrier satchel bands.
- Order a physical sample of the new pack. Drop test it yourself before you approve it.
Days 61 to 90: re-spec the green lines and change how you buy.
- Send the factory your green line list and ask for a revised quote against each change.
- Approve only what passes a side by side physical comparison.
- Consolidate your next two purchase orders into one, and price the full container option against LCL.
- Re-run the landed cost model and lock the new number into Shopify and your BOM tool.
Then hold the line. Put a calendar reminder ninety days out to check the four guardrail metrics against baseline. If returns, damage claims, reviews and 90 day repeat rate are all steady, the saving is real and it is yours to keep.
The number most founders never look at
Ask most Aussie Shopify founders what their landed cost is on their hero product and you get a number to the dollar. Ask them what the packaging line is inside it, or what they paid in duty last financial year, or what their carton cube is, and the room goes quiet.
That silence is worth somewhere between 10 and 20 percent of your cost of goods. It has been sitting there the whole time, not because you were careless, but because everyone told you growth comes from the front of the funnel and nobody told you the cheapest customer you will ever acquire is the margin you already own.
Start with one SKU. Nine cost lines. One afternoon.
Inside eCommerce Circle, cost engineering is one of the core pillars we work on with every member, because it is the fastest way to change the maths on a business without touching price or spend. If you want a second opinion on yours, let’s talk.