For most Shopify stores, the right Meta ads attribution setting is 7-day click for prospecting and 1-day click for retargeting, locked for at least 14 days at a time. The default of 7-day click plus 1-day view is fine for impulse products under $60, but it flatters your ROAS on everything else.
Here is the problem most store owners run into. Meta says you made 212 sales this fortnight. Shopify says 139 of them came from ads. You start second-guessing the whole account, flip the attribution setting to 1-day click, watch ROAS drop by a third, and pause ads that were working. Nothing changed in the real world. Only the maths did.
This guide shows you what each setting actually counts, what Meta changed in 2026, why the Meta-versus-Shopify gap exists, and the exact process we use with Aussie stores to pick a window and stop second-guessing it. If you want the wider picture first, start with our guides to ecommerce marketing attribution and Meta ads ROAS benchmarks for Australia.
What the Meta attribution setting actually controls
The attribution setting is set at the ad set level. It decides which conversions Meta credits to your ads, and it does two jobs at once. It changes how your reporting looks, and it changes how Meta optimises delivery, meaning who inside your audience gets shown the ad. That second job is the one most owners miss. Change the window and you are not only changing a number on a screen, you are changing who the algorithm hunts for.
It only applies to website conversions on the Sales, Leads and Engagement objectives. To find it, open your ad set, go to the performance goal, click See more options, then edit the attribution setting. Meta’s own default for website sales is 7-day click plus 1-day view, which Jon Loomer, an independent Meta ads trainer, describes as usually the best fit for purchases because buying decisions take time.
The reason this matters more in 2026 is that Meta has changed the rules twice this year.
Change 1: view windows removed from the API (12 January 2026)
Meta removed the 7-day view and 28-day view windows from the Ads Insights API on 12 January 2026. If you pull Meta data into a dashboard, spreadsheet or reporting tool, any report still requesting those windows now returns empty data. The windows that remain are 1-day click, 7-day click, 28-day click, 1-day engaged view and 1-day view. Meta also limited how far back some breakdowns go: 13 months for unique-count and hourly breakdowns, and 6 months for frequency breakdowns.
What to do: if your weekly report suddenly shows fewer conversions since January, check which window your tool requests before you blame the ads.
Change 2: click-through now means link clicks only (March 2026)
In March 2026 Meta announced it would count only link clicks as click-through attribution. Likes, shares, saves and comments used to be treated as clicks. Those conversions now sit in a new bucket called engage-through, which replaced engaged-view. Engage-through has a fixed 1-day window and a lower video threshold: 5 seconds of watch time instead of 10. Meta said the change should bring its numbers closer to tools like Google Analytics, which only ever tracked link clicks.
Two things follow. Your click-through numbers may have dropped without any change in performance, because some conversions were reclassified. And someone who saved your ad on Monday and bought on Thursday is no longer credited, since engage-through only looks 1 day ahead. Jon Loomer expects retargeting to feel this most. His advice is to keep engage-through ticked in the ad set and use the compare view to see what moved. If your results shifted in mid-March, that is your answer, so set a fresh baseline from then.
One caveat on dates: Meta’s announcement came from the US, and we could not find an Australia-specific rollout date, so check your own Ads Manager before assuming it is live in your account.
The attribution options, explained in plain English
- 7-day click, 1-day view (the default). A sale counts if someone clicked your ad in the last 7 days, or saw it without clicking in the last day. It captures the most conversions and is the most generous setting.
- 7-day click. Same as above without the view-through. Only people who clicked a link count. This is the cleanest match for what Shopify and GA4 can see.
- 1-day click. Only sales within 24 hours of a link click. Strictest option. It suits retargeting and quick, low-consideration offers.
- 1-day view. Someone saw the ad, did not click, then bought within a day. This is where most of the over-crediting lives, especially when you are retargeting people who were about to buy anyway.
- 1-day engage-through. Sales within a day of a like, share, save or a 5-second video view. Leave it on for video-led ad sets.
- 28-day click. Only available as a comparison column. Treat it as a curiosity unless you sell something people think about for a month.
- Incremental attribution. A newer option where Meta tries to optimise toward conversions the ad likely caused, not just touched. More on that below.
Why your Meta ROAS never matches Shopify
Three things stack up. Meta credits any order touched by an ad inside the window, while Shopify counts all orders and credits them to the last non-direct click or your UTMs. Browser tracking drops events from iOS, Safari and ad blockers. And if you run both the pixel and the Conversions API without a shared event ID, Meta can count the same sale twice.
Vendor analyses put numbers on this, and they are worth treating as rough guides rather than gospel. Aimerce, a Shopify tracking vendor, estimates that switching from 7-day click plus 1-day view to 1-day click can cut Meta-attributed revenue by 20 to 40 percent overnight. Jetfuel, a DTC agency, puts the apparent ROAS drop at 30 to 50 percent. Same account, same ads, same customers. Only the window changed.
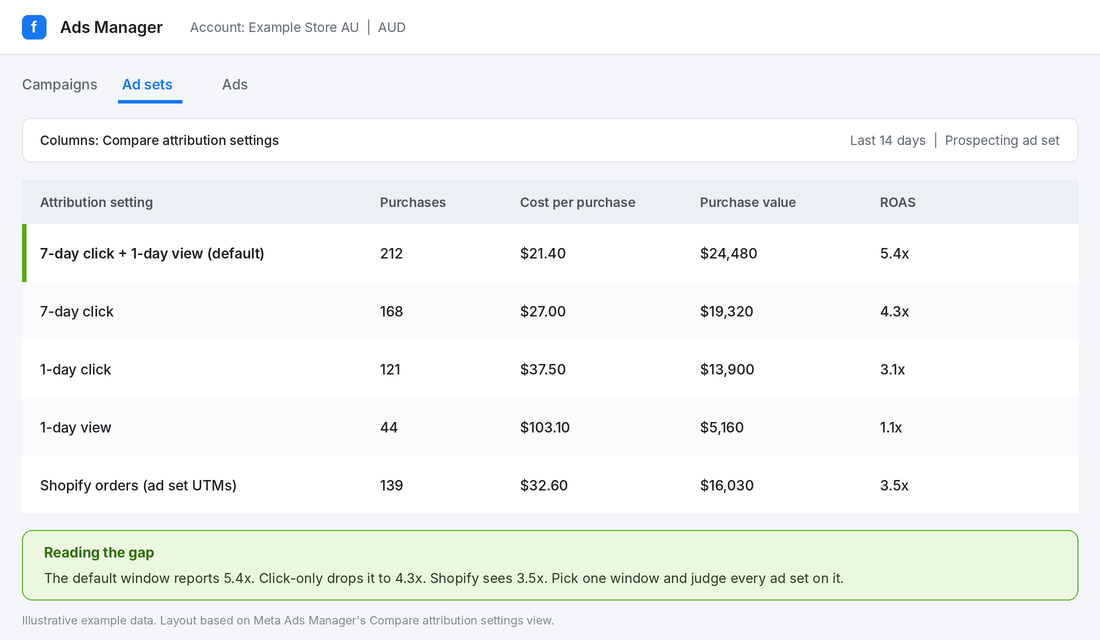
That is why you should never compare an ad set measured on 7-day click plus 1-day view against another measured on 7-day click. You are comparing two different rulers. The same applies to the day you change the setting: your before-and-after numbers are not like for like.
The check that matters: a gap between Meta and Shopify is normal. A gap you cannot explain is the problem. Aimerce suggests an unexplained gap above 10 percent points to a tracking fault such as missing deduplication, while a gap explained by attribution design is expected. We cover the full reconciliation in our Meta ads not converting guide, because bad measurement is often mistaken for bad creative.
The case against blindly cutting view-through
Here is where we part ways with the usual advice. A lot of agency blogs tell you to drop view-through and use click-only because it is more conservative. Conservative is not the same as correct. The most useful data we have on this comes from Haus, a measurement company that has run geo-based holdout tests, where ads are switched off in some regions and left on in others to see what truly changes.
In a July 2025 analysis of 640 Meta incrementality tests, Haus found Meta drove an average 19 percent lift to the brand’s main KPI. And for DTC-only brands, Meta’s 7-day click reporting actually under-stated true incrementality by 15 percent on average. So the default is not always flattering you. For some stores it is selling the ads short.
Two real brands show how this plays out:
- Javvy Coffee. Haus ran two Advantage+ campaigns with an even budget split: bottom-of-funnel (product shots and testimonials) and top-of-funnel (problem-solution video). Top-of-funnel was over 13 times more incremental. Its cost per incremental acquisition came in about 20 percent lower than click-based reporting suggested, while the bottom-of-funnel campaign’s cost per incremental acquisition was about 250 percent higher than reported. Javvy moved most of its Meta budget to top-of-funnel, and overall CAC and MER improved.
- Mejuri. The jewellery brand found most Meta revenue was coming from people who already knew the brand. It moved 25 percent of its Meta budget to upper-funnel campaigns and ran a 3-week geo test with a 30 percent holdout (22 February to 14 March 2025). Incremental revenue lifted 11 percent during the test, and iROAS improved 57 percent.
The lesson is not that view-through is good or bad. It is that last-touch style reporting rewards the ads closest to the sale, which is usually retargeting, and quietly starves the ads that create demand. If you drop view-through and judge everything on 1-day click, your retargeting will look great and your prospecting will look terrible, and you will cut the wrong one. Our incrementality testing guide shows how to run a simple holdout so you are not guessing.
There is also the new Incremental attribution setting. Haus re-analysed its tests in 2026 and found Incremental attribution outperformed standard attribution by 1.26x in the 12 months to June 2026, up from underperforming (0.80x) the year before. For DTC-only brands the recent result was 1.38x. Haus is careful to say it is a modest number of tests and advertisers should test for themselves, so treat it as worth a controlled trial, not a switch to flip across the account.
How to choose your setting: the decision table
The right window follows your customer’s buying cycle. If most buyers decide inside a day or two, a long window just credits ads for sales that were already happening. If your product takes a week of thinking, a 1-day window will miss most of your revenue and push the algorithm toward the wrong people.
Australian shoppers research a lot before they buy. The IAB Australia and Pureprofile Commerce and Discovery Report 2026 surveyed 1,079 Australians who had shopped online in the past year. It found 92 percent use search engines or online retail stores to research products, 68 percent use social media for it (88 percent of 18 to 39 year olds), and 69 percent rely on online research to feel confident before buying. That research phase is why a single Meta click often turns into a sale two or three days later, through Google or a direct visit, and why a 1-day window undercounts mid-priced products.
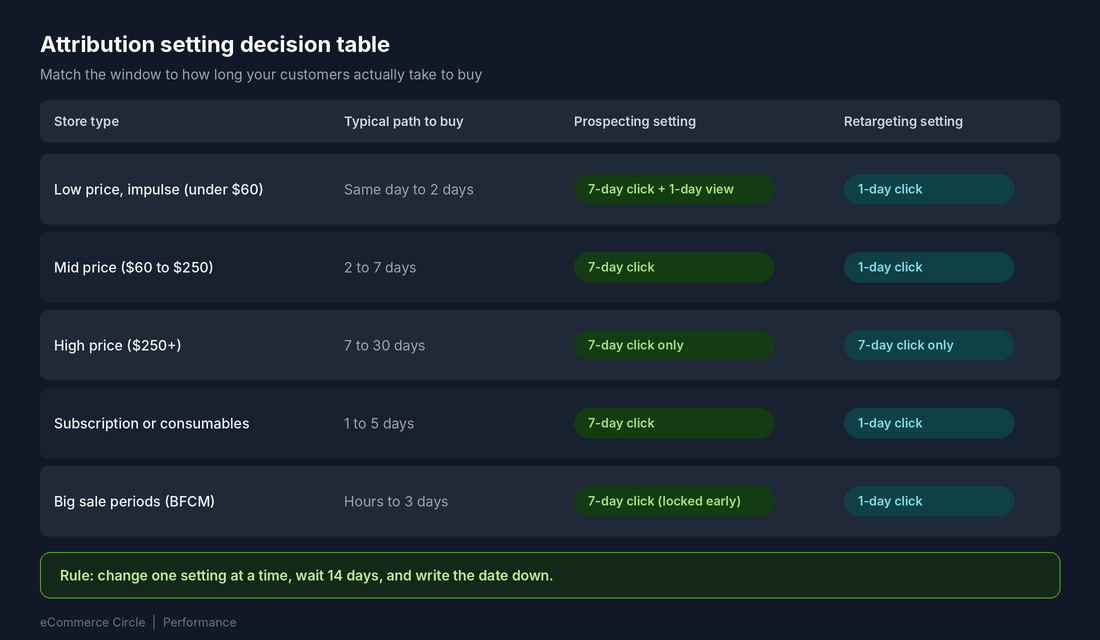
Use this as your starting point, then check it against your own data:
- Under $60, impulse purchases: 7-day click plus 1-day view is reasonable, because buyers act quickly and the view-through effect is small.
- $60 to $250: 7-day click for prospecting. This is where most Aussie Shopify stores sit.
- Over $250, considered purchases: 7-day click only, for both prospecting and retargeting. A 1-day window will hide most of your results.
- Retargeting (cart abandoners, site visitors): 1-day click. These people were already close to buying, and a long window will claim credit for emails, SMS and brand search you also sent them.
- Subscription or consumables: 7-day click for new customers, with retention tracked in Klaviyo, not Meta.
To find your own buying cycle, open Shopify Analytics, go to Reports and look at the time between a customer’s first session and first order. If more than 60 percent of buyers convert inside 24 hours, shorten the window. If less than half do, lengthen it.
Tools and setup: compare windows, then add a survey
You do not need to buy anything to start. Meta’s own Compare attribution settings view does the heavy lifting, and a post-purchase survey adds the human check that no pixel can give you.
Step 1: Run the Compare attribution settings view (free, 10 minutes)
- Open Ads Manager and go to the Ad sets tab.
- Click Columns, then choose Compare attribution settings.
- Add 1-day click, 7-day click, 1-day view and 1-day engaged view alongside your current setting.
- Set the date range to the last 14 days and filter to one prospecting ad set.
- Screenshot it. Then pull Shopify orders for the same ad set using UTMs, and put both in a simple table like the example above.
- If 1-day view is more than 40 percent of reported results, you are leaning hard on impressions. Test 7-day click only on that ad set before you scale it.
Step 2: Add a post-purchase survey with Fairing (from $0)
Fairing is a Shopify post-purchase survey app. Its free plan covers up to 200 orders a month, paid tiers start at US$49 a month for 201 to 500 orders, and it has a 5.0 rating across 196 reviews on the Shopify App Store at the time of writing. A survey asks one question after checkout: How did you first hear about us? It catches the dark social, podcast, word of mouth and TikTok influence that pixels never see.
- Install Fairing from the Shopify App Store and connect it to your store.
- Create one question, ‘How did you first hear about us?’, with answers like Instagram or Facebook, TikTok, Google, a friend, a podcast or YouTube, and Other.
- Show it on the order confirmation page so it takes one tap.
- Log the top three answers each Monday next to Meta’s reported conversions.
- After 4 weeks, compare. If ‘Instagram or Facebook’ is far larger than Meta’s click-based number, Meta is doing more work than your window credits it for.
Fairing reports that unattributed sales labelled direct or unknown often sit at 15 to 30 percent of all sales. In one case study, a skincare brand working with agency MuteSix found over half of purchases came via Instagram and nearly 20 percent via TikTok, more than its platform data showed. It kept TikTok spend flat, scaled Meta, and saw new customer acquisitions rise 40.7 percent and revenue rise 46.6 percent in a month. For a deeper walkthrough, see our post-purchase survey guide.
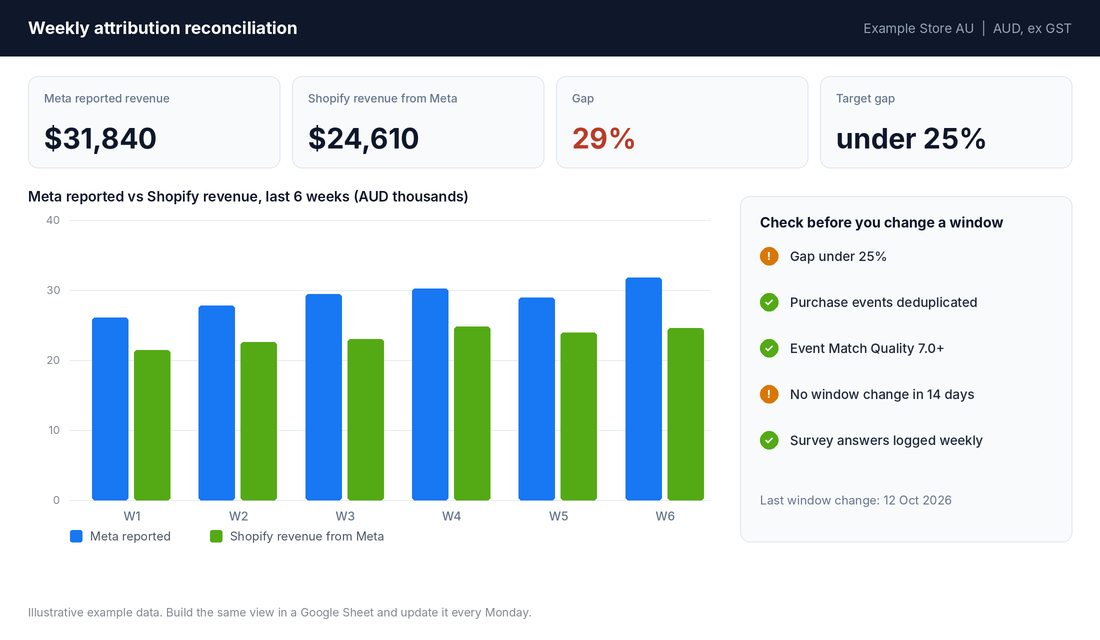
Fix your signal before you judge any window
No attribution window can rescue broken tracking. If Meta only sees 60 percent of your purchases, it will under-credit every window and optimise on partial data. Before you change a single setting, check these four things in Events Manager:
- Conversions API is on. Server-side purchase events recover sales that browsers block. Aimerce estimates it recovers 20 to 35 percent of previously lost purchase events.
- Deduplication is working. The pixel and the Conversions API should send the same event ID for each order. If you see near 0 percent of server events marked as deduplicated, you are probably double counting.
- Event Match Quality is healthy. Check your Purchase event. A score of 7 or above is a sensible target. Send hashed email and phone at checkout to lift it.
- A test order fires one Purchase. Use test mode in Events Manager, place an order, and confirm exactly one Purchase event appears.
Get these right and your Meta number and your Shopify number will sit much closer together, whichever window you pick.
The 14-day change protocol (copy this)
Most attribution damage comes from changing settings too often, not from choosing the wrong one. Use this protocol every time you touch the setting:
Attribution change checklist
Day 0: Record the current setting, ROAS, CPA and Shopify revenue for the ad set over the last 14 days. Save a screenshot.
Day 0: Check the signal checklist above. Fix tracking problems first.
Day 1: Change one thing on one ad set. Never change the window and the creative together.
Days 2 to 7: Hold budget steady. No edits, no new ads, no pausing.
Day 14: Compare cost per purchase and blended Shopify revenue, not Meta ROAS. Meta ROAS will move simply because the window changed.
Day 14: Log the date and the decision in a sheet. If the Meta CPA and your first-party CPA drift more than 30 percent apart for 3 days, investigate before you act.
The metric to judge by is blended performance: total Shopify revenue against total ad spend, tracked weekly. If you want a place to start, set up a simple MER (revenue divided by total ad spend) view and watch it alongside Meta’s reported ROAS. If both improve, the change worked. If only Meta ROAS improves, you changed the ruler, not the result.
How the pieces work together
Each part on its own is a small fix. Together they replace guesswork with a system. The window choice stops Meta over- or under-crediting your ads. Clean tracking gives the algorithm full data. The survey catches what the pixel cannot see. The weekly reconciliation keeps the Meta-versus-Shopify gap visible. And the 14-day protocol means every change is a clean test, not a coin toss.
The payoff is confidence. When you can see that prospecting is driving new customers even though its 1-day click ROAS looks weak, you stop cutting the ads that feed your retargeting. When you can see that a campaign’s ROAS is mostly view-through on people already on your email list, you stop scaling it. That is how you stop wasting budget in either direction.
Timing note for this season: Black Friday is 27 November 2026. Lock your attribution settings well before then, so your Black Friday numbers are comparable to your October baseline. Changing windows in the middle of a sale is the fastest way to lose track of what is working. Our Black Friday Australia 2026 guide has the full deadline list, and our Meta ads budget guide covers how to set spend for the peak.
Quick answers
What is the best attribution setting for Meta ads?
For most Shopify stores selling products between $60 and $250, 7-day click for prospecting and 1-day click for retargeting. Keep 1-day view off for retargeting, and test whether it earns its place in prospecting.
Is 7-day click or 1-day click better?
Neither is better in absolute terms. 7-day click suits products people think about for a few days. 1-day click suits impulse buys and retargeting. The right one matches how long your customers take to buy.
Should I remove the 1-day view window?
Remove it where it inflates results, mainly in retargeting and when remarketing to email subscribers. If 1-day view is more than 40 percent of reported results, test 7-day click only. Do not remove it everywhere without a holdout test, because it can under-credit prospecting.
Inside eCommerce Circle, attribution and measurement is one of the core pillars we work on with every member, because you cannot scale what you cannot read. If you want to see exactly where your store is being capped, take the free More Orders Scorecard. It takes two minutes and shows you which of the 10 P’s to fix first.