There is a 60-second window in your store where conversion rates run five to ten times higher than anywhere else on your site. It is not your homepage. It is not your product page. It is the moment right after a customer’s card has been charged, and most Aussie Shopify founders are wasting it on a bare order confirmation screen.
What’s in This Article
Think about what has just happened. The customer found you, trusted you, entered their payment details and committed. Every objection has already been overcome. Industry benchmarks show well-built post-purchase offers convert at 8 to 15%, while the average pre-purchase upsell scrapes along at 1 to 3%. Same products, same customer, wildly different result. The only variable is timing.
Australians spent a record $69 billion online last year according to the Australia Post 2025 eCommerce Report, up 12% year on year. The brands winning a bigger slice of that are not necessarily acquiring more customers. They are extracting more from every order they already win. This playbook walks you through the exact 5-step post-purchase upsell system we work through with eCommerce Circle members, including the offer logic, the one-click setup, and the benchmarks that tell you whether it is working.
Why the 60 Seconds After Payment Is the Cheapest Revenue You Will Ever Earn
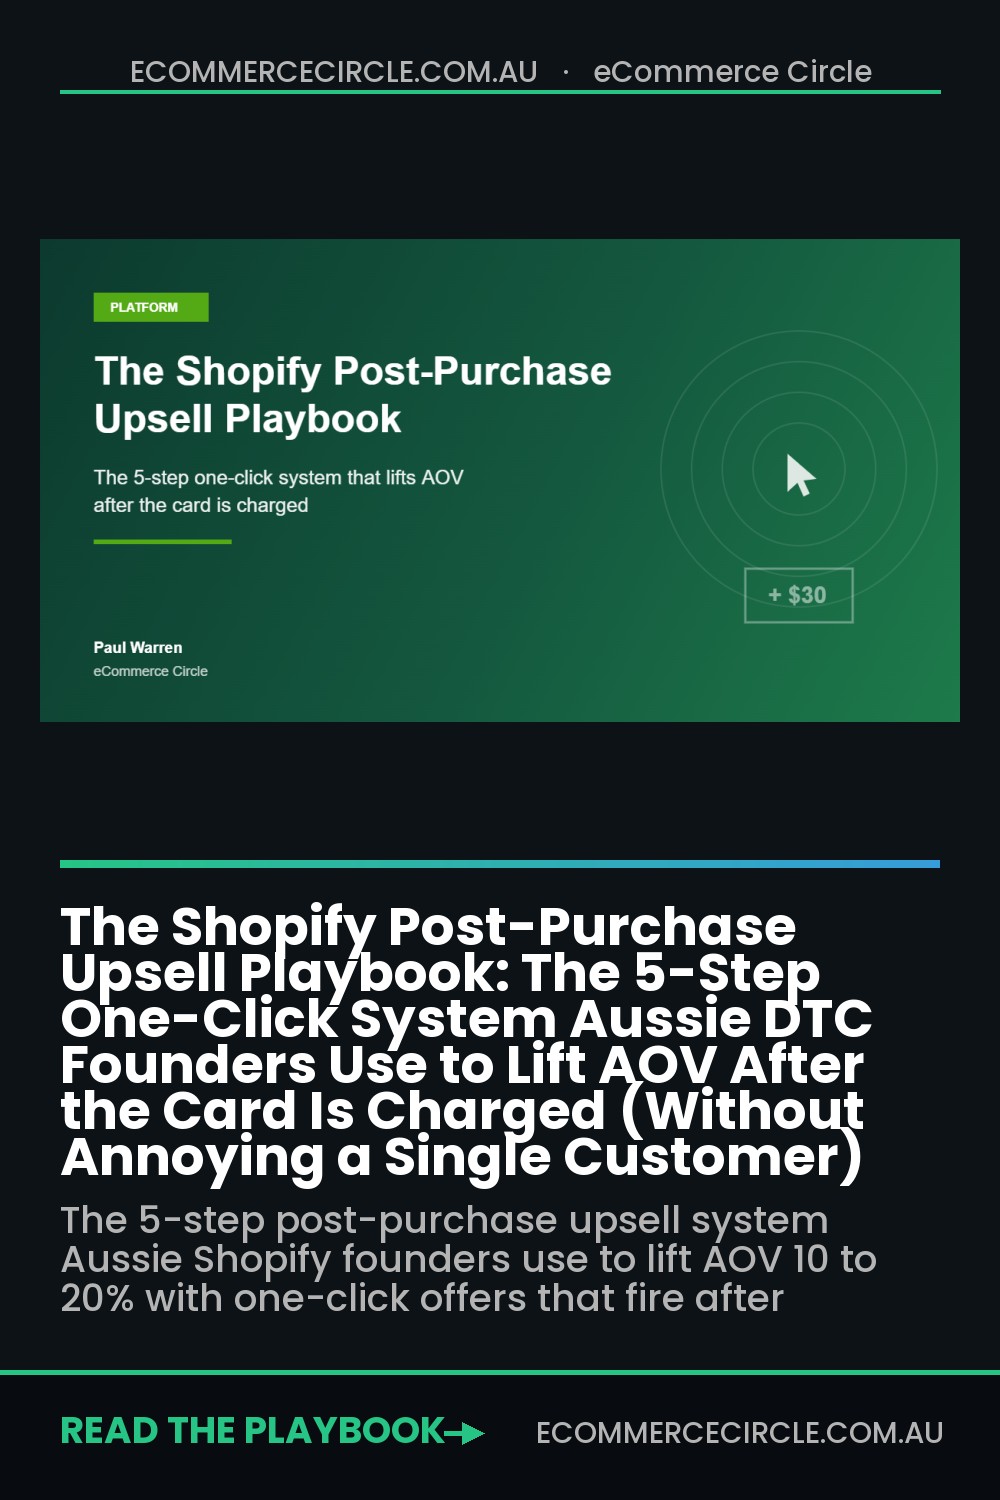
A post-purchase upsell is an offer shown between the checkout and the thank-you page. Because Shopify has already captured payment, the customer can accept with one tap. No re-entering card details, no second checkout, no friction. Decline it, and they land on the order confirmation as normal. The original order is never at risk.
That last point matters more than founders realise. The classic fear with upselling is that you distract the buyer and lose the sale. Pre-purchase upsells carry that risk. Post-purchase offers carry zero, because the money is already in your account before the offer ever appears.
The numbers back the timing argument:
- Acceptance rates of 8 to 15% are the realistic band for relevant, well-priced post-purchase offers, against an industry-wide average of roughly 4% for stores that set and forget.
- ReConvert reports a 4.7% average conversion across its user base, with top-performing funnels reaching 28.3%. The gap between average and excellent is offer quality, not the app.
- Zipify OneClickUpsell users average 16.2% conversion, and merchants on the platform generated US$254 million in additional upsell revenue in 2025 alone.
- AOV lifts of 10 to 20% are the typical outcome when the full funnel (upsell, downsell, thank-you page) is in place.
Run that against your own numbers. A store doing $80k a month at a $95 AOV processes around 840 orders. If 12% of those orders accept a $30 offer, that is just over $3,000 a month in revenue with no extra ad spend, no extra traffic, and close to no extra cost beyond the product itself. It is the closest thing ecommerce has to found money.
Step 1: Pick One Offer the Customer Cannot Argue With
Most post-purchase funnels fail at the offer, not the technology. Founders treat the upsell slot as a clearance bin and push whatever is overstocked. The customer just told you exactly what they care about by buying it. The offer has to continue that purchase, not interrupt it.
Three offer types consistently perform, in this order:
- The consumable top-up. They bought coffee beans, offer a second bag at 20% off. They bought skincare, offer the travel size. Acceptance is high because the buying decision is already made; you are just changing the quantity.
- The missing piece. The accessory that makes the main product work better. Bought a candle? Offer the wick trimmer. Bought sneakers? Offer the cleaning kit. The customer perceives this as helpful, not salesy.
- The upgrade path. A subscription version of what they just bought, or a bundle that extends it. This is the highest-LTV option, and pairs beautifully with the loyalty mechanics we covered in The Shopify Average Order Value Playbook.
Pricing rules that keep acceptance high: keep the offer between 25 and 60% of the original order value, attach a discount of 15 to 25% framed as a one-time deal, and never show more than one product per offer screen. A $95 order can carry a $25 to $50 offer comfortably. A $200 offer after a $95 order reads as a second buying decision, and second buying decisions get declined.
One real-world proof point: eyewear brand Lucyd added thank-you page and post-purchase offers through ReConvert and attributed a 5.6% lift in net revenue within three months. Their CEO put it down to catching customers “coming back and buying something within a couple of minutes” rather than trying to upsell people who had not yet committed.
Step 2: Build the One-Click Offer (the 20-Minute Setup)
You do not need a developer for any of this. Shopify’s native post-purchase API powers a handful of mature apps. AfterSell and ReConvert are the two we see most across Aussie member stores, and Zipify OCU is the heavyweight option if you are doing serious volume. All three sit in the $0 to $50 a month band at typical store sizes, and all three charge based on order volume.
Here is the AfterSell setup, start to finish:
- Install AfterSell from the Shopify App Store, then in Shopify admin go to Settings, then Checkout, and under “Post-purchase page” select AfterSell as the provider. This is the step most founders miss, and nothing renders without it.
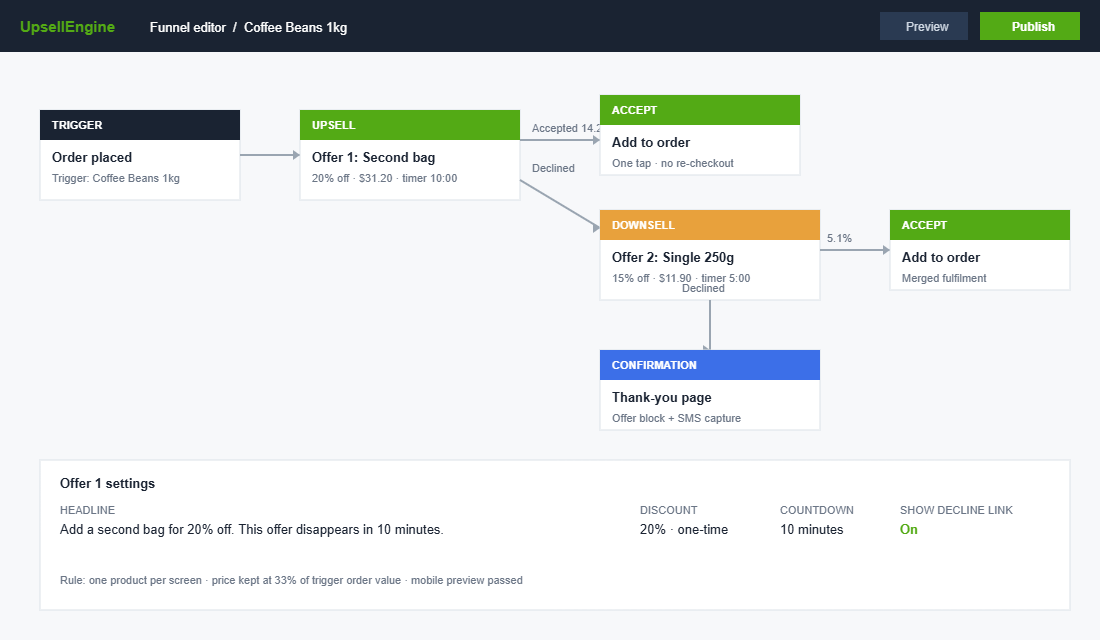
- Create your first funnel. In AfterSell, hit Funnels, then New Funnel. Name it after the trigger product so future-you can read the dashboard.
- Set the trigger. Choose the products or collections that should fire this funnel. Start with your single best-selling product. One funnel, one trigger, one offer.
- Add the offer product, set the discount (15 to 25%), and write the headline. “Add a second bag for 20% off, this offer disappears in 10 minutes” outperforms any generic “You may also like”.
- Turn on the countdown timer set to 5 or 10 minutes. Urgency here is honest: the offer genuinely cannot be retrieved once they leave the page.
- Preview on mobile, then publish. Over 70% of Aussie ecommerce traffic is mobile, so if the offer screen needs pinching and zooming, fix it before it goes live.
ReConvert follows the same shape with a drag-and-drop editor, and Zipify OCU adds AI-driven product selection that picks the offer for you. The app matters far less than the offer logic from Step 1. A mediocre app with the right offer beats a premium app pushing dead stock every time.
Step 3: Sequence the Funnel: Upsell, Downsell, Done
Shopify’s post-purchase API allows a sequence, and the proven pattern is exactly two screens. Screen one is your primary upsell. If the customer declines, screen two shows a downsell: a cheaper, smaller or simpler version of the same idea. If they decline that too, they go straight to the thank-you page. Done.
The downsell is where lazy funnels leave money behind. A decline on a $49 bundle is not a no to everything, it is a no to that price point. Offering the $19 single unit recovers a meaningful share of those declines. Across member stores we typically see downsells convert at one third to one half the rate of the primary offer, which is pure margin you would otherwise never see.
Three sequencing rules keep it clean:
- Never show a third screen. Two offers is persuasion. Three is a gauntlet, and the customer’s last memory of your brand becomes “they would not let me leave”.
- Downsell down, never sideways. The second offer must be cheaper than the first. A different product at the same price just repeats the question the customer already answered.
- Cap the timer honestly. If the countdown says the deal dies in 10 minutes, it dies in 10 minutes. Aussie shoppers are scarcity-literate, and fake urgency burns trust you spent real ad dollars building.
Step 4: Turn the Thank-You Page Into a Second Storefront
The order confirmation page is the most revisited page in your store that you have never designed. Customers return to it two to four times per order to check status, which makes it free, repeated, high-intent real estate. Shopify’s order status page accepts apps and custom content, and this is where ReConvert in particular earns its keep.
The high-performing thank-you page carries four elements in order: the order details the customer came for, a one-time offer block with its own countdown, a “complete the set” product recommendation row, and a birthday or SMS capture field that feeds your retention flows. That last element quietly builds the list that powers everything we covered in the post-purchase email and SMS playbooks.
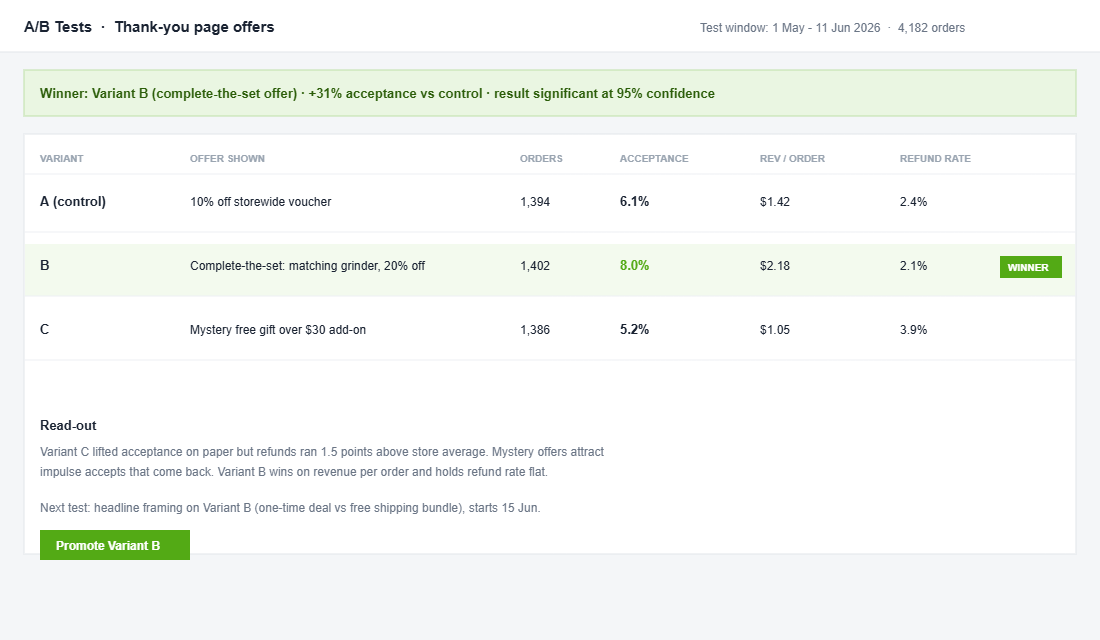
Zipify’s published case studies show what this layer adds: one cosmetics brand on OCU lifted AOV 15% with a thank-you page offer stacked on a single post-purchase upsell. The thank-you page typically converts below the one-click screens, but it costs nothing to run and compounds across every order, including the ones that declined both offers.
One guardrail: do not let the thank-you page bury the order details. The customer’s primary job on that page is reassurance. Offer second, confirmation first. Get the order wrong and you create support tickets that eat the margin the upsell just earned, a trade-off we unpacked in Shopify Checkout Optimisation: The 7-Point Audit.
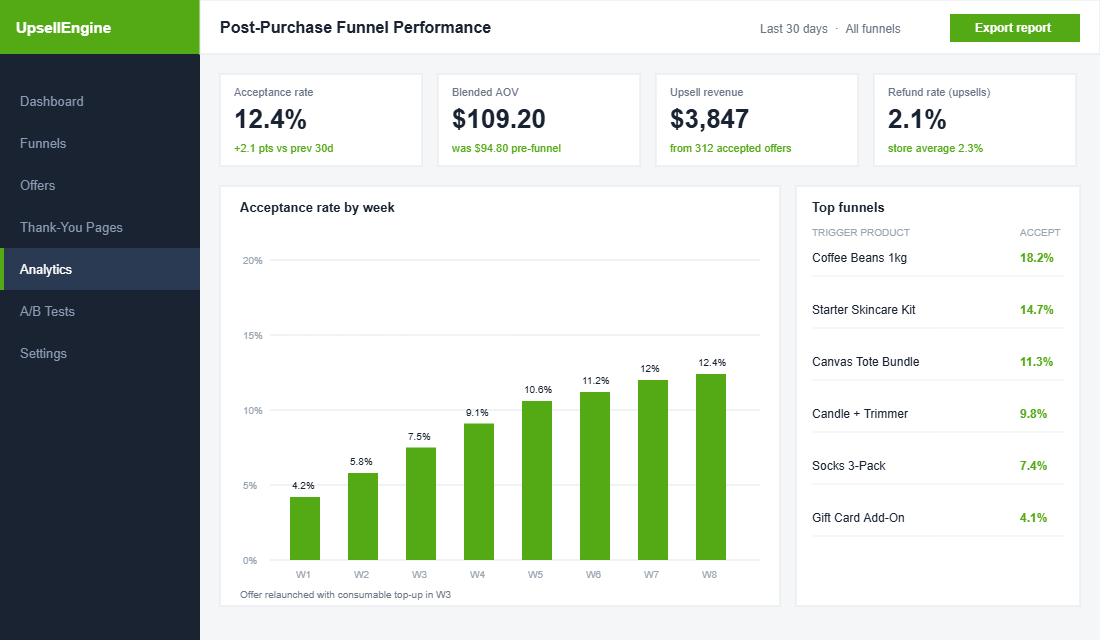
Step 5: Measure Acceptance, Not Just Revenue
Upsell revenue is a vanity number on its own. A funnel can print extra dollars while quietly annoying 95% of your customers, and you will not see the damage until repeat rates sag two months later. Four metrics tell the real story:
- Acceptance rate per funnel. Under 4%, your offer is irrelevant or overpriced; fix the offer before touching anything else. Between 8 and 15%, you are in the healthy band. Above 20%, you are leaving money on the table and can test a higher-value offer.
- AOV with and without upsell revenue. The whole exercise should be moving blended AOV by 10 to 20%. If it is moving 2%, the offer price point is too timid.
- Refund rate on upsold items. If accepted offers come back at a higher rate than normal orders, the urgency is overcooked and people are impulse-buying things they do not want. Pull the timer back or soften the copy.
- Repeat purchase rate of upsold customers. The number that settles the “does upselling annoy people” debate. In a healthy funnel, customers who accept an upsell repeat at the same rate or higher than those who decline.
Review the dashboard fortnightly for the first two months, then monthly. Change one variable at a time: offer product, then discount depth, then headline, then timer length, in that order of impact. Treat it like the A/B testing discipline you run everywhere else in the business.
The Compound Effect: What a 12% Acceptance Rate Does to Your Year
Here is where the five steps stop being tactics and start being a system. Take that same store: 840 orders a month, $95 AOV. A 12% acceptance on a $30 primary offer adds roughly $3,024 a month. The downsell catches another 4% of the decliners at $19, call it $570. The thank-you page adds 1.5% of all orders at $25, another $315. That is close to $3,900 a month, or about $47,000 a year, from customers you had already paid to acquire.
Now run it through the margin lens. If your blended contribution margin is 30%, that $47k of upsell revenue behaves more like $60k of cold-traffic revenue, because there is no acquisition cost attached to it. The system also compounds with everything else: a stronger AOV loosens your CAC ceiling, which lets you bid harder on Meta, which wins more first orders for the funnel to work on. One quiet flywheel, spinning off a page most stores leave blank.
The Five Mistakes That Kill Post-Purchase Funnels
We audit a lot of member funnels, and the failures repeat. If your acceptance rate is stuck under 4%, it is almost always one of these five.
- Offering a stranger product. The customer bought a dog harness and you offered them a cat tower because it was overstocked. Relevance is the single biggest driver of acceptance, and no discount rescues an irrelevant offer.
- Pricing the offer above the original order. An offer bigger than the order forces a brand-new buying decision. Keep it to a fraction of what they just spent and acceptance becomes a reflex rather than a deliberation.
- Cluttering the offer screen. Three products, two badges, a testimonial and a banner is a catalogue, not an offer. One product, one price, one button. The decline link stays visible, because hiding it breeds resentment and chargebacks.
- Forgetting shipping logic. If the upsell ships separately and triggers a second delivery window, say so. Australian customers are patient with distance but allergic to surprise. The post-purchase API merges fulfilment on most apps, so check how your 3PL handles the amended order before going live.
- Set and forget. The gap between the 4.7% average funnel and the 28.3% top performer is iteration. The founders at the top of that range did not write a better first offer, they reviewed the dashboard every fortnight and kept the tests running.
There is also a GST housekeeping note for Aussie stores: upsell revenue flows through Shopify as a standard order amendment, so your reporting and BAS treatment stay clean. The apps do not create a separate payment stream, which keeps your accountant happy and your reconciliation simple.
None of these fixes require new software. They require somebody to own the funnel as a weekly habit rather than a launch-day task. In most member stores that is a 20-minute fortnightly review, which makes it one of the highest-paid 20 minutes in the business.
The Post-Purchase Upsell Checklist (Steal This)
Run this before you call the funnel live, and again at your first fortnightly review:
- Offer: continues the purchase (top-up, missing piece, or upgrade), priced at 25 to 60% of original order value, one product per screen.
- Discount: 15 to 25%, framed as one-time, honoured honestly.
- Sequence: one upsell, one downsell at a lower price, never a third screen.
- Thank-you page: order details first, offer second, SMS or birthday capture present.
- Mobile: previewed and clean on a phone before publishing.
- Benchmarks: acceptance 8 to 15%, blended AOV up 10 to 20%, refund rate flat, repeat rate flat or better.
- Cadence: fortnightly reviews for two months, one variable changed at a time.
Where This Fits in Your Growth Plan
Post-purchase upsells are one lever in the AOV system, and AOV is one of the five levers that decide whether your store compounds or stalls. They work best when the cart, the checkout and the offer architecture are pulling in the same direction, which is why we built them into the same module as cart drawer optimisation inside the program.
Inside eCommerce Circle, offer architecture is one of the core pillars we work on with every member. If you want a second opinion on yours, let’s talk.