To start an online store in Australia, you need an ABN, a business name if you trade under anything other than your own, a Shopify plan, a product you have already proven people will buy, and a plan for GST once you near $75,000 in turnover. The whole setup can cost under $5,000 and take six weeks. The expensive part is not the setup. It is building a full store before anyone has said yes to the product.
Most first-time founders do it backwards. They pick a theme, order 500 units, run ads for a fortnight and wonder why nothing sells. The founders who last do the unglamorous bits first: they test the product with real buyers, sort the legal basics in an afternoon, and spend nothing on traffic until three test orders have shipped and arrived.
The timing is good. Australia Post’s 2026 eCommerce Report puts online spend at $82.6 billion for 2025, up 14% on the year before, and 24% of all retail spend now happens online. Roughly 9.8 million households (82% of the country) bought online, and about 41% of them do it at least fortnightly. The buyers are already here. This guide shows you how to be ready for them without wasting your savings.
Step 1: Prove someone will pay before you build anything
Your first job is not a website. It is ten strangers saying “yes, I’ll pay $X for that.” Everything else on this list is cheaper to fix than a product nobody wants.
Here is the cheap test we put founders through inside eCommerce Circle. Make or buy a handful of units, post them in two or three places your buyer already hangs out (a Facebook group, a local market, Instagram stories, a mate’s email list), and take payment by invoice or a simple payment link. If you cannot get ten paid orders from people who are not your family, the problem is the offer, not the website.
- Pick one product, one buyer. “Women’s activewear” is a category. “Pregnancy-safe running tights for women who train” is a business.
- Check demand with real searches. Type your product into Google, then check the autocomplete and the “People also ask” box. If nothing appears, test harder before you spend.
- Price for margin from day one. Work out landed cost (product, freight, packaging), then aim for a price that leaves at least 50% gross margin. You will need it to pay for ads, returns and your own wage.
- Talk to 10 buyers. Ask what they use now, what annoys them and what they paid last time. Their words become your product page copy.
Two Australian brands show how much this matters. Bared Footwear started in Melbourne in 2008 when podiatrist Anna Baird saw a gap for stylish shoes that actually supported the foot. It began with a recommendation from a local clinic, so the first buyers were people who already trusted her advice, and only later grew into direct-to-consumer and retail stores. Showpo founder Jane Lu has talked openly about a failed first venture built on the belief that “no one shops online” before she built one of the country’s fastest growing online fashion retailers. Neither story starts with a theme. Both start with a specific buyer and a real problem.
If you want the full launch sequence once you have a proven product, our product launch playbook covers the eight weeks around a new release.
Step 2: Sort your structure, ABN and business name
This is the part people put off for months, and it takes an afternoon. You do not need a lawyer to get moving, but you do need to make three decisions in the right order.
Choose a structure
Most Aussie founders start as a sole trader because it is simple and cheap. The trade-off is that you are personally liable for debts and claims. A Pty Ltd company is a separate legal entity with limited liability, but costs more to set up and run: the ASIC registration fee is $636 for 2026-27, plus accounting and annual fees. A partnership suits two people sharing risk. A trust is more complex and usually needs professional advice. We break the choice down in our business structure guide. If you are carrying stock, offering a physical product to the public or planning to bring in a partner, talk to an accountant before you register.
Get an ABN
An Australian Business Number lets you invoice, open supplier trade accounts and claim GST credits when you are registered. Apply through the Australian Business Register (abr.gov.au), and be wary of third-party sites that charge you for something the government site does without an application fee. Not everyone is entitled to an ABN, so read the eligibility questions properly. Have your tax file number handy, because it speeds up processing.
Register the business name (if you need to)
If you trade under a name that is not your own personal name or your company’s legal name, you must register it with ASIC. For 2026-27 that is $47 for one year or $108 for three years. Check the name is free on the ASIC register, then check the matching domain, Instagram handle and TikTok handle before you pay. A great name with no domain is an expensive lesson.
Registering a business name does not give you trademark rights. If the brand is going to be your main asset, our trademark guide explains what protection actually looks like.
Step 3: Budget the real startup cost (it is lower than you think)
Founders either overspend on a custom build or under-budget for stock and ads. A lean Australian launch lands around $4,000 to $5,000 for the first month once you count the opening inventory. Here is the budget we use as a starting point.
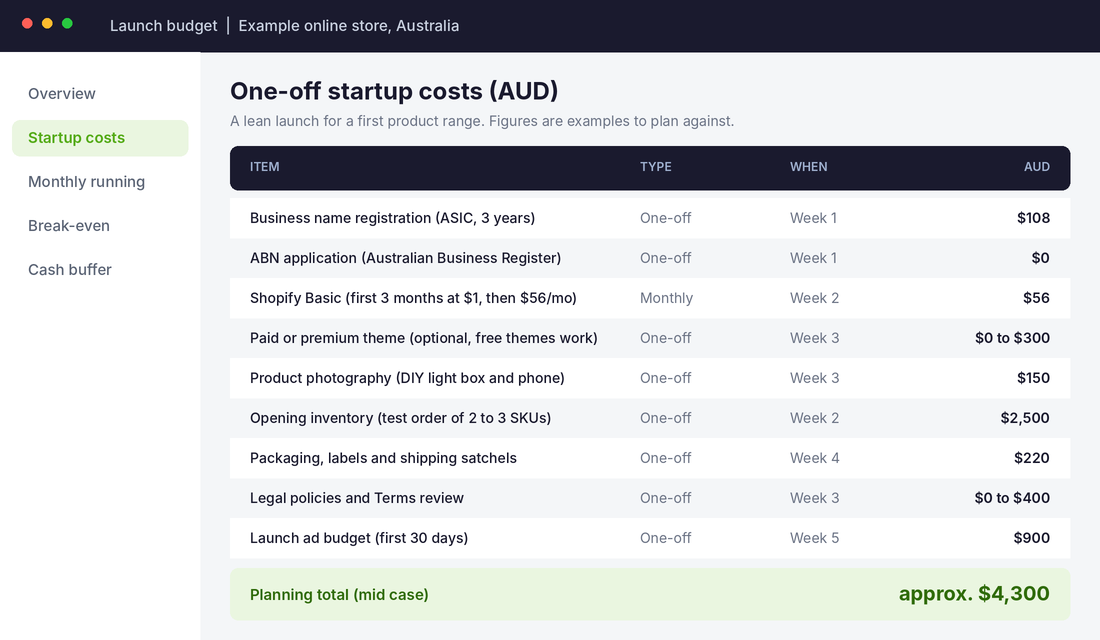
Notice where the money goes. The platform itself is a rounding error. Opening inventory and launch ad budget make up most of the spend, which is exactly why Step 1 matters. Every dollar you spend before validation is a dollar you cannot put into stock that sells.
Treat the budget as a ceiling, not a target. If your idea only works with a $15,000 build, the idea is probably too big for a first product. Start with two or three SKUs, learn what sells, then order deeper. Our cash flow guide covers how to stop stock orders strangling your bank balance as you grow.
Step 4: Pick the Shopify plan and set up payments
For almost every new Australian store, Shopify Basic is the right starting plan. Current Australian pricing is $56 a month on monthly billing or $42 a month billed yearly, with Grow at $149 a month ($114 yearly) and Advanced at $575 a month ($431 yearly). Shopify currently offers a 3-day free trial with no credit card, then most plans start at $1 a month for the first 3 months. Check shopify.com/au/pricing for the live offer before you sign up, because promotions change.
The number that matters more than the monthly fee is the card rate. On Shopify Payments, online card rates are 1.7% plus 30 cents on Basic, 1.55% plus 30 cents on Grow and 1.35% plus 30 cents on Advanced. Use Shopify Payments rather than a third-party gateway where you can, because external gateways attract an extra transaction fee on top of the processing fee. We work through when an upgrade pays for itself in our plan break-even guide.
Set the plan up in this order:
- Create the store and choose your free theme (Dawn and Horizon-style themes are fast and tested).
- Go to Settings, then Payments, and activate Shopify Payments. Have your ABN, bank details and ID ready.
- Add Afterpay or Shop Pay Installments only after you have confirmed the fees fit your margin.
- Set your store currency to AUD and your primary market to Australia.
- Turn on order notification emails and send yourself a test order.
Step 5: Build five pages that do the selling
Your first store does not need a 40-page site. It needs five pages that answer a buyer’s questions in the order they ask them. Most new stores fail on clarity, not on design.
- Home page. One headline that says what you sell and who for, a hero product, three trust points (shipping, returns, reviews) and an email capture.
- Collection page. Clear product names, price, a review star rating and a sort option. Keep filters to what buyers actually use.
- Product page. This is where you win or lose the sale: 5 to 8 quality images, a benefit-led headline, three bullets, size or fit help, delivery times and returns above the add-to-cart button.
- About page. Real founder, real story, real photo. Aussie buyers like knowing who is behind a brand.
- Contact and FAQ page. Answer shipping time, returns, sizing and payment questions before they become support emails.
Skip the clever popups, the spinning wheel and the 12 apps. Every app you add slows the site, and a slow site loses sales. If you want help choosing a theme that loads fast, read our Shopify theme guide.
Policies you need before you take a dollar
Australian Consumer Law applies the moment you sell to consumers. That means truthful advertising and testimonials, clear pricing (including unavoidable fees) and honouring consumer guarantees. You need a returns policy, a shipping policy, a privacy policy and terms of service live on the store before launch. Many small businesses under $3 million turnover are not covered by the Australian Privacy Principles, but a clear privacy policy is still a baseline expectation, and you may be covered if you handle certain data or opt in. Start from our returns policy template and shipping policy template, then have them reviewed. Our legal essentials guide covers the rest.
Step 6: Sort shipping before you sort ads
Shipping is where first-time Australian stores quietly lose money. Distance, parcel weight and customer expectations all work against you, and buyers will compare you with marketplaces that deliver fast.
- Weigh and measure every SKU. Rates are built on weight and cubic size, so a wrong weight in Shopify means a wrong price at checkout.
- Quote real rates. Pull rates from your carrier account (Australia Post, Sendle or similar) and test addresses in Perth, Hobart and regional Queensland, not just your own postcode.
- Pick a free shipping threshold with maths. Set it a little above your average order value and make sure the margin still works. Our free shipping threshold guide shows the formula.
- Promise the slow date, deliver the fast one. State realistic delivery windows on the product page and in the cart.
- Order 3 test parcels to yourself. Time them, photograph the unboxing and check the tracking emails.
If the idea is to carry no stock at all, read our honest breakdown of dropshipping in Australia first. The margins and delivery times catch a lot of people out.
Step 7: Know the GST threshold before it surprises you
You must register for GST once your GST turnover reaches $75,000 in a 12-month period. It is a rolling 12 months, not a financial year, which means a store can cross it faster than the founder expects. A good first quarter, a viral post or a Black Friday spike can take a small store from comfortable to over the line within weeks.
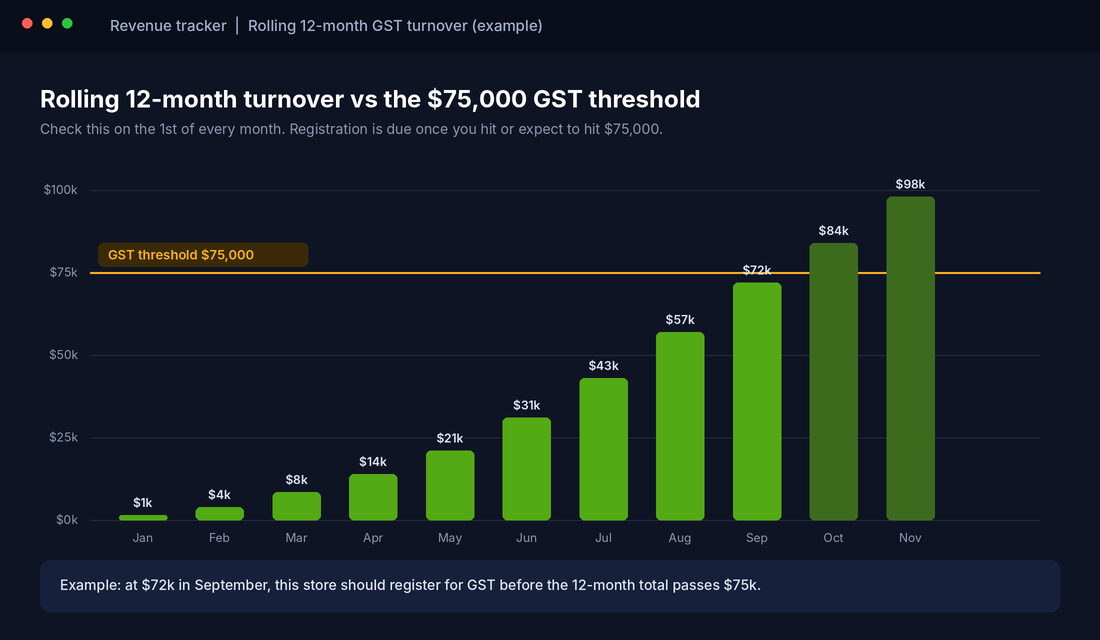
Why it matters: once you register, you charge 10% GST on your sales and claim GST credits on your costs. If you cross the threshold and register late, you can end up owing GST you never collected from customers. Build a simple monthly check into your routine and book a call with your accountant when you pass about 60% of the threshold. Our Shopify GST guide walks through how to set up GST-inclusive pricing on the store.
This is general information, not tax advice. Rules and thresholds can change, so confirm the current position with the ATO or a registered tax agent.
Step 8: Install the free tools that will run your first year
You do not need a pile of paid software at the start. Three free tools do most of the work, and the best of them for long-term profit is email.
Tool pick: Klaviyo free plan for email capture
Klaviyo’s free plan currently covers up to 250 active profiles and 500 emails a month, which is plenty for a new store testing its first welcome flow. Setup takes about 30 minutes.
- Install Klaviyo from the Shopify App Store and connect it to your store.
- Create a signup form (a simple “10% off your first order” offer is enough to start) and publish it on your home page and at checkout.
- Switch on the welcome flow with three emails: a welcome and discount, your brand story with best sellers, and a reminder before the code expires.
- Turn on the abandoned cart flow for shoppers who add to cart but do not buy.
- Send yourself a test of each email on mobile before you go live.
Once the basics work, build out the sequence with our 5-email welcome flow guide.
Tool pick: Google Search Console and GA4
Both are free and both take under an hour. Verify your domain in Search Console so Google can see your products, and connect GA4 so you can see which channels bring real orders. Do this in week four, before your first visitors arrive, because you cannot go back and capture data you did not collect. Our Search Console guide shows what to look at each week.
Step 9: Run a six-week launch, not a big bang
A launch is not a single day. It is a six-week sequence where each week has one outcome, and you only move on when that outcome is done.
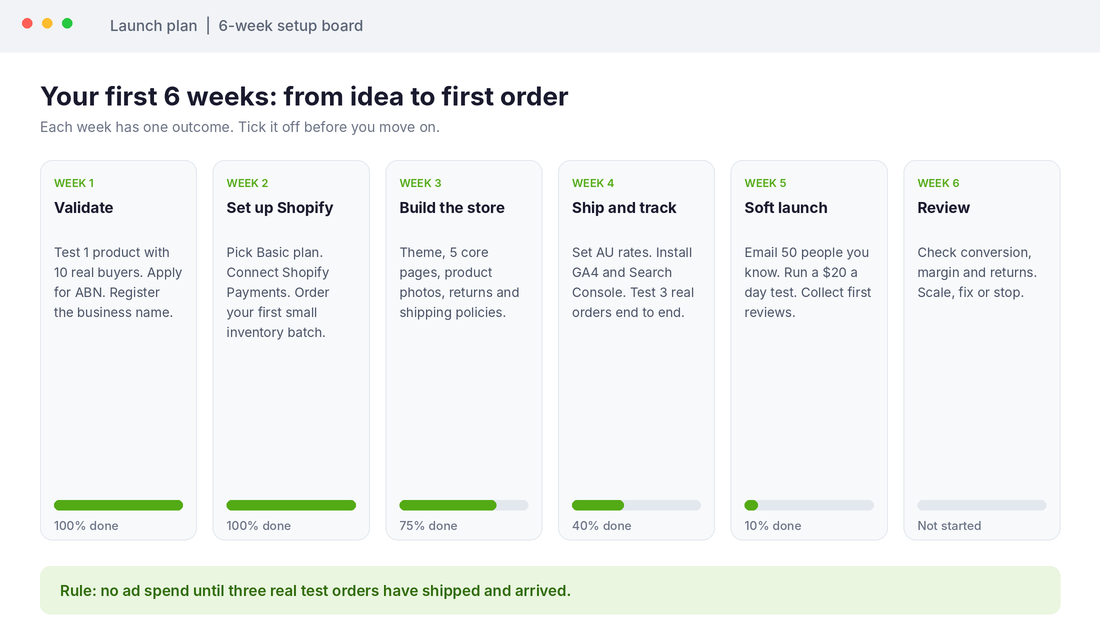
- Week 1, validate and register. Ten paid test orders, ABN applied for, business name registered.
- Week 2, set up Shopify. Basic plan, Shopify Payments live, first small stock order placed.
- Week 3, build the store. Theme, five core pages, product photos, returns and shipping policies published.
- Week 4, ship and track. Shipping rates set, GA4 and Search Console connected, three real test orders delivered.
- Week 5, soft launch. Email 50 people you know, run a small test budget (around $20 a day) and collect your first reviews.
- Week 6, review and decide. Check conversion rate, gross margin and return rate. Scale what works, fix what does not, stop what cannot be fixed.
The rule that saves the most money: no ad spend until three test orders have shipped and arrived. If you cannot get a parcel to a customer cleanly, ads only send more people into a broken experience. When you are ready to test paid traffic, our guide on Meta ads budgets shows how much a small store should spend.
The compound effect: why the order of the steps matters
Each step on this list makes the next one cheaper. A validated product means you order the right stock. The right stock means a healthy cash position. A healthy cash position means you can afford to test ads properly instead of panic-spending. A clean shipping setup means fewer refunds. And tracking from day one means that when the store grows, you know which channel earned it.
Skip one and the cost shows up later. Skip validation and you hold dead stock. Skip the GST check and you are out of pocket for tax you never collected. Skip shipping tests and your first 20 orders become 20 support tickets. That is why the founders who build a store slowly in the right order usually overtake the ones who launch fast and fix everything live.
If you want a fuller picture of where a small store should focus once it is trading, our guide to growing a Shopify store picks up where this one ends.
Your launch readiness checklist
Print this and tick it off. If you cannot tick a box, that is your next job.
| Area | Check | Done? |
|---|---|---|
| Product | 10 paid orders from non-family buyers | ☐ |
| Margin | Gross margin of 50% or more after freight and packaging | ☐ |
| Legal | ABN approved, business name registered if needed | ☐ |
| Structure | Structure decided with an accountant | ☐ |
| Platform | Shopify plan chosen, Shopify Payments active | ☐ |
| Pages | Home, collection, product, about and FAQ pages live | ☐ |
| Policies | Returns, shipping, privacy and terms published | ☐ |
| Shipping | Rates tested to 3 far postcodes, 3 test parcels delivered | ☐ |
| Tracking | GA4 and Search Console connected | ☐ |
| Klaviyo welcome and abandoned cart flows live | ☐ | |
| GST | Monthly rolling turnover check in the calendar | ☐ |
| Budget | Launch ad budget set and capped for 30 days | ☐ |
What to do next
Pick the first unchecked box and finish it this week. Do not open a theme store until the product box is ticked.
Inside eCommerce Circle, starting right is one of the core pillars we work on with every member, because the first six weeks decide how much money you burn learning. If you want to see exactly where your store is being capped, take the free More Orders Scorecard. It takes two minutes and shows you which of the 10 P’s to fix first.